
iMac Intel 20" EMC 2105 and 2118 Optical Drive Replacement

What you need

  1. iMac Intel 20" EMC 2105 and 2118 Optical Drive Replacement, Access Door: step 1, image 1 of 2 iMac Intel 20" EMC 2105 and 2118 Optical Drive Replacement, Access Door: step 1, image 2 of 2
    • Loosen the two Phillips screws securing the access door to your iMac.

    • Both screws remain captive within the access door.

    • Remove the access door.

    • Before beginning the repair, unplug the computer and press and hold the power switch for 20-30 seconds, to discharge internal capacitors.

  2. iMac Intel 20" EMC 2105 and 2118 Optical Drive Replacement, Front Bezel: step 2, image 1 of 1
    • Remove the following screws along the lower edge of your iMac:

    • Three 6 mm T8 Torx screws

    • One 8 mm T8 Torx screw (Right side of the RAM slot on 2105)

  3. iMac Intel 20" EMC 2105 and 2118 Optical Drive Replacement: step 3, image 1 of 3 iMac Intel 20" EMC 2105 and 2118 Optical Drive Replacement: step 3, image 2 of 3 iMac Intel 20" EMC 2105 and 2118 Optical Drive Replacement: step 3, image 3 of 3
    Tool used on this step:
    Plastic Cards
    $2.99
    Buy
    • Re-orient your iMac so it sits upright on the stand.

    • Insert a plastic card up into the corner of the air vent slot near the top of the rear case.

    • Push the card toward the top of the iMac to release the front bezel latch.

    • Pull the front bezel away from the rear case.

    • Repeat this process for the other side of the front bezel.

    • It may be necessary to apply several layers of duct tape to the top of the access card to aid in releasing the latches. Or use two cards for the additional thickness.

    • If the bezel refuses to release, try lifting the lower edge of the front bezel slightly away from the rear case (detailed in the next few steps) and repeat the latch release process.

  4. iMac Intel 20" EMC 2105 and 2118 Optical Drive Replacement: step 4, image 1 of 2 iMac Intel 20" EMC 2105 and 2118 Optical Drive Replacement: step 4, image 2 of 2
    • Lay your iMac stand-side down on a flat surface.

    • To lift the front bezel off the iMac, simultaneously:

    • Use your thumbs to press in the RAM arms and hold the iMac down.

    • Use your index fingers to pull the small bridge of material on the front bezel toward yourself.

    • Pull the front bezel up with your index fingers.

    • Once the small bridge of material has cleared the RAM arms, lift the front bezel by its lower edge just enough to clear the bottom edge of the rear case.

  5. iMac Intel 20" EMC 2105 and 2118 Optical Drive Replacement: step 5, image 1 of 2 iMac Intel 20" EMC 2105 and 2118 Optical Drive Replacement: step 5, image 2 of 2
    • Lift the front bezel off the rear case and rotate it away from the bottom edge of the iMac, minding the camera and microphone cables still attached to its upper edge.

  6. iMac Intel 20" EMC 2105 and 2118 Optical Drive Replacement: step 6, image 1 of 1
    • If necessary, remove the strip of tape covering the microphone cable connector.

    • The microphone connector is located near the inside of top edge of your iMac.

  7. iMac Intel 20" EMC 2105 and 2118 Optical Drive Replacement: step 7, image 1 of 3 iMac Intel 20" EMC 2105 and 2118 Optical Drive Replacement: step 7, image 2 of 3 iMac Intel 20" EMC 2105 and 2118 Optical Drive Replacement: step 7, image 3 of 3
    • Disconnect the microphone cable.

    • Disconnect the camera cable by pulling its connector away from the socket on the camera board.

    • The camera cable connector and socket are delicate and easily bent. Remove with caution.

  8. iMac Intel 20" EMC 2105 and 2118 Optical Drive Replacement, Lower EMI Shield: step 8, image 1 of 1
    • Peel up the lower EMI shield from the rear case.

    • It is only necessary to peel the shield up from three sides. Leave it attached to the display.

    • If you happen to rip the EMI shield, use a piece of foil tape to cover the tear.

  9. iMac Intel 20" EMC 2105 and 2118 Optical Drive Replacement: step 9, image 1 of 1
    • Tape the EMI shield to the face of the display to keep it out of the way.

  10. iMac Intel 20" EMC 2105 and 2118 Optical Drive Replacement, Display: step 10, image 1 of 2 iMac Intel 20" EMC 2105 and 2118 Optical Drive Replacement, Display: step 10, image 2 of 2
    • Remove the two 5 mm T6 Torx screws securing the display data cable connector to the logic board.

    • Pull the display data cable connector up off the logic board by its black pull tab.

  11. iMac Intel 20" EMC 2105 and 2118 Optical Drive Replacement: step 11, image 1 of 1
    • Peel back the EMI tape from the two vertical edges of the display.

    • During reassembly, it is helpful to use several small strips of tape to hold the EMI shielding along the left and right edges of the display footprint out of the way before lowering the display into the rear case of your iMac.

  12. iMac Intel 20" EMC 2105 and 2118 Optical Drive Replacement: step 12, image 1 of 2 iMac Intel 20" EMC 2105 and 2118 Optical Drive Replacement: step 12, image 2 of 2
    • Allow the lower EMI shield to hang down from the display.

    • Remove the four 7.5 mm T10 Torx screws securing the display to the rear case.

    • The screws are recessed, so a thin magnetic screwdriver aids in removal. Most bit drivers are too short to reach these screws.

  13. iMac Intel 20" EMC 2105 and 2118 Optical Drive Replacement: step 13, image 1 of 1
    • Lift the lower edge of the display and rotate it toward the top edge of your iMac.

    • Do not lift it too much, as the inverter cables are still attached.

  14. iMac Intel 20" EMC 2105 and 2118 Optical Drive Replacement: step 14, image 1 of 2 iMac Intel 20" EMC 2105 and 2118 Optical Drive Replacement: step 14, image 2 of 2
    • Disconnect both inverter cables from the inverter board.

    • These connectors are seated very tightly in their sockets. It is helpful to use your fingernails or the tip of a spudger to push the ears on either side of the connectors to dislodge them from their sockets. A small pair of hemostats helps a lot.

  15. iMac Intel 20" EMC 2105 and 2118 Optical Drive Replacement: step 15, image 1 of 1
    • Disconnect the two inverter cables at the top edge of the inverter using the method explained in the previous step.

  16. iMac Intel 20" EMC 2105 and 2118 Optical Drive Replacement: step 16, image 1 of 1
    • Rotate the display until it is nearly perpendicular to the rear case and lift it up to peel it off the EMI shield stuck to its top edge.

  17. iMac Intel 20" EMC 2105 and 2118 Optical Drive Replacement, Optical Drive: step 17, image 1 of 1
    • Disconnect the optical drive thermal sensor cable by pulling its connector away from the socket on the logic board.

    • Pull the connector parallel to the face of the logic board.

  18. iMac Intel 20" EMC 2105 and 2118 Optical Drive Replacement: step 18, image 1 of 1
    • Remove the two 3.6mm T6 Torx screws securing the optical drive ribbon cable connector to the logic board.

  19. iMac Intel 20" EMC 2105 and 2118 Optical Drive Replacement: step 19, image 1 of 1
    • Use the flat end of a spudger to pry the optical drive ribbon cable connector up off the logic board.

    • The connector is most easily removed when prying from the top or bottom of the connector.

    • Bend the optical drive ribbon cable back away from the logic board.

    • Be very careful when moving the optical drive ribbon cable as it is delicate and easily ripped.

  20. iMac Intel 20" EMC 2105 and 2118 Optical Drive Replacement: step 20, image 1 of 2 iMac Intel 20" EMC 2105 and 2118 Optical Drive Replacement: step 20, image 2 of 2
    • Apple's "engineers" didn't learn much about deflection and material stiffness when they went to "college", so this optical drive is particularly difficult to remove because the bracket flexes too much. The next few steps require some patience and a good amount of force.

    • Insert the flat end of a spudger into the gap between the optical drive and its bracket until it contacts the chassis.

    • Grab the spudger as close to the surface of the optical drive as you can, then depress the release tab with your thumb while pulling toward yourself.

    • The wedge shape of the spudger may cause it to slip out of the gap toward yourself. Be sure to press the spudger in toward the rear case while squeezing the release tab.

  21. iMac Intel 20" EMC 2105 and 2118 Optical Drive Replacement: step 21, image 1 of 1
    • Remove the two 6mm T10 Torx screws from the side of the optical drive.

    • It's a good idea to lay your iMac flat on a table before removing these screws to avoid them falling behind the logic board.

  22. iMac Intel 20" EMC 2105 and 2118 Optical Drive Replacement: step 22, image 1 of 2 iMac Intel 20" EMC 2105 and 2118 Optical Drive Replacement: step 22, image 2 of 2
    • Reach behind the chassis and use your finger to unclip the lower optical drive tab from the chassis.

  23. iMac Intel 20" EMC 2105 and 2118 Optical Drive Replacement: step 23, image 1 of 2 iMac Intel 20" EMC 2105 and 2118 Optical Drive Replacement: step 23, image 2 of 2
    • Maneuver the optical drive out of the rear case, minding the two plastic pins molded into the rear case near the open end of the optical drive that can break off.

  24. iMac Intel 20" EMC 2105 and 2118 Optical Drive Replacement, Optical Drive: step 24, image 1 of 1
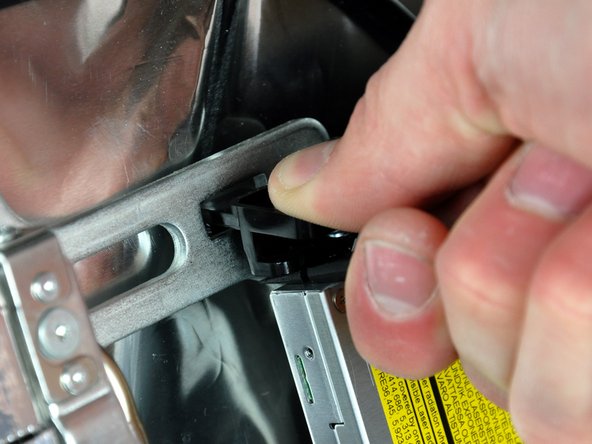
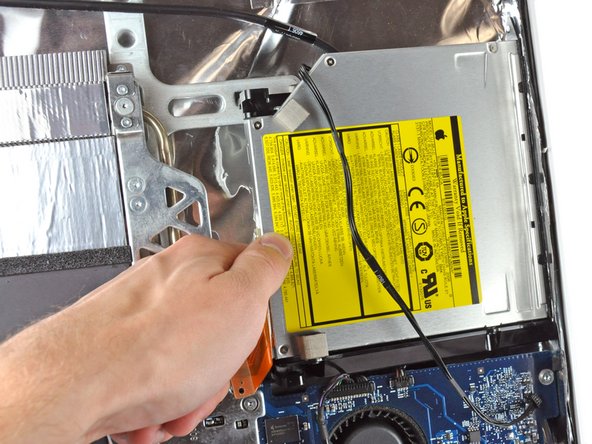
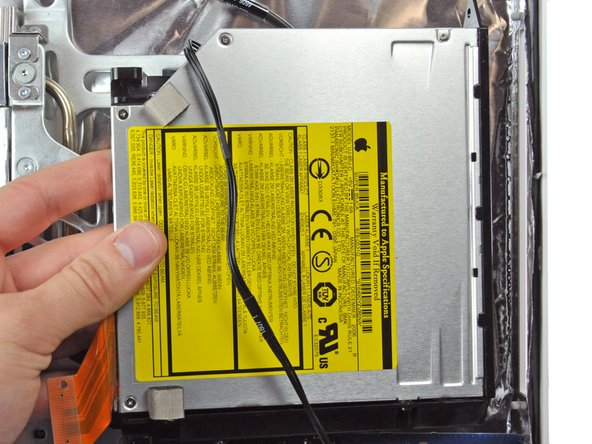
    • Remove the two T6 Torx screws securing the optical drive cable to the optical drive.

  25. iMac Intel 20" EMC 2105 and 2118 Optical Drive Replacement: step 25, image 1 of 1
    • Insert the flat end of a spudger into the gap between the optical drive cable connector and the optical drive.

    • Twist the spudger to separate the connector from the optical drive.

    • Repeat this process for both sides of the connector.

  26. iMac Intel 20" EMC 2105 and 2118 Optical Drive Replacement: step 26, image 1 of 1
    • Pull the optical drive cable connector away from the optical drive.

  27. iMac Intel 20" EMC 2105 and 2118 Optical Drive Replacement: step 27, image 1 of 1
    • Use the flat end of a spudger to remove the small pieces of EMI foam from the underside of the optical drive.

    • Don't forget to transfer these to your new drive.

  28. iMac Intel 20" EMC 2105 and 2118 Optical Drive Replacement: step 28, image 1 of 1
    • Peel the long strip of EMI foam from the underside of the optical drive.

    • Don't forget to transfer this to your new drive.

  29. iMac Intel 20" EMC 2105 and 2118 Optical Drive Replacement: step 29, image 1 of 1
    • Remove the two T10 Torx screws from the side of your optical drive.

  30. iMac Intel 20" EMC 2105 and 2118 Optical Drive Replacement: step 30, image 1 of 1
    • Use the tip of a spudger to push the two optical drive bracket tabs out of their slots in the top of the optical drive.

  31. iMac Intel 20" EMC 2105 and 2118 Optical Drive Replacement: step 31, image 1 of 1
    • Using the tip of a spudger, press the optical drive bracket tab out of its slot on the side of the optical drive.

  32. iMac Intel 20" EMC 2105 and 2118 Optical Drive Replacement: step 32, image 1 of 1
    • Use the tip of a spudger to press the optical drive bracket tabs out of the slots in the top of the optical drive.

  33. iMac Intel 20" EMC 2105 and 2118 Optical Drive Replacement: step 33, image 1 of 1
    • Pull the optical drive bracket toward the open end of the optical drive to free it from the optical drive.

  34. iMac Intel 20" EMC 2105 and 2118 Optical Drive Replacement: step 34, image 1 of 1
    • Use the flat end of a spudger to pry the optical drive thermal sensor off the adhesive securing it to the optical drive.

    • Don't forget to transfer this to your new drive.

    • If you have a disk or anything else stuck inside your optical drive, we have a guide to fix it.

Conclusion

To reassemble your device, follow these instructions in reverse order.

27 other people completed this guide.

4 Comments

I cannot get the top latches to release.Tried all the suggestions here and on YouTube. Especially a good video from Twistedmac. Made his suggested access card all different ways but nothing is working.

Any further tips or help will be greatly appreciated.

Also on the latch picture where does the credit card actually have to make contact? Please help I'm going bonkers.

Joe in PA - Reply

Finally figured it out. Lift up the bezel from the bottom about 45 deg

you will then see the latch on both sides. Put a spudger or whatever under the latch and push up. Do not lift the bezel too high or you will damage the latches. This worked like a miracle for me.

Had no success with the credit card method, it was really frustrating.

The sleestack post is also also great.

Joe in PA -

OMG!!! The rating for this repair as "moderate" is waaaaaayyyy off! I've been repairing various laptops for YEARS on iFixit and this was my first attempt at a desktop repair. It was so much more fidgety and difficult than the hardest laptop I've done (probably about 12 - 15 other repairs by now).

And sorry... tho' I love this site and am grateful for these tutorials, this one was wanting in detail and assumed that I not only knew terminology that I didn't know (I was able to figure it out of course, I DID finish the repair) but skipped important details that made it infinitely harder (and took me waaaayyy longer than it should have!). For example, when removing the optical drive, the guide skipped about three steps and I ended up accidentally breaking some delicate plastic bits. And gee thanks for waiting until I have everything apart to tell me I need a longer screwdriver! I found a tedious workaround, but... sheesh dude! All in all, I'd have to say...by far the WORST experience I've had on this site!

Traveled Woman - Reply

The credit card trick with the latches on the upper corners of the bezel works fine if you push the card in at 45 degrees, from the slot to the corners of the bezel. Works first time every time. The photo is deceptive.

Peter - Reply

Add Comment

View Statistics:

Past 24 Hours: 2

Past 7 Days: 6

Past 30 Days: 19

All Time: 41,775