
Xiaomi Roborock S5 Docking Station CDZ02RR Error 13 couldn`t charge properly - Capacitor 420v 68uf 16x25 Replacement

What you need

Video Overview

  1. Xiaomi Roborock S5 Docking Station CDZ02RR Error 13 couldn`t charge properly - Capacitor 420v 68uf 16x25 Replacement, Open Device: step 1, image 1 of 1
    • Caution: Disconnect device from power line!!

    • Open the case with the screwdriver (4 screws)

  2. Xiaomi Roborock S5 Docking Station CDZ02RR Error 13 couldn`t charge properly - Capacitor 420v 68uf 16x25 Replacement, Board removal: step 2, image 1 of 3 Xiaomi Roborock S5 Docking Station CDZ02RR Error 13 couldn`t charge properly - Capacitor 420v 68uf 16x25 Replacement, Board removal: step 2, image 2 of 3 Xiaomi Roborock S5 Docking Station CDZ02RR Error 13 couldn`t charge properly - Capacitor 420v 68uf 16x25 Replacement, Board removal: step 2, image 3 of 3
    • Open the screws that hold the board with the screwdriver (2 screws)

    • Pull the board out carefully, remove the cables from the ducts

  3. Xiaomi Roborock S5 Docking Station CDZ02RR Error 13 couldn`t charge properly - Capacitor 420v 68uf 16x25 Replacement, Component identification on the board: step 3, image 1 of 2 Xiaomi Roborock S5 Docking Station CDZ02RR Error 13 couldn`t charge properly - Capacitor 420v 68uf 16x25 Replacement, Component identification on the board: step 3, image 2 of 2
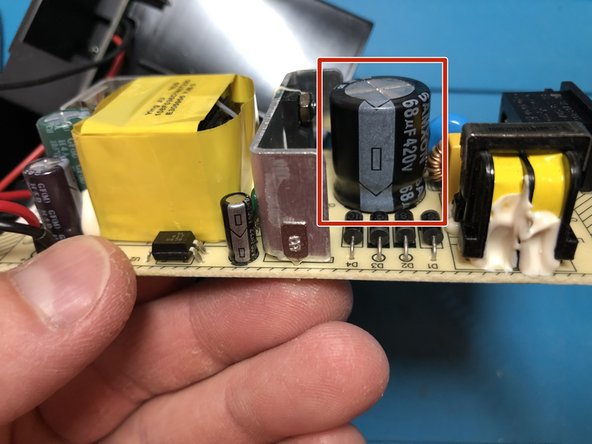
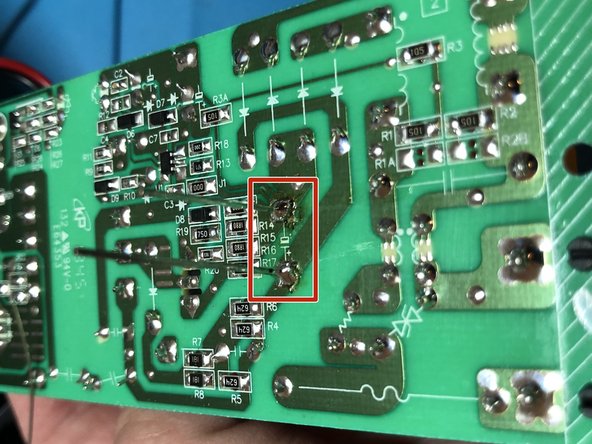
    • Identify the capacitor on the board
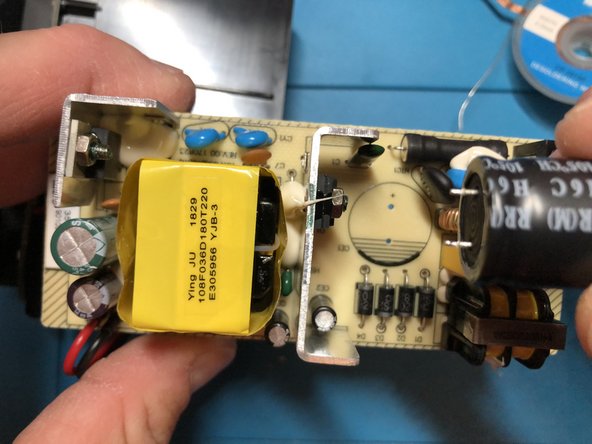
    • Flip the board

  4. Xiaomi Roborock S5 Docking Station CDZ02RR Error 13 couldn`t charge properly - Capacitor 420v 68uf 16x25 Replacement, Discharge Capacitor - Caution!!!: step 4, image 1 of 2 Xiaomi Roborock S5 Docking Station CDZ02RR Error 13 couldn`t charge properly - Capacitor 420v 68uf 16x25 Replacement, Discharge Capacitor - Caution!!!: step 4, image 2 of 2
    • Caution: The previously used capacitor can still hold a charge. Therefore it should be discharged before Removal. Doing this electric sparks can occur.

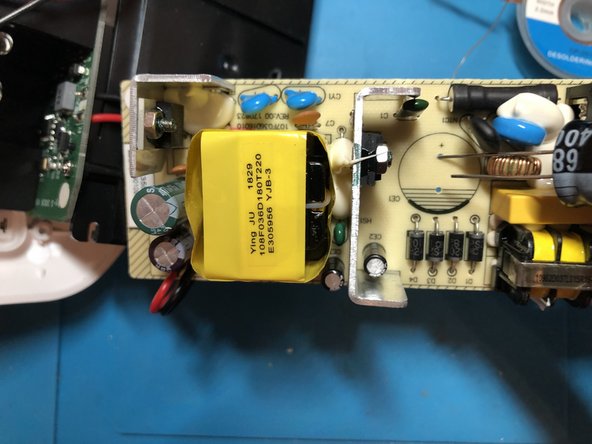
    • Find the contacts on the backside of the board and bridge these with a metal object (for example with tweezers or a screwdriver).

  5. Xiaomi Roborock S5 Docking Station CDZ02RR Error 13 couldn`t charge properly - Capacitor 420v 68uf 16x25 Replacement, Capacitor desoldering: step 5, image 1 of 2 Xiaomi Roborock S5 Docking Station CDZ02RR Error 13 couldn`t charge properly - Capacitor 420v 68uf 16x25 Replacement, Capacitor desoldering: step 5, image 2 of 2
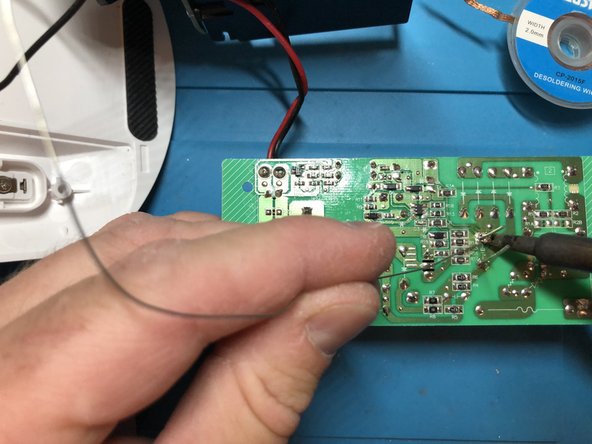
    • Use the desoldering pump and the soldering iron to unsold the soldering points

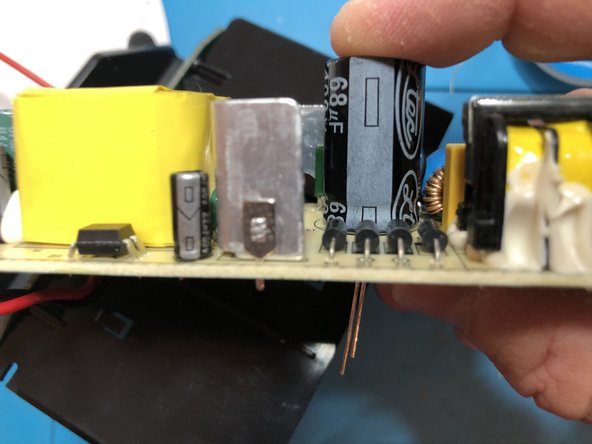
    • Extract the capacitor

  6. Xiaomi Roborock S5 Docking Station CDZ02RR Error 13 couldn`t charge properly - Capacitor 420v 68uf 16x25 Replacement, Capacitor measuring: step 6, image 1 of 1
    • Check the nominal value (68uf) of the capacitor compared to your measurement - mind the polarity

  7. Xiaomi Roborock S5 Docking Station CDZ02RR Error 13 couldn`t charge properly - Capacitor 420v 68uf 16x25 Replacement, Place and resolder new capacitor: step 7, image 1 of 2 Xiaomi Roborock S5 Docking Station CDZ02RR Error 13 couldn`t charge properly - Capacitor 420v 68uf 16x25 Replacement, Place and resolder new capacitor: step 7, image 2 of 2
    • Insert new capacitor into the board, mind the polarity

    • Flip board

  8. Xiaomi Roborock S5 Docking Station CDZ02RR Error 13 couldn`t charge properly - Capacitor 420v 68uf 16x25 Replacement, Soldering capacitor: step 8, image 1 of 3 Xiaomi Roborock S5 Docking Station CDZ02RR Error 13 couldn`t charge properly - Capacitor 420v 68uf 16x25 Replacement, Soldering capacitor: step 8, image 2 of 3 Xiaomi Roborock S5 Docking Station CDZ02RR Error 13 couldn`t charge properly - Capacitor 420v 68uf 16x25 Replacement, Soldering capacitor: step 8, image 3 of 3
    • Solder capacitor with solder and soldering iron

    • After cooling, cut off the legs with the side cutter

Conclusion

Work through the Steps 1 and 2 in reverse, to assemble your device again.

12 other people completed this guide.

Special thanks to these translators:

de en

100%

These translators are helping us fix the world! Want to contribute?
Start translating ›

hainzy

Member since: 03/23/23

5,359 Reputation

26 Guides authored

Team

German Translators Member of German Translators

Community

27 Members

742 Guides authored

43 Comments

420V ELKOs mit 68uf sind praktisch nicht erhältlich. Kann man auch auf einen 400 oder 450 V zurückgreifen? Wenn ja auch welchen? Danke

Daniel K. - Reply

Hi @danielk223,
ja siehe oben.
Genau deshalb habe ich als Ersatzteil auch schon einen üblicheren angegeben, der funktioniert.
Viel Spaß!

hainzy -

Ah even erst gesehen, vielen Dank. Dann hoffen wir mal, dass das die Lösung ist :)

Daniel K. -

ELKO ist getauscht, Problem besteht leider weiterhin. Also ist es wohl das Mainboard des Roboters…

Daniel K. -

Verhält sich der Roboter so wie im Video oder anders?

hainzy -

Add Comment

View Statistics:

Past 24 Hours: 42

Past 7 Days: 266

Past 30 Days: 1,046

All Time: 10,296