Xbox Series S Motherboard Replacement

What you need

  1. Xbox Series S Motherboard Replacement, Peel off the sticker coverings: step 1, image 1 of 3 Xbox Series S Motherboard Replacement, Peel off the sticker coverings: step 1, image 2 of 3 Xbox Series S Motherboard Replacement, Peel off the sticker coverings: step 1, image 3 of 3
    • Before you start this guide, turn off the Xbox and unplug any cables from it.

    • Use tweezers to peel off the two white screw covers located on the bottom corners of the back panel.

    Where can I get a shell replacement?

    King DK - Reply

  2. Xbox Series S Motherboard Replacement, Remove the back panel screws: step 2, image 1 of 1
    Tool used on this step:
    Magnetic Project Mat
    $19.95
    Buy
    • Use a T8 Torx driver to remove the two 10 mm-long screws securing the back panel to the bottom panel.

    • Throughout this repair, keep track of each screw and make sure it goes back exactly where it came from.

  3. Xbox Series S Motherboard Replacement, Remove the bottom panel: step 3, image 1 of 3 Xbox Series S Motherboard Replacement, Remove the bottom panel: step 3, image 2 of 3 Xbox Series S Motherboard Replacement, Remove the bottom panel: step 3, image 3 of 3
    • Slide the bottom panel horizontally toward the back of the console until it comes to a stop.

    • This slides the clips out of the slots on the plastic case.

    • Lift straight up and remove the bottom panel from the plastic case.

  4. Xbox Series S Motherboard Replacement, Remove the plastic case screws: step 4, image 1 of 1
    • Use a T10 Torx driver to remove the seven 51 mm-long screws securing the chassis to the plastic case.

  5. Xbox Series S Motherboard Replacement, Remove the plastic case: step 5, image 1 of 3 Xbox Series S Motherboard Replacement, Remove the plastic case: step 5, image 2 of 3 Xbox Series S Motherboard Replacement, Remove the plastic case: step 5, image 3 of 3
    • With the bottom of the Xbox facing you, pull the two bottom-rear corners of the plastic case away from each other.

    • As you pull the corners apart, slide the back panel towards the bottom of the device. This releases the back panel from the plastic case.

    • The back panel should now settle on top of the clips on the back of the plastic case.

    • The back panel is permanently attached to the aluminum chassis.

    • Do not attempt to fully remove the chassis from the plastic case with this technique. You may risk breaking your case.

  6. Xbox Series S Motherboard Replacement: step 6, image 1 of 3 Xbox Series S Motherboard Replacement: step 6, image 2 of 3 Xbox Series S Motherboard Replacement: step 6, image 3 of 3
    • Pull the bottom-left corner away from the chassis while swinging the chassis away from the plastic case.

    • You may need to lift the chassis to free it from the clips on the bottom-front of the plastic case during this process.

    • Remove the plastic case from the chassis.

  7. Xbox Series S Motherboard Replacement, Remove the Bluetooth board: step 7, image 1 of 1
    • Use a T8 Torx driver to remove the three 9.5 mm-long screws securing the Bluetooth board to the long edge of the chassis.

  8. Xbox Series S Motherboard Replacement: step 8, image 1 of 3 Xbox Series S Motherboard Replacement: step 8, image 2 of 3 Xbox Series S Motherboard Replacement: step 8, image 3 of 3
    • Use a spudger to pry and loosen the Bluetooth board.

    • Do not pry from the bottom or sides of the Bluetooth board as it may bend the connector.

    • Pull the Bluetooth board straight out to disconnect it from the chassis.

  9. Xbox Series S Motherboard Replacement, Remove the power button board: step 9, image 1 of 1
    • Use a T8 Torx driver to remove the 9.5 mm-long screw securing the power button board to the chassis.

  10. Xbox Series S Motherboard Replacement: step 10, image 1 of 3 Xbox Series S Motherboard Replacement: step 10, image 2 of 3 Xbox Series S Motherboard Replacement: step 10, image 3 of 3
    • Use a spudger to pry and loosen the power button board.

    • Do not pry from the bottom of the power button board as it may bend the connector.

    • Pull the power button board straight out to disconnect it from the chassis.

  11. Xbox Series S Motherboard Replacement, Remove the Wi-Fi board: step 11, image 1 of 1
    • Use a T8 Torx driver to remove the three 9.5 mm-long screws securing the Wi-Fi board to the short edge of the chassis.

  12. Xbox Series S Motherboard Replacement: step 12, image 1 of 3 Xbox Series S Motherboard Replacement: step 12, image 2 of 3 Xbox Series S Motherboard Replacement: step 12, image 3 of 3
    • Use a spudger to pry and loosen the Wi-Fi board.

    • Do not pry from the bottom or sides of the Wi-Fi board as it may bend the connector.

    • Pull the Wi-Fi board straight out to disconnect it from the chassis.

  13. Xbox Series S Motherboard Replacement, Remove the power supply screws: step 13, image 1 of 1
    • Use a T10 Torx driver to remove the seven 11.3 mm-long screws securing the power supply to the chassis.

  14. Xbox Series S Motherboard Replacement, Remove the upper chassis: step 14, image 1 of 2 Xbox Series S Motherboard Replacement, Remove the upper chassis: step 14, image 2 of 2
    • Flip the device over.

    • Lift the upper chassis straight up to remove it.

  15. Xbox Series S Motherboard Replacement, Remove the power supply: step 15, image 1 of 3 Xbox Series S Motherboard Replacement, Remove the power supply: step 15, image 2 of 3 Xbox Series S Motherboard Replacement, Remove the power supply: step 15, image 3 of 3
    • Lift the power supply straight up to disconnect it from the motherboard.

    • Remove the power supply.

    Can you please tell whether it is indispensable to use the power supply with exactly the same Revision, S/N and P/N or is the same model number, like 1920, 1921 enough to make it work? Thanks for showing the teardown.

    Ali Taimoor - Reply

  16. Xbox Series S Motherboard Replacement, Remove the fan screws: step 16, image 1 of 1
    • Use a T10 Torx driver to remove the two 11.3 mm-long screws securing the fan to the chassis.

  17. Xbox Series S Motherboard Replacement, Disconnect the fan: step 17, image 1 of 2 Xbox Series S Motherboard Replacement, Disconnect the fan: step 17, image 2 of 2
    • Flip the device over.

    • Take care when flipping the chassis over because the fan is now loose.

    • Use your fingers to pull and disconnect the fan connector from its motherboard socket.

    • Take care not to pull on the wires when disconnecting the fan to prevent breaking the connector.

    • This connector may be difficult to remove. A good method to remove it is to shimmy the connector up and out of its socket with a spudger.

    • You may be able to remove this connector without removing the power supply with a pair of needle-nose pliers.

    If you are careful you can also remove the connector by lightly prying from the sides of the connector in equal proportions (left then right then left etc.) using a 2.5 flathead.

    Zachary Stensrud - Reply

    my fan was solder to my board but it broke off i have no idea ho to put it back my power button is missing the power button on the board i need help

    Edwinn du Plessis - Reply

  18. Xbox Series S Motherboard Replacement, Remove the fan: step 18, image 1 of 2 Xbox Series S Motherboard Replacement, Remove the fan: step 18, image 2 of 2
    • Lift the fan straight up to remove it from the motherboard.

  19. Careful: steps 19-21 are sourced from a guide that's marked as in-progress.

    Xbox Series S Motherboard Replacement, Remove the motherboard screws: step 19, image 1 of 1
    • Use a T8 Torx driver to remove the four 9.4 mm-long screws securing the motherboard to the chassis.

  20. Xbox Series S Motherboard Replacement, Remove the locking clip: step 20, image 1 of 3 Xbox Series S Motherboard Replacement, Remove the locking clip: step 20, image 2 of 3 Xbox Series S Motherboard Replacement, Remove the locking clip: step 20, image 3 of 3
    • Flip the device over.

    • Insert a spudger into the locking clip located on the front-left corner of the chassis.

    • This will open up the clip to make it easier to remove.

    • Lift straight up to remove the clip.

  21. Xbox Series S Motherboard Replacement, Remove the motherboard: step 21, image 1 of 3 Xbox Series S Motherboard Replacement, Remove the motherboard: step 21, image 2 of 3 Xbox Series S Motherboard Replacement, Remove the motherboard: step 21, image 3 of 3
    • Grasp the heat sink with your fingers and lift up the front of the motherboard up above the edge of the chassis.

    • Pull the motherboard towards the front of the chassis to remove it.

  22. Xbox Series S Motherboard Replacement, Remove the SSD card: step 22, image 1 of 1
    • Use a T8 Torx driver to remove the 5.1 mm-long screw securing the SSD card to the motherboard.

  23. Xbox Series S Motherboard Replacement: step 23, image 1 of 3 Xbox Series S Motherboard Replacement: step 23, image 2 of 3 Xbox Series S Motherboard Replacement: step 23, image 3 of 3
    • Pull the SSD card straight out and remove it from the motherboard.

  24. Xbox Series S Motherboard Replacement, Remove the x-clamp: step 24, image 1 of 3 Xbox Series S Motherboard Replacement, Remove the x-clamp: step 24, image 2 of 3 Xbox Series S Motherboard Replacement, Remove the x-clamp: step 24, image 3 of 3
    Tool used on this step:
    Flathead 1.5 mm Screwdriver
    $5.49
    Buy
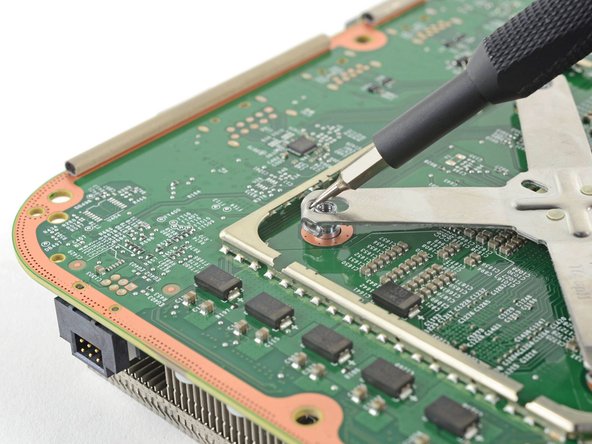
    • Insert a 1.5 mm flathead screwdriver from the top between the heat sink pin and the x-clamp.

    • Pry the x-clamp out and away from the heat sink pin to loosen the x-clamp.

    • Do not attempt to completely release the x-clamp with this technique.

  25. Xbox Series S Motherboard Replacement: step 25, image 1 of 3 Xbox Series S Motherboard Replacement: step 25, image 2 of 3 Xbox Series S Motherboard Replacement: step 25, image 3 of 3
    • With the head parallel to the motherboard, insert a flathead screwdriver from the side between the heat sink pin and the x-clamp hook.

    • Twist the flathead screwdriver clockwise to pry the bottom edge of the x-clamp out of the groove in the heat sink pin.

    • If you have trouble, try using a larger flathead screwdriver.

    • As you twist, the x-clamp should pop off the heat sink pin. If not, try repeating the previous step before attempting this one again.

  26. Xbox Series S Motherboard Replacement: step 26, image 1 of 1
    • Continue to use the same technique described in the previous two steps on all of the heat sink pins until the x-clamp is disconnected.

  27. Xbox Series S Motherboard Replacement: step 27, image 1 of 2 Xbox Series S Motherboard Replacement: step 27, image 2 of 2
    • Remove the x-clamp.

    • When reattaching the x-clamp, you should be able to attach two to three sides just by pressing down the x-clamp hooks onto the heat sink pins. Then use the flathead screwdriver to pry the x-clamp hooks over the heat sink pins.

  28. Xbox Series S Motherboard Replacement, Remove the heat sink: step 28, image 1 of 2 Xbox Series S Motherboard Replacement, Remove the heat sink: step 28, image 2 of 2
    • Flip the motherboard over.

    • Take care when flipping the motherboard over because the heat sink may fall out.

    • Lift the heat sink straight up to remove it from the motherboard.

    • One of the most common symptoms of consoles overheating is a clogged heat sink. Take time to remove the dust and debris between the heat sink fins.

  29. Xbox Series S Motherboard Replacement: step 29, image 1 of 2 Xbox Series S Motherboard Replacement: step 29, image 2 of 2
    • Only the motherboard remains.

    • Follow this guide for more specifics on how to reapply thermal paste to the processor and shield plate.

    • Since normal thermal paste isn’t designed to bridge the large gaps between the shield plate and heat sink, use K5 Pro viscous thermal paste to replace the thicker, teal putty. You will, however, need normal replacement thermal paste for the APU.

Conclusion

To reassemble your device, follow these instructions in reverse order.

Take your e-waste to an R2 or e-Stewards certified recycler.

Repair didn’t go as planned? Try some basic troubleshooting, or ask our Answers community for help.

13 other people completed this guide.

Robert Boyd

Member since: 02/01/21

26,410 Reputation

94 Guides authored

7 Comments

for some reason to me it seems like the apu is just an am4 cpu stuck on to the motherboard, could you guys do some measuring to find out?

Gage - Reply

Where can I get a new motherboard and new replacement parts ? Please help

Israel Velez - Reply

Exactly, where can anyone get a motherboard?

I mean, dismounting it is the easy part!

JoeBlog - Reply

I’m looking for a replacement motherboard. Has anyone figured out where to get one?

NathanK - Reply

Among us work great

Mathew - Reply

kasynparts XSX XSS Donor Board Motherboard is a solution

kasynlife - Reply

Can you compare Xbox Series s and xbox one x motherboard? Say its 40% less space

Why can i not use 5 tb on one x? Can i upgrade Series s to blueray?

lars martin - Reply

Add Comment

View Statistics:

Past 24 Hours: 39

Past 7 Days: 263

Past 30 Days: 1,244

All Time: 30,775