Xbox One Elite Controller (Model 1698) Joystick Potentiometer Replacement

What you need

  1. Xbox One Elite Controller (Model 1698) Joystick Potentiometer Replacement, Show me the Screws!: step 1, image 1 of 2 Xbox One Elite Controller (Model 1698) Joystick Potentiometer Replacement, Show me the Screws!: step 1, image 2 of 2
    • You can remove the side panels with a pry tool.

    • You don't need to remove the rubber. The rubber on this controller was already bad

  2. Xbox One Elite Controller (Model 1698) Joystick Potentiometer Replacement, Removing the back panel screws: step 2, image 1 of 1
    • Remove the 5 Torx Security Bit (TR9) screws

  3. Xbox One Elite Controller (Model 1698) Joystick Potentiometer Replacement, Popping that back panel off: step 3, image 1 of 3 Xbox One Elite Controller (Model 1698) Joystick Potentiometer Replacement, Popping that back panel off: step 3, image 2 of 3 Xbox One Elite Controller (Model 1698) Joystick Potentiometer Replacement, Popping that back panel off: step 3, image 3 of 3
    • Pry the panel next to the 3.5mm port

    • Be careful to not rip the ribbon shown in the next step

  4. Xbox One Elite Controller (Model 1698) Joystick Potentiometer Replacement, Warning Carefully remove the ribbon: step 4, image 1 of 2 Xbox One Elite Controller (Model 1698) Joystick Potentiometer Replacement, Warning Carefully remove the ribbon: step 4, image 2 of 2
    • Be careful to not rip the ribbon cable

    • You can pop the connector up to remove the ribbon easily

    • Ribbon Cable

  5. Xbox One Elite Controller (Model 1698) Joystick Potentiometer Replacement, Screws on controller motherboard: step 5, image 1 of 1
    • Remove the 2 Torx (T6) screws

  6. Xbox One Elite Controller (Model 1698) Joystick Potentiometer Replacement, Desolder wires from motherboard: step 6, image 1 of 2 Xbox One Elite Controller (Model 1698) Joystick Potentiometer Replacement, Desolder wires from motherboard: step 6, image 2 of 2
    • Desolder the 4 wires on each side, these control the vibrations and the RT LT

  7. Xbox One Elite Controller (Model 1698) Joystick Potentiometer Replacement, Remove the motherboard: step 7, image 1 of 2 Xbox One Elite Controller (Model 1698) Joystick Potentiometer Replacement, Remove the motherboard: step 7, image 2 of 2
    • Pull up from the "top" side of the controller on the sister board.

  8. Xbox One Elite Controller (Model 1698) Joystick Potentiometer Replacement, Desolder Button Pins: step 8, image 1 of 1
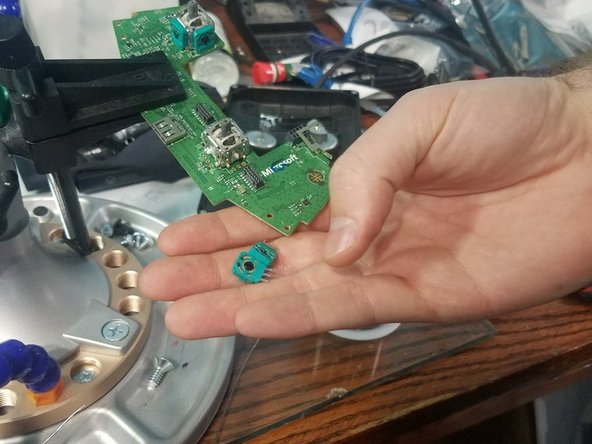
    • These can be difficult to desolder. It is best to use a 650F degree soldering iron, if you have this available. If you are having trouble desoldering it with the old solder, adding fresh solder makes removal of the old solder easier.

    • Desolder the 4 pins holding the pins in on the left analog stick.

    • Desolder the 4 pins holding the button in on the right analog stick.

  9. Xbox One Elite Controller (Model 1698) Joystick Potentiometer Replacement, Desolder potentiometers: step 9, image 1 of 1
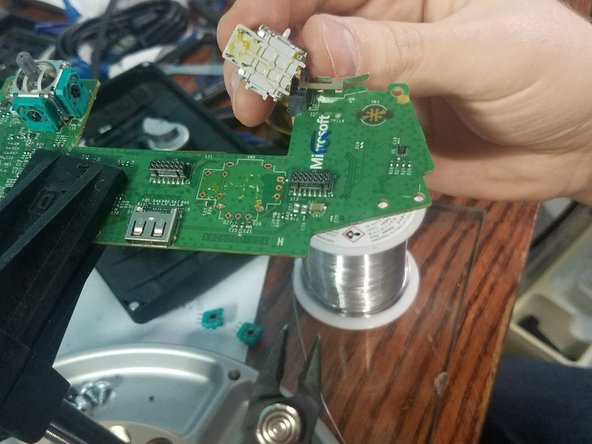
    • A 650F degree soldering iron is required. If you are having trouble desoldering these components, add new solder to make removal easier.

    • First, desolder the left analog stick.

    • Next, desolder the 6 pins for the right analog stick.

  10. Xbox One Elite Controller (Model 1698) Joystick Potentiometer Replacement, Desolder Ground Pins: step 10, image 1 of 1
    • A soldering iron that can reach at minimum 650F is required. If you are having trouble desoldering the old analog sticks, add fresh solder to make removal of the old analog sticks easier.

    • Desolder the left analog stick from the controller.

    • Desolder the right analog stick from the controller.

  11. Xbox One Elite Controller (Model 1698) Joystick Potentiometer Replacement, Troubleshooting: step 11, image 1 of 3 Xbox One Elite Controller (Model 1698) Joystick Potentiometer Replacement, Troubleshooting: step 11, image 2 of 3 Xbox One Elite Controller (Model 1698) Joystick Potentiometer Replacement, Troubleshooting: step 11, image 3 of 3
    • If you are having trouble desoldering here are the two things you can do to solve.

    • You can use a screw driver to open the resistors and then remove them from the board allowing access to the ground pins

    • Now using snips you can cut the pins and then use a soldering iron to both sides and remove the cut pin gently with pliers

EasyAsABC123

Member since: 01/22/10

2,407 Reputation

5 Guides authored

View Statistics:

Past 24 Hours: 11

Past 7 Days: 90

Past 30 Days: 419

All Time: 48,771