Xbox One ワイヤレスコントローラの上部基板の交換

What you need

  1. Xbox One ワイヤレスコントローラの上部基板の交換, バッテリーパック: step 1, image 1 of 1
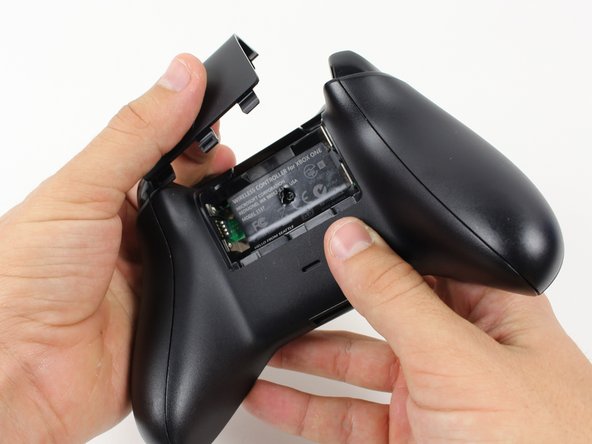
    • バッテリーパックのカバーを外します。

    • バッテリーを取り外します。

  2. Xbox One ワイヤレスコントローラの上部基板の交換, ハンドルをスライドします: step 2, image 1 of 2 Xbox One ワイヤレスコントローラの上部基板の交換, ハンドルをスライドします: step 2, image 2 of 2
    • ナイロン製スパッジャーを使ってこの作業を行ってください。ここではメタルスパッジャーを使用しています。

    • サイドハンドルを外すため、コントローラーをしっかりと握ります。スパッジャーをフロントとハンドルプレートの間にできた隙間に差し込みます。

    • スパッジャーを前後に動かしながら、フロントプレートからサイドプレートを外します。サイドプレートの隙間全体にスパッジャーを動かして作業を進めてください。

  3. Xbox One ワイヤレスコントローラの上部基板の交換, ネジ: step 3, image 1 of 2 Xbox One ワイヤレスコントローラの上部基板の交換, ネジ: step 3, image 2 of 2
    • ラベルの裏のコントローラ中央部分にネジが一本隠れています。

    • ドライバーを使って、ラベルの中央部分の穴に向けて直接押し込んで穴を開けます。

    • もしラベルに穴を開けたくない場合はラベルを剥がしてください。

    • TR8いじり止めトルクスドライバーを使って、コントローラ裏側にある長さ10mmのネジを5本外します。

  4. Xbox One ワイヤレスコントローラの上部基板の交換, バックプレート: step 4, image 1 of 1
    • バックプレートを取り外します。

  5. Xbox One ワイヤレスコントローラの上部基板の交換, フェイスプレート: step 5, image 1 of 1
    • フェイスプレートを取り外します。

  6. Xbox One ワイヤレスコントローラの上部基板の交換, 上部基板: step 6, image 1 of 2 Xbox One ワイヤレスコントローラの上部基板の交換, 上部基板: step 6, image 2 of 2
    • 予め振動用モーターをソケットから外しておいてください。

    • ハンダを除去し、モーターと基板をつないでいる赤と黒の導線を外します。

    • ハンダを除去し、上部基板につながっている黒とグレーの導線を外します。

    • モーターを外します。

    • はんだごてを使用する際は、周りの部品を損傷させないよう、また火傷しないように気をつけてください。

    • はんだごての使用方法は、こちらをご覧ください。

  7. Xbox One ワイヤレスコントローラの上部基板の交換: step 7, image 1 of 1
    • モーターの台座付近にある2本の7mm T6ネジを外します。

  8. Xbox One ワイヤレスコントローラの上部基板の交換: step 8, image 1 of 1
    • 基板の中央付近をしっかりと握ります。

    • 基板を軽く前後に揺すりながら持ち上げて取り外します。

    • 基板を外す際にある程度の力が必要です。

Conclusion

再度組み立てる際は、この説明を逆に行ってください。

28 other people completed this guide.

Special thanks to these translators:

en jp

100%

These translators are helping us fix the world! Want to contribute?
Start translating ›

Liam Gow

Member since: 01/22/15

5,285 Reputation

3 Guides authored

Team

Cal Poly, Team 20-15, Maness Winter 2015 Member of Cal Poly, Team 20-15, Maness Winter 2015

CPSU-MANESS-W15S20G15

5 Members

50 Guides authored

6 Comments

where can i get a top motherborde replacement??

Lol John - Reply

Hi John,

Unfortunately, beyond the parts list given on the main page, I don't know of any other reliable links. I'd suggest Googling the part, or maybe searching on eBay.

Liam Gow -

I was only able to unscrew 2 of the Torx screws. They have a pin right in the middle that doesn't allow for the screwdriver to be fully inserted, or at all. The two screws I was able to unscrew must've had a shorter pin than the others.

Rami Girgis - Reply

These points on the head is what we call a security torx screw. You will need the specific T8 or T6 Security Torx Screwdriver to remove these screws.

jbagge0023 -

You can use a small flat blade screwdriver ;-)

If any of the screws are tight, the centre pin may snap, then you can just use a normal Torx bit.
Lee Houston -

Add Comment

View Statistics:

Past 24 Hours: 4

Past 7 Days: 61

Past 30 Days: 261

All Time: 75,645