
VTech Kidizoom Action Cam Battery Replacement

What you need

  1. VTech Kidizoom Action Cam Battery Replacement, Display Assembly: step 1, image 1 of 1
    • Make sure that the master power switch is set to the (O) position.

  2. VTech Kidizoom Action Cam Battery Replacement: step 2, image 1 of 1
    • Using a plastic opening tool, gently pry off the circular plating over the camera lens.

    • The circular plating is held by a mild adhesive. It will not be necessary to replace this adhesive during the reassembly process.

  3. VTech Kidizoom Action Cam Battery Replacement: step 3, image 1 of 1
    Tool used on this step:
    Magnetic Project Mat
    $19.95
    Buy
    • Use a #0 screwdriver to remove the two 2.5mm Phillips head screws located on the second layer of plating.

    • Remove the second layer of plating previously held down by the screws by gripping it with your fingers and pulling upward.

    • As there will be many screws being removed from the device, we recommend using a magnetic device such as the iFixit Magnetic Project Mat.

  4. VTech Kidizoom Action Cam Battery Replacement: step 4, image 1 of 1
    • Pry off the transparent plating and paper design using a plastic opening tool.

  5. VTech Kidizoom Action Cam Battery Replacement: step 5, image 1 of 1
    • Unscrew the (4) 2.5mm Phillips head screws from the third layer of plating using a #0 screwdriver.

  6. VTech Kidizoom Action Cam Battery Replacement: step 6, image 1 of 1
    • Turn the camera around and gently remove the plating that surrounds the LCD screen by grasping it with your fingers and pulling away from the device.

  7. VTech Kidizoom Action Cam Battery Replacement: step 7, image 1 of 3 VTech Kidizoom Action Cam Battery Replacement: step 7, image 2 of 3 VTech Kidizoom Action Cam Battery Replacement: step 7, image 3 of 3
    • Use the plastic opening tool to lift the LCD screen, including the purple casing and set it aside, revealing the motherboard and connector ribbon.

    • Exercise caution while performing this step, as any excessive pulling may tear the connector ribbon from the motherboard.

  8. VTech Kidizoom Action Cam Battery Replacement, Battery: step 8, image 1 of 2 VTech Kidizoom Action Cam Battery Replacement, Battery: step 8, image 2 of 2
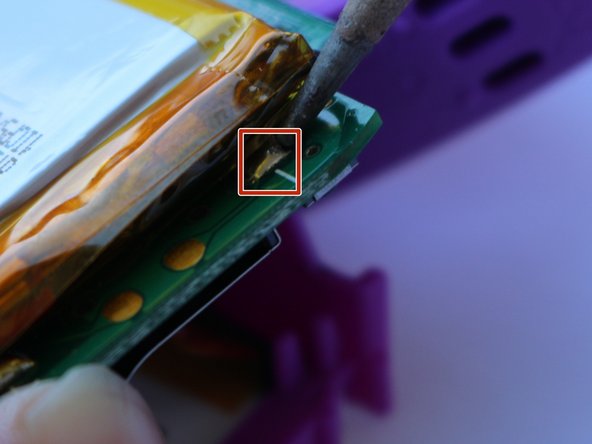
    • Use the soldering iron to unsolder the battery wires connected to the motherboard by reheating the existing solder.

    • Do not cut the two wires at the same time as this can result in shocks.

    • Soldering Iron will be very hot and can be dangerous to touch.

  9. VTech Kidizoom Action Cam Battery Replacement: step 9, image 1 of 1
    • Gently lift the battery away from the motherboard using a plastic opening tool.

Conclusion

To reassemble your device, follow these instructions in reverse order.

8 other people completed this guide.

Ross Anderson

Member since: 02/10/16

630 Reputation

2 Guides authored

Team

USF Tampa, Team 3-5, Sullivan Spring 2016 Member of USF Tampa, Team 3-5, Sullivan Spring 2016

USFT-SULLIVAN-S16S3G5

3 Members

6 Guides authored

2 Comments

Where will get new batteries for same.

Niketan Naik - Reply

Where does one buy a replacement battery? And what type of battery is it?

clemsontiger04 - Reply

Add Comment

View Statistics:

Past 24 Hours: 0

Past 7 Days: 12

Past 30 Days: 62

All Time: 7,107