Introduction
There are several variants of the A300 laptop so yours may not be identical in terms of the number and precise position of screws, but the principles will be very much the same. The one used to write this guide is model PSAJ1E.
You will need a small cross-head screwdriver and a prying tool (or a small flat screwdriver or a blunt knife).
In a dry atmosphere or if you find yourself picking up static from the carpet an antistatic wrist strap is highly recommended. At the very least you should frequently touch a radiator or water pipe or an earthed electrical appliance in order to discharge yourself.
Several different lengths of screws are used and it's important to put them back in the right place. You can use an egg box or a pill box and put screws of different lengths in different compartments, or to be really organised, stick the screws from each step to a piece of paper with Blu-tack and write the step number against each.
-
-
Remove the battery. Slide the locking slider to the unlocked position then slide the other spring-loaded slider against the spring while lifting the battery tab.
-
-
-
Undo 3 captive screws holding the RAM cover in place, and remove the cover.
-
Remove the RAM stick or sticks by pulling the retaining clips outwards.
-
-
-
Optionally, lift the two aerial connectors off the WiFi card, remove 2 screws, and remove the WiFi card.
-
-
-
Undo 2 captive screws in the hard disk bay cover, and remove the cover.
-
Remove 2 screws securing the hard disk in its bay. These are the 2 black screws at the opposite end to the connector.
-
Disengage the hard disk from its connector by pulling on the black plastic tab.
-
-
-
Undo two captive screws in the 2nd hard disk bay cover and remove the cover.
-
-
-
Remove the screw which retains the CD/DVD drive, and remove the drive by pushing on the tab that the screw retained.
-
-
-
-
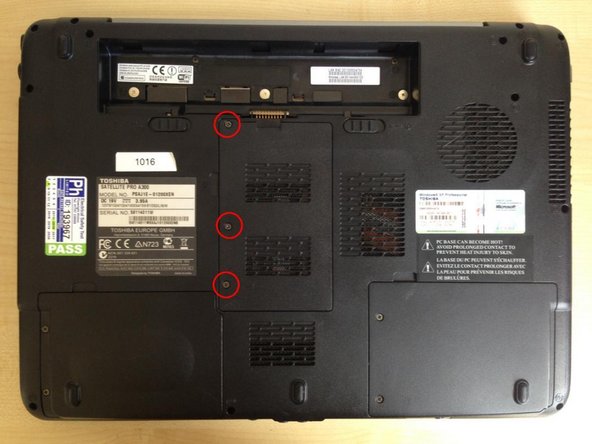
Remove three silver screws with large heads from the battery compartment.
-
Turn the laptop over and open the screen past the vertical position.
-
Pry out the keyboard bezel. It is retained by 3 clips, one at each end and one in the middle. Disengage the end ones first with a prying tool inserted a short distance in from each end.
-
-
-
Remove a screw retaining the keyboard.
-
Lift the keyboard from the back to disengage it from clips on the two sides. Take care not to lift it too far or you may damage its connecting ribbon.
-
Turn the keyboard over by lifting the back and turning it towards yourself. Lay it flat on its face.
-
With a fingernail or prying tool, gently lift the black clamping bar on the keyboard ribbon connector and withdraw the ribbon from the connector.
-
-
-
Close the laptop and lay it upside down.
-
Remove nine 6.5mm screws as follows:
-
Three from the front edge.
-
Four from the 2nd hard disk bay. (One of these is recessed and two others are beneath soft plastic flaps.)
-
One from the corner of the RAM bay.
-
One from a corner of the hard disk bay.
-
-
-
Remove nine 8mm screws as follows:
-
Six from the back near the corners (either side of the battery bay).
-
Two from the sides.
-
One from near the circular vent.
-
Remove two 3mm screws from the battery bay.
-
-
-
Turn the laptop over and open the screen.
-
Disconnect the power button and trackpad ribbons by pulling gently on the tabs.
-
From the metal plate beneath the keyboard, remove the following screws:
-
Two 3mm.
-
Four 6.5mm.
-
The front of the laptop should now lift off easily. If not, there's yet another screw that you've missed.
-
-
-
With the laptop upside down, disconnect the power connector visible in the RAM bay. Turn the laptop right side up again.
-
Disengage 3 connectors from the top of the motherboard:
-
The video connector near the top left.
-
(The small connector adjacent to the video connector need not be disengaged.)
-
A small connector at the bottom right corner of the motherboard
-
The 2nd hard disk bay connector towards the bottom right of the motherboard.
-
-
-
Disengage two connectors on a small circuit board on the bottom of the 2nd hard disk bay and lift the screened cable off the bay.
-
Remove two 6.5mm black screws. (On reassembly it's important to put these screws back in the right holes otherwise the front cover of the laptop won't fit.
-
Gently lift the motherboard from the right hand edge, first disengaging the audio sockets and volume control from the lower shell, then the connectors from their openings in the left hand side. You can now remove it completely.
-
-
-
Now is an excellent time to clean the fan and the cooling vanes through which it blows air. If necessary you can use a pin to dislodge dust stuck to the heat exchanger vanes, then a vacuum cleaner crevice tool to suck it out.
-
The backup battery is just to the left of the RAM sockets on a pair of flying leads. Remove the modem module (just above it in the photo - retained by a single screw) in order to disconnect it.
-
-
-
Lift the WiFi antenna leads out of their routing channels.
-
Whilst supporting the screen, remove six 6.5mm screws from the screen hinge and lift off the screen.
-
To remove and replace the power connector and lead, remove the right hand speaker, secured by two screws at the base of its sound box.
-
-
-
Remove six screw covers (if present) from the screen bezel, and remove the 6 screws.
-
Use a spudger to release the retaining clips around the edges of the bezel and the bottom of the hinge cover, and lift off the bezel.
-
You now have access to the LCD, the inverter at the bottom of the screen (this powers the backlight) and the WiFi antennae along tne top.
-


Team
