
Toshiba Satellite P855-S5312 Screen Replacement

What you need

  1. Toshiba Satellite P855-S5312 Screen Replacement, Fan: step 1, image 1 of 3 Toshiba Satellite P855-S5312 Screen Replacement, Fan: step 1, image 2 of 3 Toshiba Satellite P855-S5312 Screen Replacement, Fan: step 1, image 3 of 3
    • Unscrew the one 1.5mm screw using a Philips #0 screwdriver holding the L shape panel.

    • Pry up the panel to gain access to hidden screws.

  2. Toshiba Satellite P855-S5312 Screen Replacement: step 2, image 1 of 2 Toshiba Satellite P855-S5312 Screen Replacement: step 2, image 2 of 2
    • Remove the fourteen (14) screws using a Philips #0 screwdriver for the 1.5mm screws on the underside of casing.

  3. Toshiba Satellite P855-S5312 Screen Replacement: step 3, image 1 of 3 Toshiba Satellite P855-S5312 Screen Replacement: step 3, image 2 of 3 Toshiba Satellite P855-S5312 Screen Replacement: step 3, image 3 of 3
    • Unscrew the nine 1.5mm screws using a Philips #0 screwdriver under the keyboard with the F6 printed next to them.

    • Unplug the three no-fuss ribbon cable connector cables by gently pulling on them away from you towards the keyboard.

  4. Toshiba Satellite P855-S5312 Screen Replacement: step 4, image 1 of 2 Toshiba Satellite P855-S5312 Screen Replacement: step 4, image 2 of 2
    • Pry apart the casing with the plastic opening tool.

    • Removing the cover under keyboard.

  5. Toshiba Satellite P855-S5312 Screen Replacement: step 5, image 1 of 3 Toshiba Satellite P855-S5312 Screen Replacement: step 5, image 2 of 3 Toshiba Satellite P855-S5312 Screen Replacement: step 5, image 3 of 3
    • Unplug the single no-fuss cable connector using the plastic opening tool pushing the edges towards the fan.

    • Unscrew the two 1.5mm screws using a Philips #0 screwdriver by the head mounting holding down the fan.

    • Pull the fan up and remove it from the device.

  6. Toshiba Satellite P855-S5312 Screen Replacement, Screen: step 6, image 1 of 3 Toshiba Satellite P855-S5312 Screen Replacement, Screen: step 6, image 2 of 3 Toshiba Satellite P855-S5312 Screen Replacement, Screen: step 6, image 3 of 3
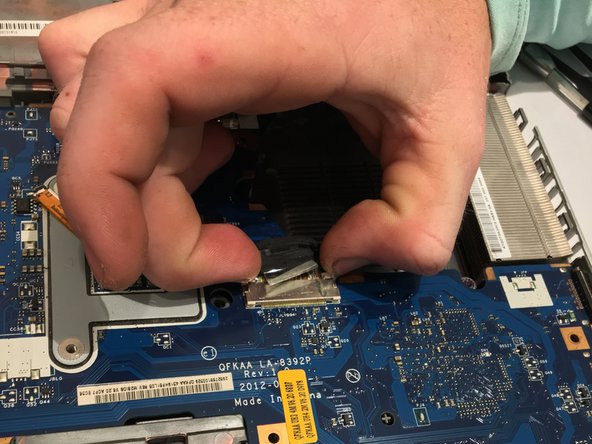
    • Turn laptop upside down with the spine facing towards you and locate the microchip.

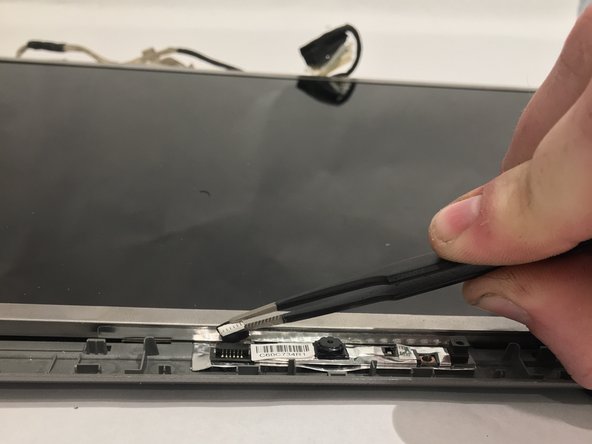
    • Remove the white and black sliding connector wires by prying upward with tweezers gently pulling the black and white wires upwards.

  7. Toshiba Satellite P855-S5312 Screen Replacement: step 7, image 1 of 2 Toshiba Satellite P855-S5312 Screen Replacement: step 7, image 2 of 2
    • Unplug the single ZIF connector ribbon by gently pulling up.

    • Pull the white and black wires through from the underside of device.

  8. Toshiba Satellite P855-S5312 Screen Replacement: step 8, image 1 of 3 Toshiba Satellite P855-S5312 Screen Replacement: step 8, image 2 of 3 Toshiba Satellite P855-S5312 Screen Replacement: step 8, image 3 of 3
    • Unscrew the four hinges mounting the 1.5mm screws on each side from casing using a Philips #0 screwdriver.

    • Remove entire screen assembly from casing.

  9. Toshiba Satellite P855-S5312 Screen Replacement: step 9, image 1 of 3 Toshiba Satellite P855-S5312 Screen Replacement: step 9, image 2 of 3 Toshiba Satellite P855-S5312 Screen Replacement: step 9, image 3 of 3
    • Locate the two black sticker covers on the bottom of both sides of the monitor

    • Using a pair of tweezers, carefully remove black stickers concealing two screws

  10. Toshiba Satellite P855-S5312 Screen Replacement: step 10, image 1 of 3 Toshiba Satellite P855-S5312 Screen Replacement: step 10, image 2 of 3 Toshiba Satellite P855-S5312 Screen Replacement: step 10, image 3 of 3
    • Using a prying tool, carefully pry along the edges of the screen cover

  11. Toshiba Satellite P855-S5312 Screen Replacement: step 11, image 1 of 2 Toshiba Satellite P855-S5312 Screen Replacement: step 11, image 2 of 2
    • Unscrew the two 1.5mm screws at the bottom of monitor using a Philips #0 screwdriver.

  12. Toshiba Satellite P855-S5312 Screen Replacement: step 12, image 1 of 3 Toshiba Satellite P855-S5312 Screen Replacement: step 12, image 2 of 3 Toshiba Satellite P855-S5312 Screen Replacement: step 12, image 3 of 3
    • With all the edges of the screen cover pried up, carefully remove the screen cover.

  13. Toshiba Satellite P855-S5312 Screen Replacement: step 13, image 1 of 3 Toshiba Satellite P855-S5312 Screen Replacement: step 13, image 2 of 3 Toshiba Satellite P855-S5312 Screen Replacement: step 13, image 3 of 3
    • Using the Philips #0 screwdriver, remove the four 1.5mm screws at the corners of the screen.

  14. Toshiba Satellite P855-S5312 Screen Replacement: step 14, image 1 of 3 Toshiba Satellite P855-S5312 Screen Replacement: step 14, image 2 of 3 Toshiba Satellite P855-S5312 Screen Replacement: step 14, image 3 of 3
    • At the top of the screen, using the tweezers, remove the ZIF ribbon connector by gently pushing it up.

  15. Toshiba Satellite P855-S5312 Screen Replacement: step 15, image 1 of 2 Toshiba Satellite P855-S5312 Screen Replacement: step 15, image 2 of 2
    • Remove the screen from the device.

    • Make sure to be carful because the screen is very fragile.

Conclusion

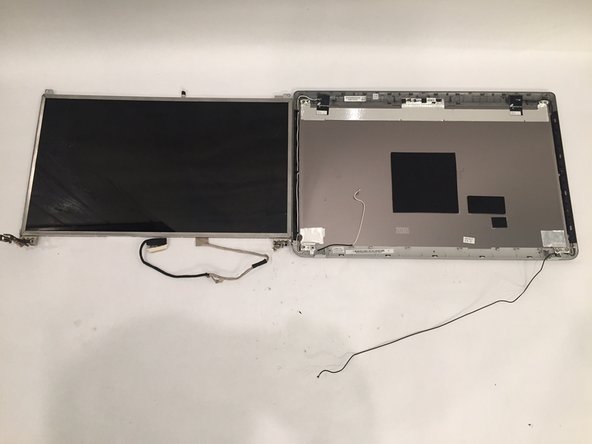
To reassemble your device, follow these instructions in reverse order.

One other person completed this guide.

Bishop Clark

Member since: 10/02/17

225 Reputation

2 Guides authored

Team

USF Tampa, Team S10-G2, Thompson Fall 2017 Member of USF Tampa, Team S10-G2, Thompson Fall 2017

USFT-THOMPSON-F17S10G2

3 Members

6 Guides authored

0 Comments

Add Comment

View Statistics:

Past 24 Hours: 0

Past 7 Days: 1

Past 30 Days: 4

All Time: 734