Introduction
Use this guide to remove the Toshiba Satellite P55t-A5116 Power Jack.
What you need
-
-
Close laptop and turn it upside down
-
Remove the 14 circular rubber covers with tweezers along with one smaller more cylindrical rubber cover.
-
-
-
Gently pry off the bottom case with the plastic opening tools.
-
Find the seam between the back case and the rest of the laptop casing.
Great write-up of process, BUT VERY IMPORTANT step to insert after Step 3: With the back off, you will have access to the wide ribbon cable for the keyboard. See the 2nd and 3rd photos in Step 17 below. Before doing anything else, flip up the ribbon clamp and remove the ribbon. Inspect the underside (electrical contact side) of the cable and blow out the connector. Carefully fully reinstall ribbon cable, but before clamping top back down, pull cable out about the width of a hair. Then push clamp down. This will allow tiny pins to contact a fresh spot on the exposed runs. Then test. This 100% fixed multiple problems with my keyboard without doing anything else (after buying a new keyboard, now just a spare…) and saved a TON of time and trouble. I think some people replace the keyboard and think this is what fixed it, but doing the above would have worked. I suspect after a few years some galvanic corrosion develops that affects the tiny connections. This makes new connections which work perfectly.
-
-
-
-
Use the #PH0 screw head, remove 4 (5.7mm) screws.
-
Unplug the battery's 10 pin connector and gently lift the battery out of the laptop.
-
-
-
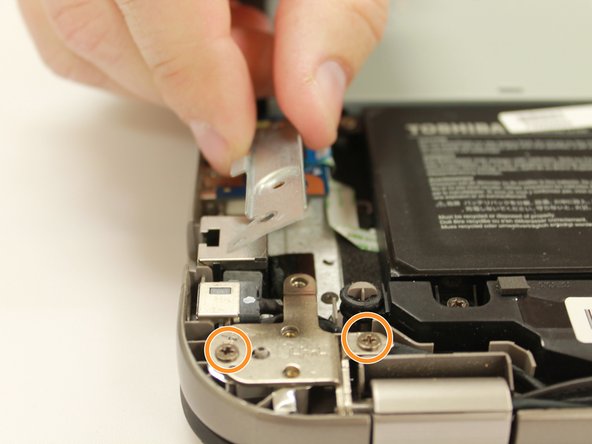
Using the #PH0 screw head, remove 2 (5.7 mm) screws.
-
Remove metal plate.
-
Using the #PH0 screw head remove 1 (5.7mm) screw and 1 (4.15mm) screw.
-


To reassemble your device, follow these instructions in reverse order.
To reassemble your device, follow these instructions in reverse order.
Cancel: I did not complete this guide.
2 other people completed this guide.

Team

Eastern Washington University, Team 1-5, Mathisen Winter 2017 Member of Eastern Washington University, Team 1-5, Mathisen Winter 2017
EWU-MATHISEN-W17S1G5
5 Members
12 Guides authored