Toshiba Satellite E45T-A4300 Motherboard Replacement

What you need

  1. Toshiba Satellite E45T-A4300 Motherboard Replacement, Back Panel: step 1, image 1 of 1
    • Remove the twelve 5 mm Phillips #1 screws from the back panel.

  2. Toshiba Satellite E45T-A4300 Motherboard Replacement: step 2, image 1 of 1
    • Pry the back panel open with the plastic spudger or fingernails.

    • Pry it gently so that the back panel does not crack.

  3. Toshiba Satellite E45T-A4300 Motherboard Replacement, Hard Drive: step 3, image 1 of 1
    • Remove the three 7mm black screws using the Phillips #1 screwdriver.

  4. Toshiba Satellite E45T-A4300 Motherboard Replacement: step 4, image 1 of 1
    • Remove the hard drive’s connection port with grooved tweezers.

  5. Toshiba Satellite E45T-A4300 Motherboard Replacement: step 5, image 1 of 2 Toshiba Satellite E45T-A4300 Motherboard Replacement: step 5, image 2 of 2
    • Pull the hard drive out of the hook and remove it from the device.

  6. Toshiba Satellite E45T-A4300 Motherboard Replacement, Fan: step 6, image 1 of 2 Toshiba Satellite E45T-A4300 Motherboard Replacement, Fan: step 6, image 2 of 2
    • Remove the two 5 mm screws using a Phillips #1 screwdriver.

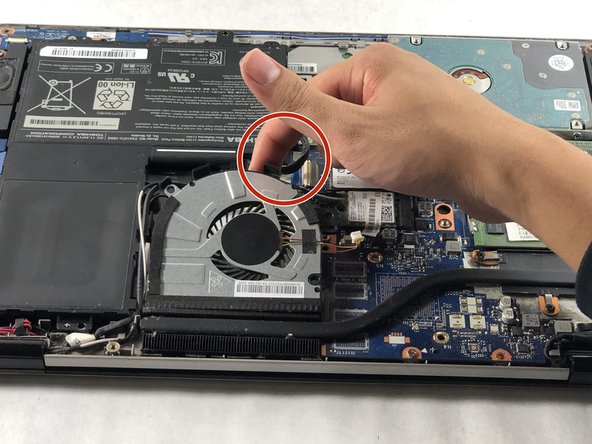
  7. Toshiba Satellite E45T-A4300 Motherboard Replacement: step 7, image 1 of 1
    • Gently disconnect the fan cable from the device.

  8. Toshiba Satellite E45T-A4300 Motherboard Replacement: step 8, image 1 of 2 Toshiba Satellite E45T-A4300 Motherboard Replacement: step 8, image 2 of 2
    • Move the wires away from the fan’s hook.

    • Remove the fan from the device.

  9. Toshiba Satellite E45T-A4300 Motherboard Replacement, Heat Sink: step 9, image 1 of 1
    • Remove the three 5 mm screws using a Phillips #1 screwdriver.

  10. Toshiba Satellite E45T-A4300 Motherboard Replacement: step 10, image 1 of 3 Toshiba Satellite E45T-A4300 Motherboard Replacement: step 10, image 2 of 3 Toshiba Satellite E45T-A4300 Motherboard Replacement: step 10, image 3 of 3
    • Pry the heat sink away from the laptop with two hands at both ends and remove it from the device.

    • The heat sink is glued to a gray paste called thermal paste. Do not touch the paste.

  11. Toshiba Satellite E45T-A4300 Motherboard Replacement, Battery: step 11, image 1 of 1
    • Disconnect the battery connector from the motherboard.

  12. Toshiba Satellite E45T-A4300 Motherboard Replacement: step 12, image 1 of 1
    • Remove the single screw Phillips #1 screw near the battery.

  13. Toshiba Satellite E45T-A4300 Motherboard Replacement: step 13, image 1 of 2 Toshiba Satellite E45T-A4300 Motherboard Replacement: step 13, image 2 of 2
    • Remove the battery from the laptop.

  14. Toshiba Satellite E45T-A4300 Motherboard Replacement, Motherboard: step 14, image 1 of 2 Toshiba Satellite E45T-A4300 Motherboard Replacement, Motherboard: step 14, image 2 of 2
    • Remove the single 7 mm silver screw using a Phillips #1 screwdriver.

  15. Toshiba Satellite E45T-A4300 Motherboard Replacement: step 15, image 1 of 1
    • Pull metal stick holder until it is upright.

  16. Toshiba Satellite E45T-A4300 Motherboard Replacement: step 16, image 1 of 2 Toshiba Satellite E45T-A4300 Motherboard Replacement: step 16, image 2 of 2
    • Remove the 7 mm silver screw under the metal bar using the Phillips #1 screwdriver.

  17. Toshiba Satellite E45T-A4300 Motherboard Replacement: step 17, image 1 of 3 Toshiba Satellite E45T-A4300 Motherboard Replacement: step 17, image 2 of 3 Toshiba Satellite E45T-A4300 Motherboard Replacement: step 17, image 3 of 3
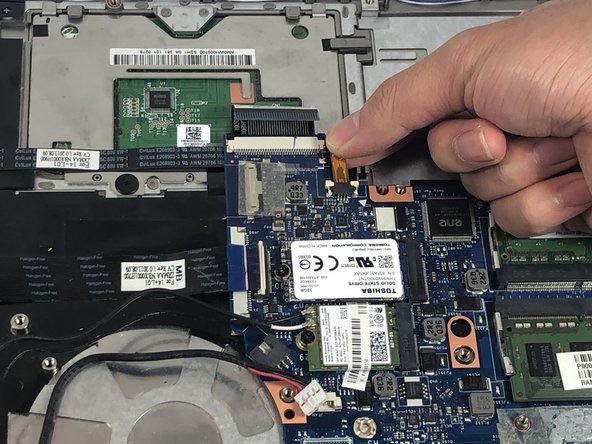
    • Disconnect the six connectors from the device.

    • For the monitor port, pull it from the black tab.

    • For the connection port with the blue strip, lift the white placeholder before pulling the blue strip out of the connection port.

  18. Toshiba Satellite E45T-A4300 Motherboard Replacement: step 18, image 1 of 2 Toshiba Satellite E45T-A4300 Motherboard Replacement: step 18, image 2 of 2
    • Pull out 2 plugs out from the wireless network card.

  19. Toshiba Satellite E45T-A4300 Motherboard Replacement: step 19, image 1 of 1
    • Remove the motherboard from the device.

Conclusion

To reassemble your device, follow these instructions in reverse order.

James Nguyen

Member since: 10/23/18

573 Reputation

5 Guides authored

Team

0 Comments

Add Comment

View Statistics:

Past 24 Hours: 0

Past 7 Days: 1

Past 30 Days: 5

All Time: 678