
Toshiba Encore WT8-A Tablet Audio Jack Replacement

What you need

  1. Toshiba Encore WT8-A Tablet Audio Jack Replacement, Battery: step 1, image 1 of 1
    • Use the metal spudger to create a gap between the back cover and the device.

    • Be gentle when using the metal spudger so that the casing is not damaged.

  2. Toshiba Encore WT8-A Tablet Audio Jack Replacement: step 2, image 1 of 2 Toshiba Encore WT8-A Tablet Audio Jack Replacement: step 2, image 2 of 2
    • Use the nylon spudger to completely separate the back of the device.

    • Take the nylon spudger around the outside of the device cover until it comes free.

  3. Toshiba Encore WT8-A Tablet Audio Jack Replacement: step 3, image 1 of 2 Toshiba Encore WT8-A Tablet Audio Jack Replacement: step 3, image 2 of 2
    • Use the Phillips head PH0 to remove the 7 battery screws.

    • The 5 side screws measure 3.5mm.

    • The 2 top and bottom screws measure 4.5 mm.

  4. Toshiba Encore WT8-A Tablet Audio Jack Replacement: step 4, image 1 of 2 Toshiba Encore WT8-A Tablet Audio Jack Replacement: step 4, image 2 of 2
    • To disconnect the cable, use the fine tweezers to flip up the small retaining flap. Then, you can safely pull the ribbon cable out.

    • Be sure you are prying up on the hinged retaining flap, not the connector itself.

    • The zero insertion force (ZIF) connector is used to secure delicate ribbon cables, such as this trackpad cable.

  5. Toshiba Encore WT8-A Tablet Audio Jack Replacement: step 5, image 1 of 1
    • Remove the colored power cable from its connector.

    • To disconnect it safely, use the pointed tip of a spudger to carefully push on each side of the connector.

    • Alternating from one side to the other, gently “walk” the connector out of its socket.

    • Be sure to be very gentle when prying colored wires from motherboard to ensure that there is no damage.

  6. Toshiba Encore WT8-A Tablet Audio Jack Replacement: step 6, image 1 of 1
    • Battery will lift out of the device.

  7. Toshiba Encore WT8-A Tablet Audio Jack Replacement, Motherboard: step 7, image 1 of 1
    • Remove the 4 – 4.5 mm screws from the motherboard assembly.

  8. Toshiba Encore WT8-A Tablet Audio Jack Replacement: step 8, image 1 of 1
    • Remove the 2 – 3.5 mm screws from the motherboard assembly.

  9. Toshiba Encore WT8-A Tablet Audio Jack Replacement: step 9, image 1 of 1
    • The motherboard should come free at this point.

  10. Toshiba Encore WT8-A Tablet Audio Jack Replacement, Audio Jack: step 10, image 1 of 1
    • Prepare soldering iron to heat the connections to the motherboard.

    • Soldering irons are very hot, use caution as not to burn yourself, or other parts of the motherboard.

  11. Toshiba Encore WT8-A Tablet Audio Jack Replacement: step 11, image 1 of 3 Toshiba Encore WT8-A Tablet Audio Jack Replacement: step 11, image 2 of 3 Toshiba Encore WT8-A Tablet Audio Jack Replacement: step 11, image 3 of 3
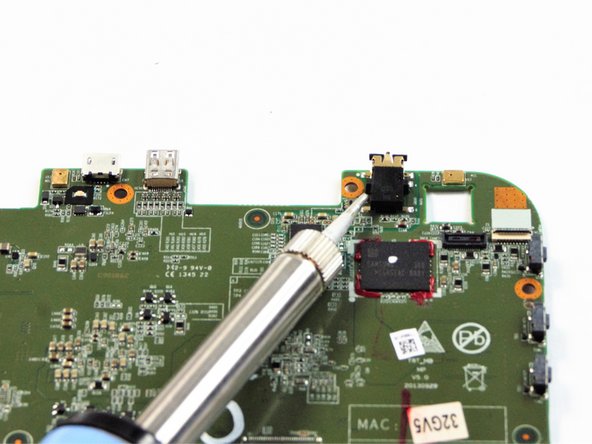
    • Use the soldering iron to melt the metal connection from the motherboard to the audio jack.

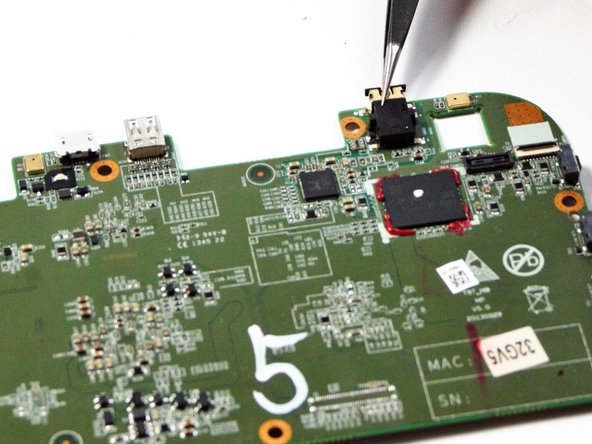
    • Use the fine pointed tweezers to pull the audio jack away from the motherboard.

    • Do not touch the audio jack or surrounding area with your hands, melted metal is very hot.

    • The solder cools quickly so you will have to be quick and precise.

  12. Toshiba Encore WT8-A Tablet Audio Jack Replacement: step 12, image 1 of 1
    • Upon acquiring a new audio jack, use the soldering iron to solder the six connection ports into the motherboard.

Zack Smith

Member since: 09/20/16

119 Reputation

1 Guide authored

Team

USF Tampa, Team 17-4, Blackwell Fall 2016 Member of USF Tampa, Team 17-4, Blackwell Fall 2016

USFT-BLACKWELL-F16S17G4

3 Members

8 Guides authored

View Statistics:

Past 24 Hours: 0

Past 7 Days: 3

Past 30 Days: 4

All Time: 523