
TomTom XL Screen and Motherboard Replacement

What you need

  1. TomTom XL Screen and Motherboard Replacement, Screen and Motherboard: step 1, image 1 of 1
    • Slip a small plastic opening tool underneath the screen bezel, gently sliding it around the inside edge.

    • Starting at the corners, carefully pry up the screen bezel.

  2. TomTom XL Screen and Motherboard Replacement: step 2, image 1 of 1
    • Remove the four Phillips #00 screws around the edge of the screen.

  3. TomTom XL Screen and Motherboard Replacement: step 3, image 1 of 3 TomTom XL Screen and Motherboard Replacement: step 3, image 2 of 3 TomTom XL Screen and Motherboard Replacement: step 3, image 3 of 3
    • Slide a small plastic opening tool under the top portion of the metal frame and gently lift it up.

    • Slide the plastic opening tool around the inner edge of the metal frame until it feels loose.

    • It may take some time to release the frame from the housing. Some force may be necessary—but be careful not to bend the frame's fragile interior bracket.

    • Remove the frame from the housing.

  4. TomTom XL Screen and Motherboard Replacement: step 4, image 1 of 2 TomTom XL Screen and Motherboard Replacement: step 4, image 2 of 2
    • Lifting from the upper edge of the screen, tilt the screen away from the device.

    • Tilt the screen slowly. Flipping the screen up too quickly may damage the display cable.

  5. TomTom XL Screen and Motherboard Replacement: step 5, image 1 of 2 TomTom XL Screen and Motherboard Replacement: step 5, image 2 of 2
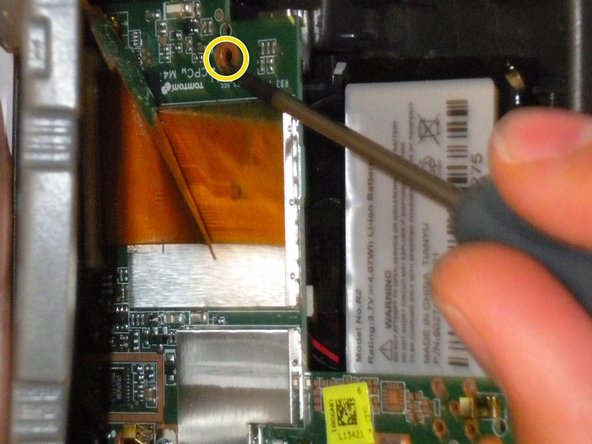
    • Remove the three Phillips #00 screws connecting the motherboard to the plastic housing:

    • Two Phillips #00 screws are located at the bottom of the first picture.

    • The third screw is hidden under the orange ribbon cable, near the screen.

    • You may have to carefully lift the screen in order to reach this screw.

  6. TomTom XL Screen and Motherboard Replacement: step 6, image 1 of 2 TomTom XL Screen and Motherboard Replacement: step 6, image 2 of 2
    • Flip the screen and motherboard over.

    • Gripping the plastic casing, disconnect the battery cable connector from the motherboard.

    • Disconnect the speaker cable connector from the motherboard.

    • Remove the motherboard and screen from the housing.

Adam Johnson

Member since: 04/21/10

122 Reputation

2 Guides authored

Team

Cal Poly, Team 33-84, Johann Spring 2010 Member of Cal Poly, Team 33-84, Johann Spring 2010

CPSU-JOHANN-S10S33G84

4 Members

5 Guides authored

View Statistics:

Past 24 Hours: 1

Past 7 Days: 1

Past 30 Days: 10

All Time: 9,030