Introduction
Diese Anleitung erklärt, wie die Ladebuchse am Taschenrechner ausgetauscht wird. Der Austausch ist das letzte, was du probieren solltest, wenn der Akku nicht mehr geladen wird. Vorher solltest du zuerst den Akku/die Batterie wechseln, ein neues Ladekabel und ein anderes Ladegerät probieren. Wenn du keine Daten übertragen kannst, dann prüfe, ob du ein Kabel hast, das nur zum Laden geeignet ist.
Achtung: Das Verfahren zum Öffnen des Nspire CX II (CAS) ist völlig anders.
What you need
-
-
-
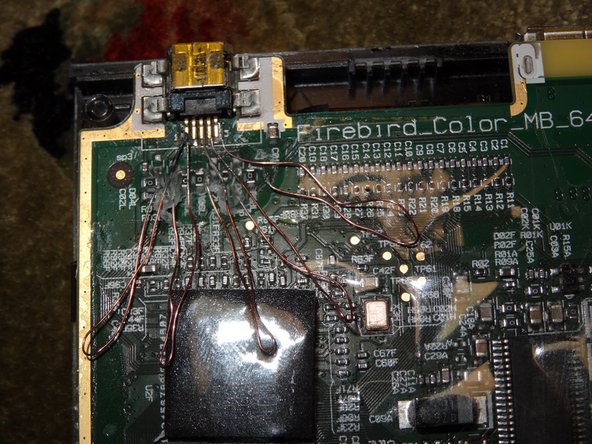
Verwende beschichtetes oder anders isoliertes Kabel.
-
Behandle die Stellen vorher mit Zinn, damit die Lötstöcke besser am Kupfer kleben. Gib dazu Lötzinn auf die Spitze des Lötkolbens und reibe es dann über eines der Enden des Ersatzkabels.
-
Mach das auf beiden Seiten aller Kabel, behandle sowohl die Vorder- als auch die Rückseite jedes Endes mit Zinn. Das Zinn fließt nicht automatisch auf beide Seiten, deshalb mühselig zuerst die Vorder-, dann die Rückseite behandeln.
-


Folge den Schritten in umgekehrter Reihenfolge, um das Gerät wieder zusammenzubauen.
Folge den Schritten in umgekehrter Reihenfolge, um das Gerät wieder zusammenzubauen.
Cancel: I did not complete this guide.
3 other people completed this guide.
Special thanks to these translators:
100%


These translators are helping us fix the world! Want to contribute?
Start translating ›
8 Comments
Hi, nice layout and very clear thank you. Do you know where one can buy this usb charge port please??
That moment your recognize your colleague’s dog in the last photo.
P.S. You can buy spare mini USB ports from sites like Amazon or Ebay.
Hello, I was going to follow this guide, but I cannot find a 1mm clutch bit can you send me a link or tell me where to go to find one. Thank you.
I used an appropriately sized flathead from a electronics repair kit I owned. I also was not able to locate a suitable bit. I thought a tiny spanner ( 2 prongs) bit would do, but alas…
My most recent set had the flathead in (was also doing an imac repair and needed a larger variety of pentalobes):
https://www.amazon.com/Vastar-Magnetic-P...
It’s every bit as cheap as it looks, but since those blasted pentalobes die with each attempt on a repair pretty much, I am not looking for fancy. Stupid Apple.
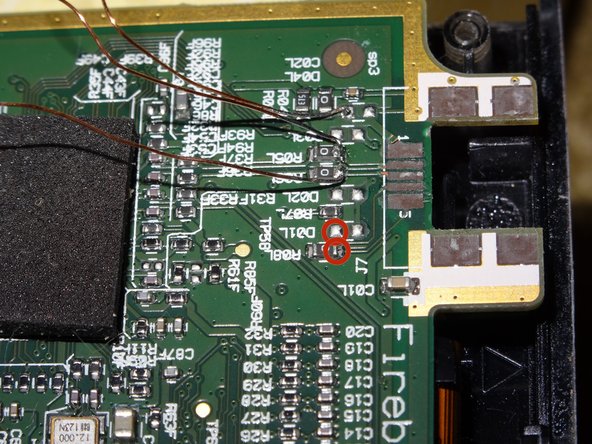
Hello all. I was able to complete this guide successfully however please do not solder like the Author did. I was able to get data working as well. The steps to getting the calculator open were awesome but after that please do not follow. I also found a small flathead will work for taking off the “clutch” screws. I was able to get a USB-C connector working with data transfer. I used insulated cables not thin strands of copper which have a high likely hood of shorting and no need to tape over anything. Also for those solders going to the bridge connectors, you can actually remove those bridge resistors as they are 0 ohms. Effectively doing nothing but acting as a bridge between pads. Texas Instruments must use this same PCB design for multiple things.