Introduction
La splendente metà posteriore della copertura del tuo iPod.
What you need
-
-
Per aiutarti nel trovare i ganci, i due cerchiati in rosso sono i più vicini alla presa jack.
i don't know what genoration my ipod is...but it looks exactly like that on and it doesnt have the clips......what do i do?
https://www.ifixit.com/info/ID-your-iPod
Try that first to find what you have
Given the inherited risks of damaging the components, it would also be important to mention that the area where there are no clips is where the flat cable to the screen resides. So NO deep sticking tools in that area. It’s attractive to do because at that right side the back panel is intruded the easiest way - but dont do it.
-
-
-
-
Infila lo strumento di apertura per iPod nella fessura tra la copertura anteriore e quella posteriore dell'iPod, sopra la porta di connessione. La punta dello strumento dovrebbe essere rivolta verso la copertura posteriore per evitare di graffiare per sbaglio la copertura anteriore in alluminio anodizzato.
-
-
-
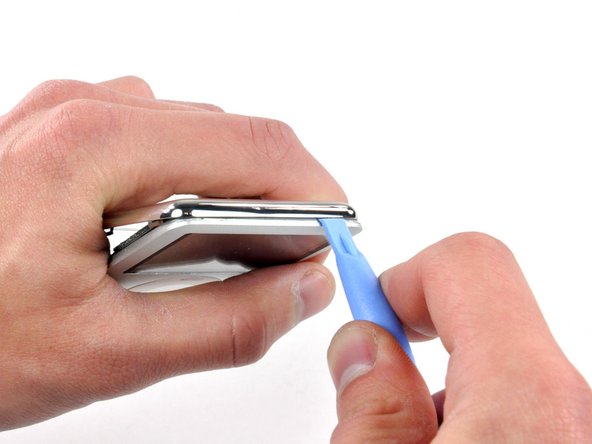
Infila uno strumento di apertura per iPod nella fessura sul lato della presa jack dell'iPod, con la punta dello strumento rivolta verso la copertura posteriore.
-
Allarga delicatamente la fessura esistente premendo/muovendo lo strumento di apertura nella fessura vicino ai due ganci, spingendoli verso il centro dell'iPod fino ad averli liberati entrambi.
the tool i bought because you suggested it to me got inevitably broken like it was butter made, thanks
This is virtually impossible! I have already cut myself when the stupid tool slipped trying to push in on the clips. Why on earth would anyone design something to impossible to open when they know the battery would need to be replaced at some point?
Forget the iFixit plastic tools. You need to use steel on steel. I used a heavy duty engravers knife I happened to have, to get it started. Then, a fine chisel and jeweler’s screwdrivers and LOTS of force to pry it off. I messed up the aluminum front case a bit, but I cleaned that up with sandpaper. The back case was bent a bit, but I straightened that, and after replacing the battery I fastened it back on with black electricians tape. It looks quite well, and good enough for me. I will cancel my order for a replacement back. Joe M 2/3/2018
i never needed the large tool i just needed i little flat head screwdriver
-
-
-
Infila uno strumento di apertura per iPod nella fessura vicino all'angolo in alto a sinistra e libera i tre ganci lungo il bordo superiore della copertura posteriore.
-
Dopo esserti assicurato di aver liberato tutti i ganci, separa le due metà dell'iPod.
-
La copertura posteriore è ora separata dall'iPod.
-


Per rimontare il dispositivo, segui le istruzioni in ordine inverso.
Per rimontare il dispositivo, segui le istruzioni in ordine inverso.
Cancel: I did not complete this guide.
36 other people completed this guide.
Special thanks to these translators:
100%

These translators are helping us fix the world! Want to contribute?
Start translating ›

2 Comments
but what about the model no.
its just a third-gen ipod nano they all have the same design
I found removing the back to be very difficult and had to use a mini screwdriver to complete it. While removing the back to replace the clickwheel, I not only destroyed the back, I inadvertently mangled the video cable and so I then had to replace that too.
gruntso - Reply