
Sony Xperia Z3 Battery Replacement

What you need

  1. Sony Xperia Z3 Battery Replacement, Back Cover: step 1, image 1 of 3 Sony Xperia Z3 Battery Replacement, Back Cover: step 1, image 2 of 3 Sony Xperia Z3 Battery Replacement, Back Cover: step 1, image 3 of 3
    • Heat the back cover of your Xperia Z3 to loosen the adhesive underneath.

    • If you use an iOpener, follow these instructions for use.

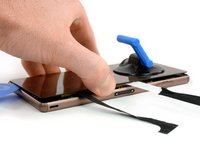
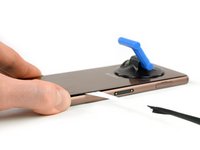
    • Lift up the back cover with a suction handle and put an opening pick in the gap.

    • Move the pick carefully around the edges to loosen the adhesive on every side of the phone.

    • Don't put the pick in too deep under the back cover to not damage any parts inside the phone.

  2. Sony Xperia Z3 Battery Replacement: step 2, image 1 of 2 Sony Xperia Z3 Battery Replacement: step 2, image 2 of 2
    • There are two adhesive strips in the center of the phone connecting the rear case to the battery, you'll need to remove them to open the phone.

    • When the edges of the cover are free from adhesive, tilt it to allow access to the battery tabs.

    • Use tweezers to pull the two black adhesive strips out of the phone but don't pull just yet.

  3. Sony Xperia Z3 Battery Replacement: step 3, image 1 of 2 Sony Xperia Z3 Battery Replacement: step 3, image 2 of 2
    Tool used on this step:
    Plastic Cards
    $2.99
    Buy
    • Gently pull out both of the adhesive tabs out of the phone, parallel to the rear cover.

    • If the adhesive tabs break, try to use a thin flat plastic tool such as a plastic card to remove the last of the adhesive. If the adhesive is stubborn, heat it with an iOpener or hair dryer and pry again.

  4. Sony Xperia Z3 Battery Replacement: step 4, image 1 of 2 Sony Xperia Z3 Battery Replacement: step 4, image 2 of 2
    • After pulling out the adhesive tabs, you can lift the back cover and remove it.

  5. Sony Xperia Z3 Battery Replacement, Battery: step 5, image 1 of 2 Sony Xperia Z3 Battery Replacement, Battery: step 5, image 2 of 2
    • Unplug the battery flex connector.

    • Use a tweezer to gently pull off the adhesive strip on the bottom part of the battery.

  6. Sony Xperia Z3 Battery Replacement: step 6, image 1 of 2 Sony Xperia Z3 Battery Replacement: step 6, image 2 of 2
    • Use a spudger on the left side of the frame to lever out the battery.

    • Be careful with the spudger - there are cables beneath the battery!

    • Remove the battery.

Conclusion

To reassemble your device, follow these instructions in reverse order.

25 other people completed this guide.

Dominik Schnabelrauch

Member since: 11/23/16

202,694 Reputation

682 Guides authored

Team

iFixit Member of iFixit

Staff

135 Members

16,731 Guides authored

6 Comments

En hoe krijg je ‘m dan weer goed dicht?

Tijmen Brozius - Reply

If the original tape won’t hold anymore, you could replace it with double sided adhesive tape to reseal the back cover. Take a look here:

Tesa 61395 Tape

or directly in the EU Store for shipping to the Netherlands:

https://eustore.ifixit.com/en/Tools/Cons...

Tobias Isakeit -

When I opened up my phone to replace the battery, almost everything in this guide was still correct except that now the battery is screwed in with 1.2mm star screws.

Marisha Parker - Reply

Once replaced do i need to recalibrate the phone to show charge level correctly or should this happen automatically? As phone seems to discharge to 8% then stay there for a couple of hours?

Craig - Reply

This guide worked for me.

But during step 3, the tabs ripped off, and I had a hard time separating the battery from the back cover.

So instead I used a tweezer to disconnect the battery (step 5), and slowly pried the battery off, along with the back cover. After that, you can have more space to work with removing the battery from the cover.

Chawit Leosrisook - Reply

Add Comment

View Statistics:

Past 24 Hours: 7

Past 7 Days: 20

Past 30 Days: 76

All Time: 32,640