Introduction
Follow this guide to replace the battery on the Sony WH-1000XM4 wireless headphones.
Most single-celled lithium-ion replacement batteries with the same battery connector should work—as long as they physically fit.
Note: If you’re having battery charging problems, follow this procedure to disassemble your headphones, disconnect the battery for 15 minutes, reconnect it, and see if the problem is fixed before replacing the battery.
To minimize risk of damage, turn on your headphones and allow the battery to fully discharge before starting this procedure. If a charged lithium-ion battery is accidentally punctured, a dangerous and uncontrollable fire may result. If your battery looks puffy or swollen, take extra precautions.
What you need
-
-
Place your headphones onto a work surface, ear pads facing up.
-
-
-
Use your thumb to depress the RIGHT ear pad near the long outer edge, creating a gap between the cushion and the frame.
-
-
-
Insert the flat end of a spudger into the gap you've created, between the edge of the cushion and the frame.
-
Pivot the spudger down to unclip the long edge of the ear pad.
-
-
-
-
Align the cushion over the speaker and press them firmly together to snap it into place.
-
Press around the entire edge of the cushion, making sure all the clips have engaged.
-
-
-
Use a Phillips screwdriver to remove the four 8.4 mm screws securing the right ear cup cover.
-
-
-
Flip the headphones over, ear cups facing down.
-
Use your fingers to lift up and flip over the right ear cup cover.
-
-
-
Grip the touch ribbon cable and pull it straight out of its connector on the main board to remove it.
-
Remove the ear cup cover.
-
-
-
Use a pair of tweezers to grip the edges of the battery connector, and pull up to disconnect it from the main board.
-
-
-
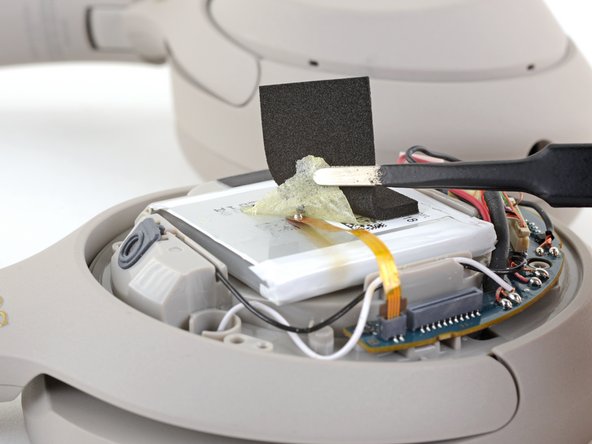
Use a pair of tweezers to peel back the foam and adhesive covering the battery thermal sensor.
-
-
-
Slide the flat end of a spudger under the top-lefthand corner of the battery.
-
Push the spudger underneath the battery, prying up intermittently to work the battery away from its adhesive.
-
-
-
Remove the battery.
-
Remove any remaining adhesive from the battery well.
-
If your replacement battery does not come with replacement adhesive, lay some double-sided tape or pre-cut adhesive strips in the headphone's battery well.
-
Peel away any tape liners to expose the adhesive.
-
Lay the battery on the adhesive and press firmly.
-
Compare your new replacement part to the original part—you may need to transfer remaining components or remove adhesive backings from the new part before installing.
To reassemble your device, follow the above steps in reverse order.
Take your e-waste to an R2 or e-Stewards certified recycler.
Repair didn’t go as planned? Try some basic troubleshooting or search our Answers community for help.
Cancel: I did not complete this guide.
24 other people completed this guide.
7 Comments
You can also get the battery from sony’s site!
como puedo adquirir la batería con el sensor térmico preinstalado de los audífonos sony wh1000xm4 ????? avisarme a josephchr_est@hotmail.com
Bought one tool kit. Buying a few more, because all the guides on this site have saved me hours of frustration.
Thank you, IFixIt, please don't change!!!


