What you need
-
-
With the computer facing you, locate the screw on the back left-hand side of the computer (purple marker). This screw keeps the speaker panel and keyboard in place. Use a small Phillips screwdriver to remove the screw. After removing, place the screw in a secure location – it will need to be replaced later.
-
-
-
Open laptop facing towards user
-
Now that the screw has been removed from the side of the computer, the purple speaker panel can be removed. Carefully lift the left side of the panel, unhook the right side, and remove the panel a couple inches from the computer, taking care not to pull beyond the length of the ribbon cable that secures it to the motherboard (red marker).
-
NOTE: If you do not wish to replace the keyboard, proceed to "Step 4".
-
-
-
With the speaker panel absent, the keyboard can be easily removed. lift the keyboard a few inches from the computer, taking care not to pull beyond the length of the ribbon cable that secures it to the motherboard (purple marker).
-
Identify the ribbon cable connecting the keyboard to the computer’s motherboard (purple marker) and remove it by gently pulling near its point of connection.
-
Once the cable is free from the motherboard, the keyboard is fully separated from the computer.
-
NOTE: If you do not wish to replace the speakers, proceed to "Step 7".
-
-
-
-
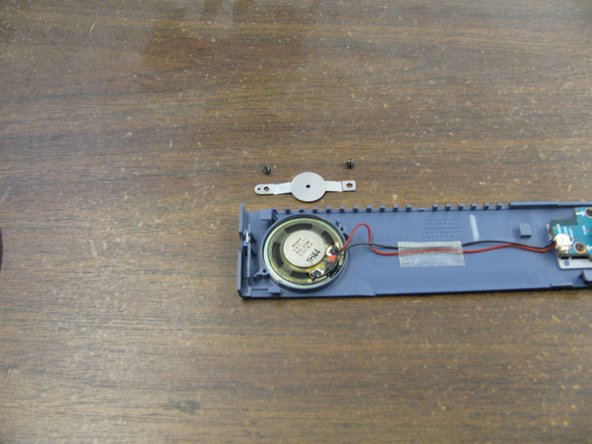
Identify the speakers on the underside of the speaker panel. Unplug the black and red wires connecting the speakers—on both ends of the panel—to the circuit board on the center of the panel by carefully pulling at the wires close to their connection (red markers) with the circuit board.
-
Using a Phillips screwdriver, remove the four screws—two screws per speaker— and the metal brackets holding the speakers in place. Place the screws and brackets in a secure place – they will be replaced later.
-
Remove the adhesive tape securing the speaker wires to the panel.
-
-
-
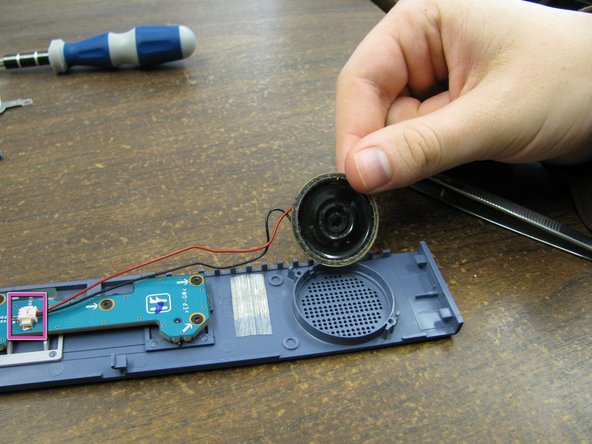
A sticky adhesive holds the speakers in place in addition to the screws. The speakers will likely be reluctant to detach from the panel due to this cement.
-
To overcome the adhesive and remove the speakers, place the screw driver in the hole in the speaker mesh and pry out, using the raised metal lip in the center of the speaker for leverage.
-
A good amount of force may be necessary to completely overcome the adhesive. NOTE: The tweezers or needle nose pliers may be used in place of the screw driver.
-
-
-
Place the new speakers into the circular mold that held the old speakers, making sure to align the notch inside the molds with the indents on the outer rim of the speakers.
-
Replace the two metal brackets and all four screws—one bracket and two screws for each speaker—to keep the speakers in place.
-
Holding them such that the visible metal contacts are facing up, insert the white plastic end of each speaker wire into their respective connection ports on the circuit board.
-
Replace the tape securing the wires to the panel.
-
-
-
Attach the new keyboard’s ribbon cable to the motherboard by carefully inserting it into the white plastic outlet located at the top center of the motherboard (purple marker).
-
Rest the keyboard in place making sure it is aligned with the rest of the computer on the bottom and both sides.
-
-
-
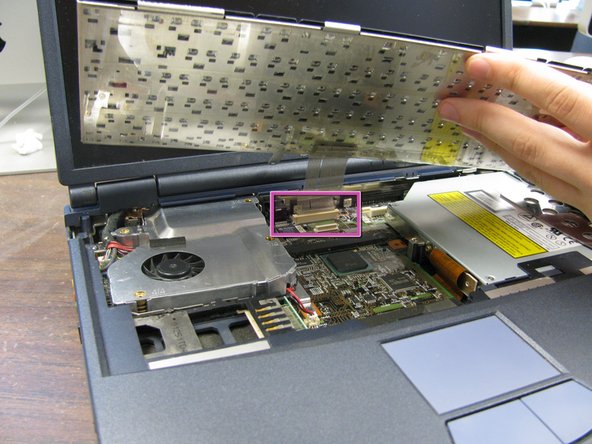
Locate the white attachment point of the speaker panel’s gray ribbon cable to the computer’s motherboard, in the middle of the board just to the left of the CD drive (red marker). Insert the cable.
-
Align the top of the speaker panel with the computer’s frame (note purple markers). Allow the panel to rest in place and slide it to the left until the sides of the panel are flush with the computer.
-
Replace screw on the left-hand side of the computer (orange marker).
-


Team

Cal Poly, Team 18-68, Johann Spring 2010 Member of Cal Poly, Team 18-68, Johann Spring 2010
CPSU-JOHANN-S10S18G68
4 Members
9 Guides authored