
Sony Vaio Fit 13A Charger Port Replacement

What you need

  1. Sony Vaio Fit 13A Charger Port Replacement, Back Cover: step 1, image 1 of 2 Sony Vaio Fit 13A Charger Port Replacement, Back Cover: step 1, image 2 of 2
    • Starting with the laptop top-down, locate and remove the twelve 1mm Phillips #0 screws securing the back cover to the main body of the computer.

  2. Sony Vaio Fit 13A Charger Port Replacement: step 2, image 1 of 2 Sony Vaio Fit 13A Charger Port Replacement: step 2, image 2 of 2
    • Use the Plastic Opening Tools or Metal Spudger to carefully loosen back cover from the body of the computer.

    • Be sure to avoid headphone jack when removing back cover by lifting cover away from computer and up.

  3. Sony Vaio Fit 13A Charger Port Replacement: step 3, image 1 of 1
    • Lift off back cover to access inner components of computer.

  4. Sony Vaio Fit 13A Charger Port Replacement, Fan: step 4, image 1 of 2 Sony Vaio Fit 13A Charger Port Replacement, Fan: step 4, image 2 of 2
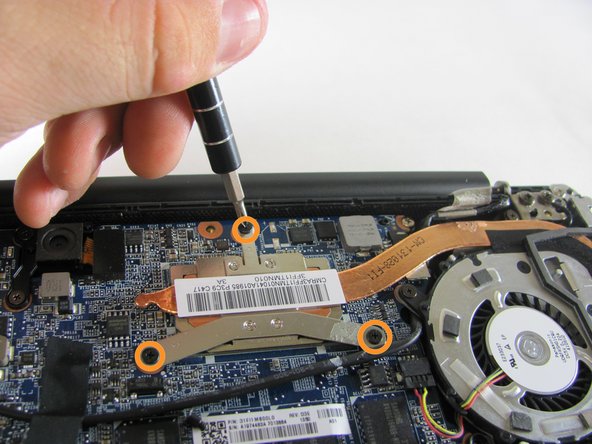
    • Remove the three 1mm Phillips #0 screws surrounding the fan.

    • Loosen the three 1mm Phillips #0 screws. These screws will stay captive to the heatsink.

  5. Sony Vaio Fit 13A Charger Port Replacement: step 5, image 1 of 3 Sony Vaio Fit 13A Charger Port Replacement: step 5, image 2 of 3 Sony Vaio Fit 13A Charger Port Replacement: step 5, image 3 of 3
    • Use tweezers to carefully unplug the fan connector.

  6. Sony Vaio Fit 13A Charger Port Replacement, Remove the Fan: step 6, image 1 of 2 Sony Vaio Fit 13A Charger Port Replacement, Remove the Fan: step 6, image 2 of 2
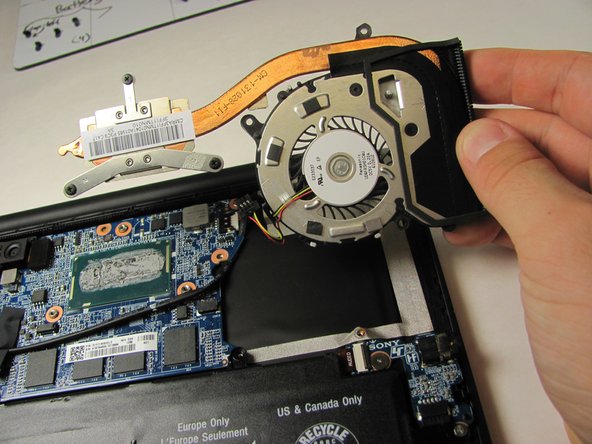
    • Use the Plastic Opening Tool to gently remove the heat sink and fan assembly from the computer.

    • Important: Follow the How to Apply Thermal Paste guide to replace the thermal paste before reassembling your device.

  7. Sony Vaio Fit 13A Charger Port Replacement, Charger Port: step 7, image 1 of 3 Sony Vaio Fit 13A Charger Port Replacement, Charger Port: step 7, image 2 of 3 Sony Vaio Fit 13A Charger Port Replacement, Charger Port: step 7, image 3 of 3
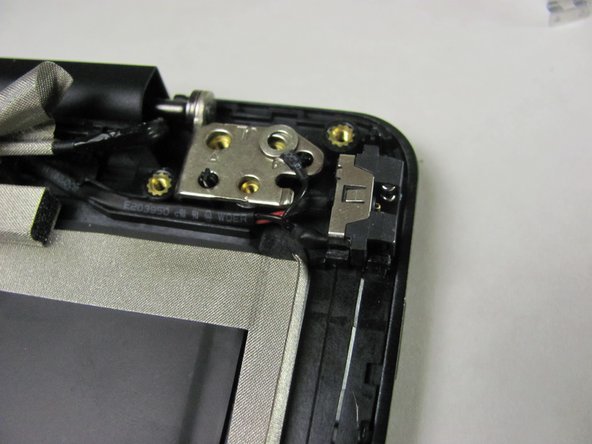
    • Remove 1mm screw using a Phillips Head #0 screwdriver.

    • Remove two 3mm screws using a Phillips Head #1 screwdriver.

  8. Sony Vaio Fit 13A Charger Port Replacement: step 8, image 1 of 1
    • Use tweezers to carefully remove the charger port cover.

  9. Sony Vaio Fit 13A Charger Port Replacement, Unplug the Port: step 9, image 1 of 2 Sony Vaio Fit 13A Charger Port Replacement, Unplug the Port: step 9, image 2 of 2
    • Gently unplug charger port from motherboard using tweezers.

Marii

Member since: 01/08/15

658 Reputation

3 Guides authored

Team

Cal Poly, Team 21-19, Maness Winter 2015 Member of Cal Poly, Team 21-19, Maness Winter 2015

CPSU-MANESS-W15S21G19

4 Members

12 Guides authored

View Statistics:

Past 24 Hours: 1

Past 7 Days: 7

Past 30 Days: 17

All Time: 4,058