
Sonos Play 5 Mid- Range Speakers Replacement

What you need

  1. Sonos Play 5 Mid- Range Speakers Replacement, Front Panel Assembly: step 1, image 1 of 1
    • Disconnect any power to the speaker and wait a few minutes for the capacitors to fully discharge.

    • Flip the speaker upside down.

    • There may be a rubber foot covering the bottom screws (not included in picture). Remove this by pulling up from one of the corners using a spudger.

    By the time you actually reached the motherboard the capacitors will already be discharged sufficiently to a safe level, so just go ahead there's no need to wait in this step.

    That said, be careful once you have the motherboard out and decide to test it on your table. The two large capacitors are directly behind the full bridge rectifier that's connected to the mains, so without load they carry the peak voltage. In Europe with 230V that means 325V, in 110V countries that means 156V (see https://en.wikipedia.org/wiki/Alternatin... for more information about RMS and peak voltages).

    Erik Mouw - Reply

  2. Sonos Play 5 Mid- Range Speakers Replacement: step 2, image 1 of 2 Sonos Play 5 Mid- Range Speakers Replacement: step 2, image 2 of 2
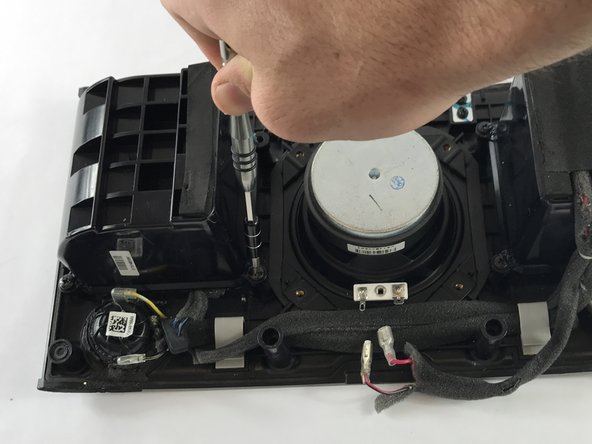
    • Remove eight 10mm Phillips #2 screws

    • Remove the bottom panel by pulling upwards.

    • Be very gentle with the ends of the three antennas. They are very fragile.

    NB: in the photograph, two antennas of the three soldered on the antenna PCBs are broken: You can see one standing upside down towards the center-right of the photograph

    Toni - Reply

    On my model, only 6 of the 8 screws hold the bottom panel. Looking at the picture above, where the screws are circles, the bottom row of 5 screws, the second and fourth screw are threaded for nuts, as opposed to the other six, which are threaded for plastics. These two screws can be removed once the bottom panel has been removed.

    Toni - Reply

    Like the previous poster said: in this step it is sufficient to remove the second and fourth screw cause these hold the front panel. Removing the front panel takes a bit of force and it is better to have the fragile WiFi antennas protected by the bottom panel.

    The remaining six screws can be removed just before step 13 (which also misses a step, see my comments over there).

    Erik Mouw - Reply

  3. Sonos Play 5 Mid- Range Speakers Replacement: step 3, image 1 of 3 Sonos Play 5 Mid- Range Speakers Replacement: step 3, image 2 of 3 Sonos Play 5 Mid- Range Speakers Replacement: step 3, image 3 of 3
    • Flip the device so that the grille is facing up.

    • Locate the line on the right side of the speaker where the grill and the plastic meet, and place your plastic opening tool in the gap.

    • Run the spudger along the gap, loosening the grille from the plastic. Repeat this process on the left side as well.

    • Gently pull up on the grille, removing it from the front panel.

    might be worth mentioning there are two strips of industrial velcro running along near the top and bottom that simply have to be pulled apart

    Adam Tibbalds - Reply

    Run the plastic opening tool under the grille to remove to pull the velcro apart. In that way you avoid bending the grille. Be careful with the speaker cones, though.

    Erik Mouw - Reply

  4. Sonos Play 5 Mid- Range Speakers Replacement: step 4, image 1 of 1
    • Remove the six 8mm Phillips #2 screws.

    • Remove the two 10mm Phillips #2 screws.

    In my unit the top two screws marked in red had a rubber plug in the hole as well. I had to remove them by sticking a knife in and carefully pulling them out.

    Adam Tibbalds - Reply

    I had the same issue but no problem getting them out.

    clarkal2000 - Reply

    I pulled them out using the corkscrew method: I drove a screw about 10mm deep into the rubber plug, then pulled up the screw. This method created way less damage than other methods i have tried.

    Toni - Reply

  5. Sonos Play 5 Mid- Range Speakers Replacement: step 5, image 1 of 2 Sonos Play 5 Mid- Range Speakers Replacement: step 5, image 2 of 2
    • Locate the line on the right side where the front panel and back panel meet. Place a plastic opening tool in the gap, and run it along the gap. Repeat this on the left side.

    • Use the opening tool to lift the front plate. If a plastic tool is not providing enough leverage, use a metal opening tool.

    • Gently pull up on the face plate to ensure it has been detached from the enclosure.

    • When pulling on the face plate be cautious because it is still connected by wires on the back of the plate.

  6. Sonos Play 5 Mid- Range Speakers Replacement: step 6, image 1 of 3 Sonos Play 5 Mid- Range Speakers Replacement: step 6, image 2 of 3 Sonos Play 5 Mid- Range Speakers Replacement: step 6, image 3 of 3
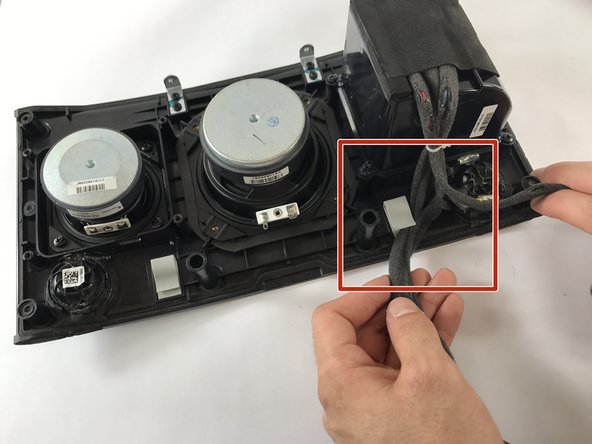
    • Lift up the front panel, forming a 90 degree angle with the back panel. Locate the locate ten pin connector shown. This is the wire that connects the front panel to back panel.

    • Press down on the small tab located on the connector. With the tab firmly pressed down, pull the connector out from its socket.

    • The faceplate assembly is now fully detached from the rest of the speaker.

    my unit didn’t have the tab in the middle of the connector. It simply had to be prised apart (I used a plastic spudger to separate the two parts of the connector) and then reconnected carefully (I used the plastic spudger again between the pcb and the case to support the pcb as it was flexing)

    Adam Tibbalds - Reply

    My unit has a white gasket between the front and back panel. It was stuck to the front panel when I opened the unit. When rebuilding the unit it was easier to remove the gasket and put it in the small ridge of the back panel.

    Erik Mouw - Reply

  7. Sonos Play 5 Mid- Range Speakers Replacement, Mid- Range Speakers: step 7, image 1 of 2 Sonos Play 5 Mid- Range Speakers Replacement, Mid- Range Speakers: step 7, image 2 of 2
    • Remove four 9.5mm Phillips #2 screws.

  8. Sonos Play 5 Mid- Range Speakers Replacement: step 8, image 1 of 1
    • Remove four 9.5mm Phillips #2 screws.

  9. Sonos Play 5 Mid- Range Speakers Replacement: step 9, image 1 of 2 Sonos Play 5 Mid- Range Speakers Replacement: step 9, image 2 of 2
    • Unplug the wires connected to the left speaker.

  10. Sonos Play 5 Mid- Range Speakers Replacement: step 10, image 1 of 1
    • Pull the left speaker up and away from the front panel.

  11. Sonos Play 5 Mid- Range Speakers Replacement: step 11, image 1 of 2 Sonos Play 5 Mid- Range Speakers Replacement: step 11, image 2 of 2
    • Remove the wires from the plastic clips on the bottom of the front panel.

  12. Sonos Play 5 Mid- Range Speakers Replacement: step 12, image 1 of 1
    • Remove four 9.5mm Phillips #2 screws.

  13. Sonos Play 5 Mid- Range Speakers Replacement: step 13, image 1 of 1
    • Remove the plastic speaker cover by lifting up and away.

  14. Sonos Play 5 Mid- Range Speakers Replacement: step 14, image 1 of 1
    • Remove four 9.5mm Phillips #2 screws.

  15. Sonos Play 5 Mid- Range Speakers Replacement: step 15, image 1 of 1
    • Remove the right mid-range speaker buy pulling up and away from the front panel.

Conclusion

To reassemble your device, follow these instructions in reverse order.

4 other people completed this guide.

Warren Girouard

Member since: 02/20/17

309 Reputation

2 Guides authored

Team

USF Tampa, Team S3-G6, Sullivan Spring 2017 Member of USF Tampa, Team S3-G6, Sullivan Spring 2017

USFT-SULLIVAN-S17S3G6

4 Members

16 Guides authored

One Comment

Thanks for posting this howto on the SonosPlay5.

I have a unit with a broken midrange speaker that needs replacing - do you have any idea where I might purchase one of these please?

Gerry - Reply

Add Comment

View Statistics:

Past 24 Hours: 1

Past 7 Days: 2

Past 30 Days: 37

All Time: 4,756