Introduction
Questo iPod è stato smontato il 10 settembre 2008.
What you need
-
-
Il nuovo iPod touch è venduto con una scatola più piccola e di plastica trasparente.
-
Qualcuno ci ha domandato se l'avevamo acceso o avevamo provato il suo nuovo software prima di smontarlo. Ma eravamo troppo impazienti per farlo.
-
-
-
Rimuovere il display di vetro e lo schermo touch.
Guys, for anyone trying to dissemble their ipor, be very carefull, there is on the top left of the ipod behind the benzel, a very thin cable that connects the benzel to the mother board. If you trying to remove the benzel, do not lift it untill you got the tape out, then carefully lift the benzel, and unplug the cable.
Hey, this is not easy... I've successfully broken the LCD on my ipt2g trying to fix a chip in the glass. the mistake occurred when i was initially popping it open. Ive spent the last two years of my life fixing cellphones for a radio shack and like to consider myself somewhat of an expert on using a pry tool to pop open anything. i made a noob mistake. the kind of simple ^@^^ i did on my first phones. this is simply not easy to do, applying to much force causes a violent opening, not enough and you fidget around until you slip up. go at it with purpose and a good mindset. hold it above something soft and never allow you hands to get sweaty. when you slip and break it, try to keep your cool and not kick a hole in drywall.
xKOMx... yo
U R so right, this is no experience for the faint of heart, I use 3 guitar picks, have been modified, used to use the Nokia tool (I'm Nokia level III certified) stil, I've manage to open 3 of this iPods.
GOOODDD, it's so difficult, please, be very careful, you'll find yourself replacing in the best case scenario the Digitizer.
Good luck
Beware of cracking glass opps!
For some reason the multi-touch stopped working after i started to remove the glass. should i pretend that i didn't try and mess with it and send it in for warranty repair or should i try again to take it apart? i don't know why it isn't working whether i nicked something or if somehow the glass isn't touching anymore or something silly like that.
Quote from bizzbobb:
Cool. I cracked my bezel too. Why aren't there any written instructions or warnings? $65 mistake. Ugh…
Actually, this warning is written across the top of the page:
"Teardowns provide a look inside a device and should not be used as disassembly instructions."
Quote from Floofy:
For some reason the multi-touch stopped working after i started to remove the glass. should i pretend that i didn't try and mess with it and send it in for warranty repair or should i try again to take it apart? i don't know why it isn't working whether i nicked something or if somehow the glass isn't touching anymore or something silly like that.
did you figure out what you did...either i have done something different or similar!
I luv this website but man what a bad set of instructions for #4. I have been repairing iPhone's for some time now and just tried my first iPod touch using these instructions....not only did I destroy the digitizer, I also destroyed the frame and the lcd! then I went to youtube and for the correct instructions. Im not blaming iFixit but a complete set of instructions would be very helpful!! oh and i still luv this site and I luv the tools I just bought off here!
Quote from chargit:
I luv this website but man what a bad set of instructions for #4. I have been repairing iPhone's for some time now and just tried my first iPod touch using these instructions....not only did I destroy the digitizer, I also destroyed the frame and the lcd! then I went to youtube and for the correct instructions. Im not blaming iFixit but a complete set of instructions would be very helpful!! oh and i still luv this site and I luv the tools I just bought off here!
Quote from bizzbobb:
Cool. I cracked my bezel too. Why aren't there any written instructions or warnings? $65 mistake. Ugh…
I dont understand it took me less than 45 mins to replace the digitizer and bezel and the contact was easy to connect btw i got the bezel and digitizer under $30 so look for a good seller!
-
-
-
Il display LCD nudo.
-
Apple dichiara dimensioni da 3,5 pollici (diagonale) con una risoluzione di 480x320 pixel con 163 pixel per pollice.
-
-
-
-
Rimozione del supporto metallico.
-
La batteria è fissata al supporto con due strisce di adesivo ma si stacca facilmente.
how do i remove the metal backing to remove the battery? do i need to buy one of your screwdrivers?
-
-
-
Il grande cavo arancione collega l'antenna WiFi (in alto a sinistra) alla scheda logica.
-
Nella parte superiore dell'immagine sopra la batteria c'è una copertura metallica. Sotto la cover c'è un chip Broadcom BCM4325 Wi-Fi e Bluetooth. Sì, è vero, Bluetooth! Apple non ha detto nulla su questo pubblicamente.
-
Questo particolare chipset Bluetooth supporta BT2.1 + EDR. Non si sa ancora se Apple ha incluso il supporto ad A2DP, che consentirebbe l'uso di cuffie stereo.
-
Numeri parte: BCM4325GKWBG CD0825 B76332 P40 SF
Quote from Qman:
The bluetooth could be a way of tracking people or something i think someone is controlling my IPT because it will close out to the home screen in the middle of a game and that makes me mad anybody know why it does that and if it can be fixed?
That is because Ram inside the device is getting so hot that it is nearly going to overheat so the ipod cleverly shuts down the application so it can free up RAM.
Quote from technobot:
That is because Ram inside the device is getting so hot that it is nearly going to overheat so the ipod cleverly shuts down the application so it can free up RAM.
an add: restart the device to really clear the RAM.
Quote from technobot:
That is because Ram inside the device is getting so hot that it is nearly going to overheat so the iPod cleverly shuts down the application so it can free up RAM.
Its not because the ram is overheating, the device doesnt generate enough heat for that to even be a factor, its because the ram is getting full.
Quote from Qman:
The bluetooth could be a way of tracking people or something i think someone is controlling my IPT because it will close out to the home screen in the middle of a game and that makes me mad anybody know why it does that and if it can be fixed?
Nothing about the RAM getting hot. It's just running low on memory. Apps start closing when the device has about less than 10 MB RAM available. But jailbreaking solves this, there are tweaks that allow for expanding virtual memory, e.g. iMemory Enhancer from Gumball Tech repo.
-
-
-
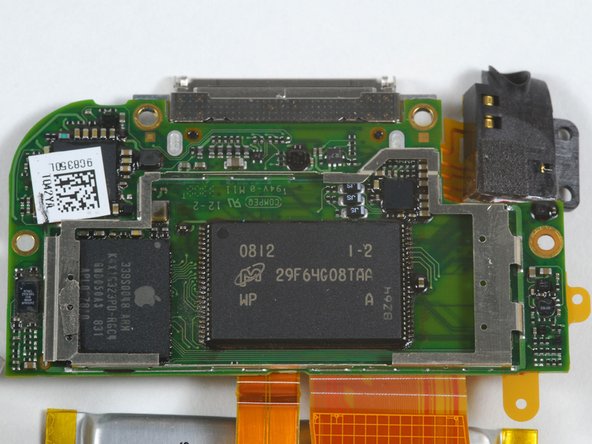
Si può vedere il connettore dock al centro e il jack cuffie a destra.
Quote from pteotexz:
Do you have to dissasemble the whole board just to get to the earphone jack? I need to replace it... it looks like it requires soldering?
I have the same question.
hal
Quote from pteotexz:
Do you have to dissasemble the whole board just to get to the earphone jack? I need to replace it... it looks like it requires soldering?
Did anyone resoldered this? Is it difficult?
-
-
-
Fine.
Where does one purchase a replacement back panel?
Thanks! Broke mine down too, except i used a flat screwdriver and a pocketknife! :)
not as clean as your teardown, but quite the same. Great job!
Where might one purchase a new back plate?
-


Special thanks to these translators:
94%


These translators are helping us fix the world! Want to contribute?
Start translating ›
3 Comments
Broke the screen.
probaly should of used a hair dryer
i need all the parts of ipod touch 2nd generation
hard to do really