
Shark Navigator Lift-Away Deluxe NV360 Roller Brush Replacement

What you need

  1. Shark Navigator Lift-Away Deluxe NV360 Roller Brush Replacement, Roller Brush Belt: step 1, image 1 of 2 Shark Navigator Lift-Away Deluxe NV360 Roller Brush Replacement, Roller Brush Belt: step 1, image 2 of 2
    • Lay the vacuum down by hand and locate the roller brush underneath the vacuum cleaner.

  2. Shark Navigator Lift-Away Deluxe NV360 Roller Brush Replacement: step 2, image 1 of 3 Shark Navigator Lift-Away Deluxe NV360 Roller Brush Replacement: step 2, image 2 of 3 Shark Navigator Lift-Away Deluxe NV360 Roller Brush Replacement: step 2, image 3 of 3
    • Insert the metal spudger between the inside side of the wheel and the plastic body.

    • Push the metal spudger away from you to pop the wheels out.

    • Repeat the step to remove the other wheel on the other side.

  3. Shark Navigator Lift-Away Deluxe NV360 Roller Brush Replacement: step 3, image 1 of 1
    • Remove the six 15mm screws using the PH1 screwdriver.

    There are also 2 screws up near the top of the picture past the wheels. Note, there are 2 wheel screws as well, but you don’t need to remove those. You want the 2 deepest screws at very top. Also note, the top left most screw circled in the picture above is the only screw longer than all the rest because of the design.

    Bryan Hawkins - Reply

    I have these as well. Reading the same in the comments was reassuring! You can see the holes in the photo where the screws are missing from.

    Andrew Reed -

    Mine has tore security screws with the pins in the center.

    sval229 - Reply

    I had to remove 10 screws before Step 5 worked for me. But it’s fixed! Gratifying.

    Janet - Reply

    Before you start check the screw heads, on ours they were TR20 Torx Security.
    As well as two extra screws hiding up near the main wheels.

    LordGarrey - Reply

  4. Shark Navigator Lift-Away Deluxe NV360 Roller Brush Replacement: step 4, image 1 of 2 Shark Navigator Lift-Away Deluxe NV360 Roller Brush Replacement: step 4, image 2 of 2
    • Move the blue fulcrum connecting the bottom and the main body of the vacuum cleaner back and forth to loosen up crevice between the two halves of the roller brush enclosure.

    The separation is not occurring with multiple tries to the point of stressing the plastic.

    Bob - Reply

    All 6 screws removed

    Bob - Reply

    I'm having the same problem, all 6 screws removed and I cannot get the pieces apart without breaking the plastic, feels like there is something else holding the two parts together behind the main wheels

    Brock Josephson - Reply

    There are two more screws down in the back below the wheel assembly that have to be removed as well because I also roughed up my plastic before taking them out and then it came right apart.

    Pam Osterhoudt - Reply

    What Pam said. There are 2 extra screws behind the wheels, next to the other 2 screws at the back of the housing.

    Enzo the Baker - Reply

    Shark may make a good vacuum, but I don't know if I will buy one again or suggest for anyone to buy one. When they make routine replacements so hard

    hdarnell15@yahoo.com - Reply

    Amen, darnell.

    IVAN BJELOPERA -

    Plus, the clip that keeps the top lid of the debris collecter closed also has to bear the full weight of the appliance when it is picked up by the handle that is part of the lid. The clip is much too flimsy to do that often and breaks easily. POOR DESIGN‼️‼️‼️and POOR ENGINEERING but good news for the replacement parts profit center. 😾🤔🤬🤥👹👎🏻👎🏻👎🏻

    Unique username - Reply

  5. Shark Navigator Lift-Away Deluxe NV360 Roller Brush Replacement: step 5, image 1 of 3 Shark Navigator Lift-Away Deluxe NV360 Roller Brush Replacement: step 5, image 2 of 3 Shark Navigator Lift-Away Deluxe NV360 Roller Brush Replacement: step 5, image 3 of 3
    • Insert the plastic opening tool into the crevice between the blue and the dark grey plastic frames enclosing the roller brush.

    • Apply an outward force throughout and all around the gap in order to separate the two plastic frames.

    I did not find it necessary to pry the pieces apart, but your experience may very.

    Bryan Hawkins - Reply

    I cannot get the grey frame to separate. It seems stuck around the wheel area. All other areas are separated. I am afraid I will crack the 'plastic if I apply any force. Any thoughts?

    Mary T Sullivan - Reply

    Did you remove all 10 screws? Yes, there are a lot more than 6.

    IVAN BJELOPERA - Reply

  6. Shark Navigator Lift-Away Deluxe NV360 Roller Brush Replacement: step 6, image 1 of 2 Shark Navigator Lift-Away Deluxe NV360 Roller Brush Replacement: step 6, image 2 of 2
    • Lift the grey frame off the bottom of the vacuum cleaner with your hands and place it on a flat surface.

  7. Shark Navigator Lift-Away Deluxe NV360 Roller Brush Replacement: step 7, image 1 of 3 Shark Navigator Lift-Away Deluxe NV360 Roller Brush Replacement: step 7, image 2 of 3 Shark Navigator Lift-Away Deluxe NV360 Roller Brush Replacement: step 7, image 3 of 3
    • Lift the roller brush slightly upwards using your hand.

    • Take one side of the black roller brush belt off by pulling it over the end of the roller brush with your other hand.

  8. Shark Navigator Lift-Away Deluxe NV360 Roller Brush Replacement: step 8, image 1 of 1
    • Remove the roller brush belt with your hands by sliding it of the end of the motor.

  9. Shark Navigator Lift-Away Deluxe NV360 Roller Brush Replacement, Roller Brush: step 9, image 1 of 2 Shark Navigator Lift-Away Deluxe NV360 Roller Brush Replacement, Roller Brush: step 9, image 2 of 2
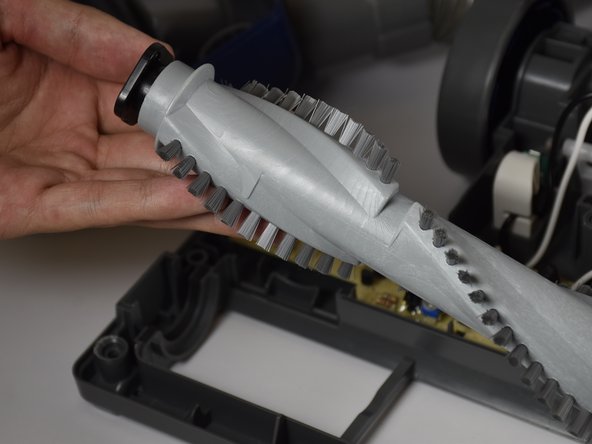
    • Remove the roller brush from the plastic frame using your hands by lifting it away.

    Excellent! I should have followed your steps BEFORE I almost broke it!

    Laura Fisher - Reply

Conclusion

To reassemble your device, follow these instructions in reverse order.

13 other people completed this guide.

Elena Postupalskaya

Member since: 10/02/17

1,159 Reputation

6 Guides authored

Team

Cal Poly, Team S15-G2, Livingston Fall 2017 Member of Cal Poly, Team S15-G2, Livingston Fall 2017

CPSU-LIVINGSTON-F17S15G2

3 Members

14 Guides authored

3 Comments

What is the part number for the roller brush?

Sean E. Belew - Reply

what is the part number for the motor and motherboard

benjpatt - Reply

Worst screw types. You suck

Ace - Reply

Add Comment

View Statistics:

Past 24 Hours: 4

Past 7 Days: 112

Past 30 Days: 551

All Time: 43,247