
Sega Game Gear Screen Replacement

What you need

  1. Sega Game Gear Screen Replacement, Battery: step 1, image 1 of 1
    • Place your device upside down and locate the two battery compartments.

  2. Sega Game Gear Screen Replacement: step 2, image 1 of 1
    • Press on the tabs at the bottom of the battery covers then lift up to remove.

    • Remove batteries if they are present.

  3. Sega Game Gear Screen Replacement, Case: step 3, image 1 of 1
    • Remove the following screws:

    • Six Phillips screws

    • One 4.5 mm Gamebit screw

    It says remove 7 Philips screws, the picture shows 6 but one is incorrect.

    The thread below the label has no screw, but there is another one in the other battery compartment.

    The hole below the label is for a security bolt when stores put them on display.

    rs.beast - Reply

    The screw hole in the bottom center is for the PowerBack. Also there are not 7 screws there are only 6

    Electrohacker - Reply

  4. Sega Game Gear Screen Replacement: step 4, image 1 of 1
    • Use tweezers to take all other screws out.

  5. Sega Game Gear Screen Replacement: step 5, image 1 of 2 Sega Game Gear Screen Replacement: step 5, image 2 of 2
    • Gently open the case by unfolding it over the top of the Sega Game Gear.

    • Do not pull the back of the case away, as cables are connected between both sides.

  6. Sega Game Gear Screen Replacement: step 6, image 1 of 3 Sega Game Gear Screen Replacement: step 6, image 2 of 3 Sega Game Gear Screen Replacement: step 6, image 3 of 3
    • Carefully unplug the 2 white-tipped connectors on the top cover.

    Il faut aussi débrancher le connecteur du haut parleur (2 broches, en haut à droite).

    Arnaud Melun - Reply

    There is a third cable on the right side of the top half in this picture which is the speaker. Unplug that too.

    Electrohacker - Reply

  7. Sega Game Gear Screen Replacement, Screen: step 7, image 1 of 1
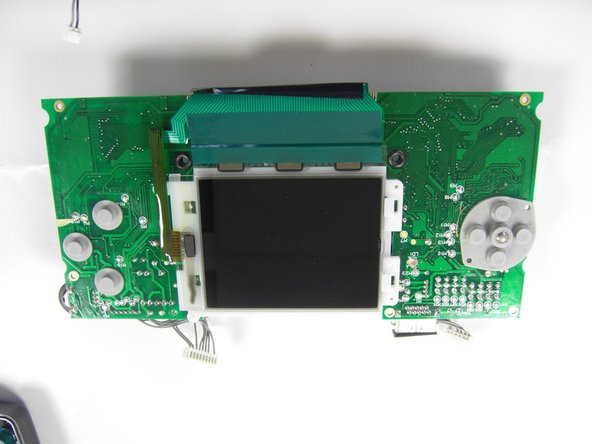
    • Unscrew all the marked screws.

    There are two more screws at the top just to the left and right of the screen you can see clearly in this photo (the ones on the green PCB, not the ones on the screen support). Unscrew those too. All the screws have a white circle printed around them.

    Electrohacker - Reply

  8. Sega Game Gear Screen Replacement: step 8, image 1 of 1
    • Slide the logic board out from under the circular black fastener at the top-left corner of the case.

    There is no circular black fastener. It's the brightness control wheel and it's attached to the board.

    rs.beast - Reply

  9. Sega Game Gear Screen Replacement: step 9, image 1 of 1
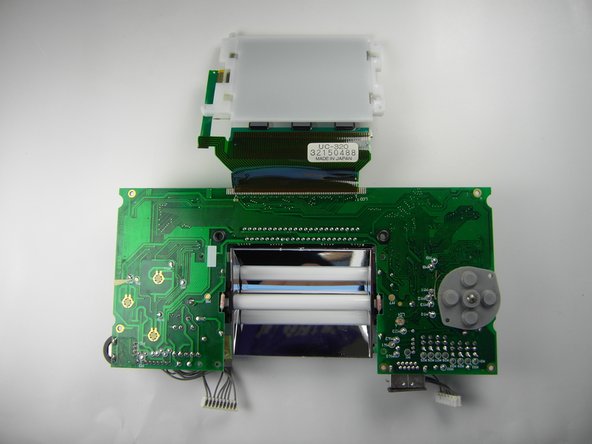
    • Place the board onto a flat surface.

    • Small plastic buttons may fall off during this process, save them in a container or a place where they could be found later on.

    There is a gasket around the screen which may also stick to the screen. Be careful not to lose, stretch, or damage that.

    Electrohacker - Reply

  10. Sega Game Gear Screen Replacement: step 10, image 1 of 1
    • Unscrew the marked screws.

    • Flip the board, having its back facing up.

    • Hold onto the screen in the back, as it will flip open if not held onto.

  11. Sega Game Gear Screen Replacement: step 11, image 1 of 2 Sega Game Gear Screen Replacement: step 11, image 2 of 2
    • Make sure the screen is towards the bottom, as indicated in the second picture.

  12. Sega Game Gear Screen Replacement: step 12, image 1 of 2 Sega Game Gear Screen Replacement: step 12, image 2 of 2
    • Gently open the screen up.

    • The screen will not come out all the way since it is glued onto the top side.

Conclusion

To reassemble your device, follow these instructions in reverse order.

13 other people completed this guide.

Lauren Thurston

Member since: 04/15/10

431 Reputation

3 Guides authored

Team

Cal Poly, Team 28-33, Regan Spring 2010 Member of Cal Poly, Team 28-33, Regan Spring 2010

CPSU-REGAN-S10S28G33

5 Members

13 Guides authored

9 Comments

any one know where to get a new display that wont bleed me dry?

isaiah bellamy (masta ike) - Reply

Due to the nature a Game Gear screen attaches, a ribbon directly soldered to the mainboard, replacing it requires a soldering iron and some fairly advanced technique.

This guide, titled “Sega Game Gear Screen Replacement”, only takes us to the point you remove the ribbon. There is much work left.

Anthony Bessel - Reply

so, uh, is there a more comprehensive version somewhere?

rollin -

Does the screen get fixed at the end?

Caedmon O’Brien - Reply

SadlySadly, in step 7 you missed a screw location

talliesine - Reply

there’s actually 2 more screws, one above the transformer and one on the left of the EXT port. this guide is sooooo incomplete, it’s a shame.

Walter Comunello -

I’d like to see a capacitor replacement guide, I’m in the process of doing my early model Game Gear.

Also, how about a screen LCD upgrade guide?

They make modern LCD’s for these that eliminate the fluorescent bulbs that suck the batteries dry in a hurry. Lol

Can’t wait to get mine back up and running after several caps started to leak, video was non-existent and sound was very low and poor.

jeffrey griffith - Reply

this guide is stupid

Stephen Smith - Reply

so in conclusion this is half a guide

Stephen Smith - Reply

Add Comment

View Statistics:

Past 24 Hours: 13

Past 7 Days: 86

Past 30 Days: 285

All Time: 65,084