Introduction
Use this guide to replace a worn-out or dead battery in your Samsung Galaxy Watch3.
If your battery is swollen, take appropriate precautions. For your safety, discharge your battery below 25% before disassembling your smartwatch. This reduces the risk of a dangerous thermal event if the battery is accidentally damaged during the repair.
You’ll need replacement adhesive to reattach a new battery when reassembling the device.
What you need
-
-
Before starting repairs, take your watch off the charger and power it down.
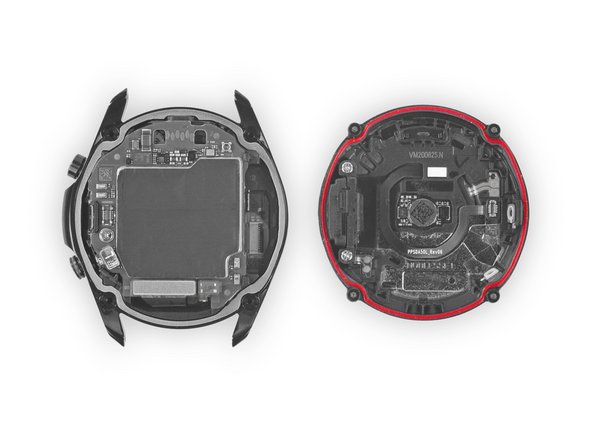
-
Use a Tri-point Y00 driver to unfasten the four screws on the back of the watch.
-
-
-
Insert an opening tool between the back cover and the metal housing.
-
Twist the opening tool to create a wider gap.
-
-
-
Lay the watch face down.
-
Carefully lift the back cover up from the edge with the buttons to access the sensor connector.
-
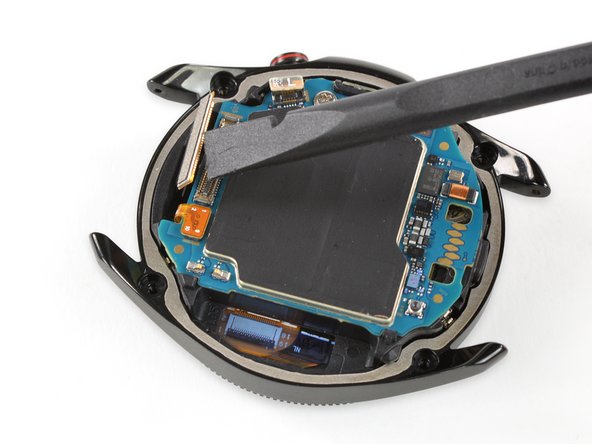
Use the flat end of a spudger to pry up and disconnect the sensor flex cable from the motherboard.
-
-
-
-
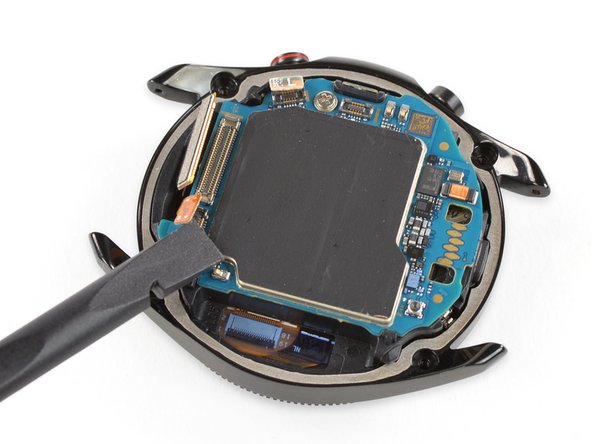
Use the flat end of a spudger to disconnect the flex cables of the side buttons, the display and the hall sensor.
-
-
-
The motherboard is held in place by two small plastic clips.
-
Use a pair of blunt tweezers to lift the motherboard out from underneath the plastic clips towards the buttons.
-
Remove the motherboard.
Question, I had a demo Watch3. I tried to swap out the software and ended up putting it into Odem Mode. It’s bricked right now, any idea or help to fix it?
-
-
-
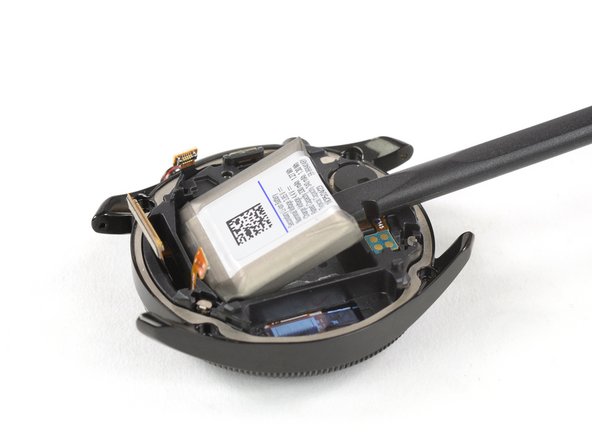
Place the flat end of a supdger in the small gap between the plastic frame and the battery, opposite to the display cable.
-
Carefully lever the battery up and out of its recess.
-
-
-
Lift the battery up a little in order to access its glued down connector cable.
-
Use a pair of blunt tweezers to lift up the battery connector which is secured with some light adhesive.
-
Remove the battery.
Herzlichen Dank für die hervorragende Anleitung. Ich habe mich genau daran gehalten und es hat problemlos geklappt.
Wichtig ist: guten Schraubendreher Y00 verwenden, nicht die billigen kleinen Plastik Schraubendreher die oft beim Akku dabei sind.
-


If possible, turn on your device and test your repair before installing new adhesive and resealing.
Secure the new battery with pre-cut adhesive or double-sided adhesive tape. In order to position it correctly, apply the new adhesive into the device at the places where the old adhesive was located, not directly onto the battery.
To reassemble your device, follow these instructions in reverse order.
For optimal performance, calibrate your newly installed battery: Charge it to 100% and keep charging it for at least 2 more hours. Then use your device until it shuts off due to low battery. Finally, charge it uninterrupted to 100%.
Repair didn’t go as planned? Try some basic troubleshooting, or ask our Answers community for help.
Take your e-waste to an R2 or e-Stewards certified recycler.
Cancel: I did not complete this guide.
17 other people completed this guide.

Team

15 Comments
Once I had the correct tools and replacement battery, fixing was easy. Tyvm!
One question, where can I find an authorized battery for this watch? or one that you highly recommend. Thanks.
**Edit - Your store doesn’t have a 45mm battery for my Galaxy Watch 3. Only 42 and 46.
The 42 and 46 mm models are the first Galaxy Watch sizes. We ’re working on getting the Watch3 batteries and parts but it may take some time.
Hi, is it possible to put the battery from samsung watch 472mAh, on samsung watch 3, instead of 340mAh?
Hi Andrey, short answer is no—although basically a good idea. But even if you cut the battery contact plate to fit (cut off the part with the alignment hole) its polarity is inverted. The Watch3 contact plate has -/+ (noted under the cable) whereas the original has +/-. Also the original Galaxy Watch battery is much bigger than the one in the Watch3. So it won’t fit inside the recess. Here is an image with the Watch3 battery on top of the original battery.
Hi Tobias, thanks for the reply, I don't think the pins are a problem, the wire can be turned over and the tab with the hole, cut off. the pins will be pressed by the motherboard. I'm more interested in the size of the 472mAl battery and the inside of the battery compartment of the Watch 3?
Also I wonder if it would be a problem if the battery has a 472mAl, 1.27Wh and the 340mAl, 1.8Wh ?
Unfortunately, I don't have the opportunity to measure and test it myself.
Thanks.
Here’s a photo for you with some measurements. I’m afraid you won’t be able to fit the bigger Watch1 battery inside the Watch3 frame
Great instructions which were easy to follow. Side note is I was doing the battery replacement on the 41mm instead of the 45mm (did not find one specifically for the 41mm version) and the battery it uses is the same one in Samsung Galaxy Watch Active2 40mm (EB-BR830ABY). Just in case anyone else was wondering.
Do you mean that the battery EB-BR840ABY for the 45mm is compatible with the EB-BR830ABY for the 41mm. So I could put the 840 in my 41mm?
Are there batteries for the smr850 yet??
It is nice that they give instructions on how to remove the battery with the right tools it can be accomplished. However reassembly should be addressed for people who have never done this before. I had difficulty making the last connection on to the motherboard with the connector that is attached to the back cover. I tried using my dominant hand several times to no avail. Apparently you need your dominant hand to hold the cover steady while you use your fingers from your non-dominant hand to press down to connector. My Water Seal adhered to the watch and I had to carefully reuse a spudger to remove it and then reshape it so it would fit back onto the back cover. And then during reassembly I had to carefully make sure that that part of the water seal was carefully in place before screwing the the cover down.
Tienen la batería disponible para el modelo de Samsung watch 3 de 41mm modelo de la batería: EB-BR830ABY
Is the battery EB-BR840ABY for the 45mm is compatible with the EB-BR830ABY for the 41mm. So I could put the 840 in my 41mm?
I guess what Bradley was saying is, that the battery from the Active 2 (40mm) is the same battery used in the Watch 3 (41mm).
You very likely can NOT use the battery from the Galaxy Watch 3 (44mm) in the smaller Galaxy Watch 3 (41mm) model.
The Galaxy 3 has two variants - a 41mm case, and a 45mm case. The batteries are different. The basic steps for disassembly and battery replacement are the same for both, but make sure you get the correct battery. The size is shown on the case, in small print. Please don't assume you have a 45mm case based on these instructions.
I heeded your advice - and now need another screw because it fell out!!!
Paul - Reply
I must have stripped the screws out or either the dirt and sweat is so packed into the screw i can't get a good bite to unscrew the screws. What can I do about this? This watch battery DOES NOT hold a charge for more than 5min, should I trash the watch?
ShaneWizdum - Reply