
Samsung Galaxy Tab S2 9.7 SM-T813 Rear Camera Replacement

What you need

  1. Samsung Galaxy Tab S2 9.7 SM-T813 Rear Camera Replacement, Screen: step 1, image 1 of 1
    • Heat the iOpeners in a microwave for 1-2 minutes.

    • The iOpeners will be hot. Use caution and hold the tabs on the ends.

    • Place heated iOpeners on screen edges to heat the adhesive.

    • For more detailed instructions on how to use the iOpeners, please refer to the iOpener Instructions.

  2. Samsung Galaxy Tab S2 9.7 SM-T813 Rear Camera Replacement: step 2, image 1 of 1
    • Separate the screen assembly from the back by wedging the picks between the two components.

    • Slide the picks along the edge and leave them holding the device open all around the edges.

  3. Samsung Galaxy Tab S2 9.7 SM-T813 Rear Camera Replacement: step 3, image 1 of 1
    • Place suctioning device near the corner of the screen and gently lift up to create a gap between the front panel assembly and the back.

    • Insert the picks to hold the two components apart once a gap is created.

  4. Samsung Galaxy Tab S2 9.7 SM-T813 Rear Camera Replacement: step 4, image 1 of 1
    • Once all edges have been disconnected, carefully lift the screen off by pulling one side up.

    • Be careful not to cut yourself. Any broken glass from the screen will be sharp.

  5. Samsung Galaxy Tab S2 9.7 SM-T813 Rear Camera Replacement: step 5, image 1 of 1
    • Using the tweezers, gently peel up on the silver tape covering the connector.

  6. Samsung Galaxy Tab S2 9.7 SM-T813 Rear Camera Replacement: step 6, image 1 of 1
    • Use the plastic opening tool to get under the connector piece. This will allow you to remove the front panel assembly from the rest of the device.

  7. Samsung Galaxy Tab S2 9.7 SM-T813 Rear Camera Replacement: step 7, image 1 of 1
    • Detach the connecter from the inside of the device.

    • Lift the screen to separate the front panel assembly from the rest of the device.

  8. Samsung Galaxy Tab S2 9.7 SM-T813 Rear Camera Replacement, Central Panel: step 8, image 1 of 2 Samsung Galaxy Tab S2 9.7 SM-T813 Rear Camera Replacement, Central Panel: step 8, image 2 of 2
    • Remove the 17 silver 3.0 mm Phillips head screws located around the edge of the device using the screwdriver.

    • For additional information on how to remove screws, please refer to Screwdriver Best Practices.

  9. Samsung Galaxy Tab S2 9.7 SM-T813 Rear Camera Replacement: step 9, image 1 of 2 Samsung Galaxy Tab S2 9.7 SM-T813 Rear Camera Replacement: step 9, image 2 of 2
    • Remove the 2 centrally-located black 3.0 mm Phillips head screws using the screwdriver.

  10. Samsung Galaxy Tab S2 9.7 SM-T813 Rear Camera Replacement: step 10, image 1 of 2 Samsung Galaxy Tab S2 9.7 SM-T813 Rear Camera Replacement: step 10, image 2 of 2
    • Use the plastic opening tools to gently separate the middle panel from the rest of the device.

    • Move the tool around under the edges until you can remove the panel by hand.

    • Popping/cracking noises are completely normal. These are the sounds of the panel separating from the rest of the device.

  11. Samsung Galaxy Tab S2 9.7 SM-T813 Rear Camera Replacement: step 11, image 1 of 3 Samsung Galaxy Tab S2 9.7 SM-T813 Rear Camera Replacement: step 11, image 2 of 3 Samsung Galaxy Tab S2 9.7 SM-T813 Rear Camera Replacement: step 11, image 3 of 3
    • Lift up the central panel starting from one corner to separate it from the rest of the device.

    • Pull towards the top of the device as you lift out to ensure that the charging port connection is not damaged.

  12. Samsung Galaxy Tab S2 9.7 SM-T813 Rear Camera Replacement, Rear Camera: step 12, image 1 of 3 Samsung Galaxy Tab S2 9.7 SM-T813 Rear Camera Replacement, Rear Camera: step 12, image 2 of 3 Samsung Galaxy Tab S2 9.7 SM-T813 Rear Camera Replacement, Rear Camera: step 12, image 3 of 3
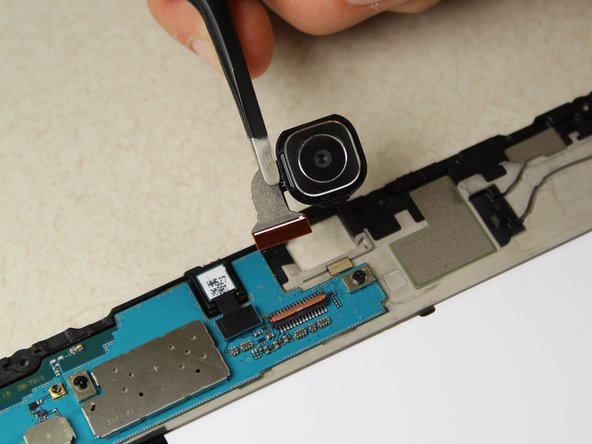
    • Using the tweezers, remove the green protective film from the connector between the rear camera and the motherboard.

  13. Samsung Galaxy Tab S2 9.7 SM-T813 Rear Camera Replacement: step 13, image 1 of 2 Samsung Galaxy Tab S2 9.7 SM-T813 Rear Camera Replacement: step 13, image 2 of 2
    • Pull up the orange flap on the connector using the pointed edge of the spudger.

    • Pulling out the connector without the flap up could damage the connector.

  14. Samsung Galaxy Tab S2 9.7 SM-T813 Rear Camera Replacement: step 14, image 1 of 2 Samsung Galaxy Tab S2 9.7 SM-T813 Rear Camera Replacement: step 14, image 2 of 2
    • Pull the connector out of the slot using tweezers and remove the camera.

Conclusion

To reassemble your device, follow these instructions in reverse order.

2 other people completed this guide.

Nash Elder

Member since: 04/18/18

761 Reputation

4 Guides authored

Team

Cal Poly, Team S16-G5, Livingston Spring 2018 Member of Cal Poly, Team S16-G5, Livingston Spring 2018

CPSU-LIVINGSTON-S18S16G5

5 Members

12 Guides authored

0 Comments

Add Comment

View Statistics:

Past 24 Hours: 0

Past 7 Days: 0

Past 30 Days: 4

All Time: 714