
Samsung Galaxy Tab 8.9 Vibration Motor Replacement

What you need

  1. Samsung Galaxy Tab 8.9 Vibration Motor Replacement, Insert Opening tool: step 1, image 1 of 1
    • Insert a plastic opening tool between the back cover and screen of the Samsung Galaxy Tab 8.9 (as indicated in the photograph).

  2. Samsung Galaxy Tab 8.9 Vibration Motor Replacement, Insert second tool: step 2, image 1 of 1
    • Insert a second plastic opening tool 6 cm (~2.4 inches) away from the first tool.

  3. Samsung Galaxy Tab 8.9 Vibration Motor Replacement: step 3, image 1 of 1
    • Slide the second plastic opening tool along the edge of the device to separate the back cover.

  4. Samsung Galaxy Tab 8.9 Vibration Motor Replacement: step 4, image 1 of 1
    • Using your hands, remove the back cover.

  5. Samsung Galaxy Tab 8.9 Vibration Motor Replacement, Battery: step 5, image 1 of 1
    • Insert a plastic opening tool between the back cover and the screen of the Samsung Galaxy Tab 8.9.

  6. Samsung Galaxy Tab 8.9 Vibration Motor Replacement: step 6, image 1 of 1
    • 6 cm [2 in] away from the first plastic opening tool, insert a second plastic opening tool between the back cover and the screen.

  7. Samsung Galaxy Tab 8.9 Vibration Motor Replacement: step 7, image 1 of 1
    • Slide the second plastic opening tool along the edge of the device to separate the back cover from the screen.

  8. Samsung Galaxy Tab 8.9 Vibration Motor Replacement: step 8, image 1 of 1
    • Use your hands to open the back cover.

  9. Samsung Galaxy Tab 8.9 Vibration Motor Replacement, Remove Green Tape: step 9, image 1 of 3 Samsung Galaxy Tab 8.9 Vibration Motor Replacement, Remove Green Tape: step 9, image 2 of 3 Samsung Galaxy Tab 8.9 Vibration Motor Replacement, Remove Green Tape: step 9, image 3 of 3
    • Use tweezers to peel up the green tape located on top of the two flexible ribbon cables.

  10. Samsung Galaxy Tab 8.9 Vibration Motor Replacement: step 10, image 1 of 2 Samsung Galaxy Tab 8.9 Vibration Motor Replacement: step 10, image 2 of 2
    • Insert a spudger under the orange tab.

    • Gently pry up the tab to disconnect the black flexible ribbon cable from the motherboard.

  11. Samsung Galaxy Tab 8.9 Vibration Motor Replacement: step 11, image 1 of 3 Samsung Galaxy Tab 8.9 Vibration Motor Replacement: step 11, image 2 of 3 Samsung Galaxy Tab 8.9 Vibration Motor Replacement: step 11, image 3 of 3
    • Carefully pull out the yellow flexible ribbon cable to disconnect it from the motherboard.

  12. Samsung Galaxy Tab 8.9 Vibration Motor Replacement, Disconnect Battery from MotherBoard: step 12, image 1 of 3 Samsung Galaxy Tab 8.9 Vibration Motor Replacement, Disconnect Battery from MotherBoard: step 12, image 2 of 3 Samsung Galaxy Tab 8.9 Vibration Motor Replacement, Disconnect Battery from MotherBoard: step 12, image 3 of 3
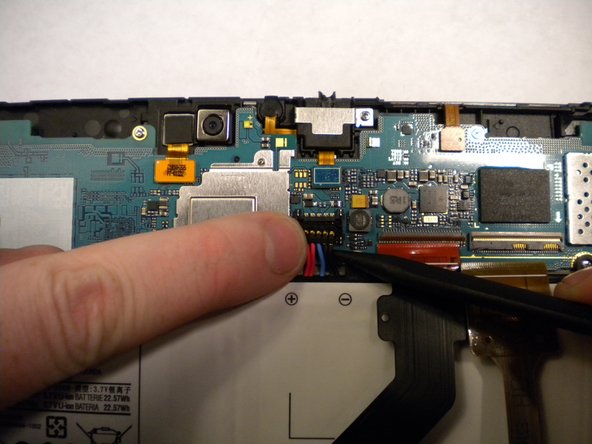
    • Insert the spudger under the red, black, and white cables.

    • Pry up and detach the battery from the motherboard.

  13. Samsung Galaxy Tab 8.9 Vibration Motor Replacement: step 13, image 1 of 1
    • Use a Phillips #00 screwdriver to remove the nine 1 mm screws located around the battery.

  14. Samsung Galaxy Tab 8.9 Vibration Motor Replacement, Remove the Battery: step 14, image 1 of 3 Samsung Galaxy Tab 8.9 Vibration Motor Replacement, Remove the Battery: step 14, image 2 of 3 Samsung Galaxy Tab 8.9 Vibration Motor Replacement, Remove the Battery: step 14, image 3 of 3
    • Use a spudger to lift up and separate the battery from its housing.

  15. Samsung Galaxy Tab 8.9 Vibration Motor Replacement, Motherboard: step 15, image 1 of 3 Samsung Galaxy Tab 8.9 Vibration Motor Replacement, Motherboard: step 15, image 2 of 3 Samsung Galaxy Tab 8.9 Vibration Motor Replacement, Motherboard: step 15, image 3 of 3
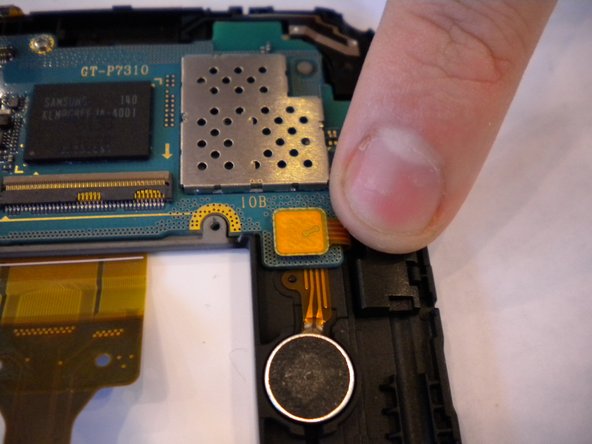
    • Locate the motherboard and 5 connectors on it.

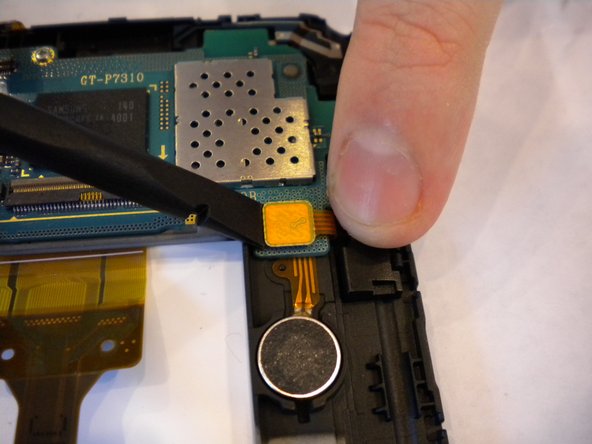
    • Pry up and detach the connector from the motherboard using the flat edge of the spudger.

    • Repeat for the 4 remaining connectors.

  16. Samsung Galaxy Tab 8.9 Vibration Motor Replacement: step 16, image 1 of 3 Samsung Galaxy Tab 8.9 Vibration Motor Replacement: step 16, image 2 of 3 Samsung Galaxy Tab 8.9 Vibration Motor Replacement: step 16, image 3 of 3
    • Using the Phillips #00 screwdriver, unscrew the 3 screws (1mm) that are located near:

    • Camera

    • Power and volume buttons

    • Tilt sensor

  17. Samsung Galaxy Tab 8.9 Vibration Motor Replacement: step 17, image 1 of 3 Samsung Galaxy Tab 8.9 Vibration Motor Replacement: step 17, image 2 of 3 Samsung Galaxy Tab 8.9 Vibration Motor Replacement: step 17, image 3 of 3
    • Using the flat edge of the spudger, pry and lift up the motherboard.

  18. Samsung Galaxy Tab 8.9 Vibration Motor Replacement: step 18, image 1 of 2 Samsung Galaxy Tab 8.9 Vibration Motor Replacement: step 18, image 2 of 2
    • Pull away the motherboard from the housing.

  19. Samsung Galaxy Tab 8.9 Vibration Motor Replacement, Vibration Motor: step 19, image 1 of 1
    • Use tweezers to grab wire lead and gently lift to release glue holding wire lead to housing.

  20. Samsung Galaxy Tab 8.9 Vibration Motor Replacement: step 20, image 1 of 1
    • Use opening tool to pry motor from housing.

Conclusion

To reassemble your device, follow these instructions in reverse order.

Eric Bird

Member since: 05/09/17

543 Reputation

5 Guides authored

Team

IUPUI, Team S4-G2, Harley Spring 2017 Member of IUPUI, Team S4-G2, Harley Spring 2017

IUPUI-HARLEY-S17S4G2

4 Members

10 Guides authored

0 Comments

Add Comment

View Statistics:

Past 24 Hours: 0

Past 7 Days: 0

Past 30 Days: 0

All Time: 196