
Samsung Galaxy Tab 4 8.0 Verizon Rear Case Replacement

What you need

  1. Samsung Galaxy Tab 4 8.0 Verizon Rear Case Replacement, Rear Case: step 1, image 1 of 3 Samsung Galaxy Tab 4 8.0 Verizon Rear Case Replacement, Rear Case: step 1, image 2 of 3 Samsung Galaxy Tab 4 8.0 Verizon Rear Case Replacement, Rear Case: step 1, image 3 of 3
    • Before disassembling your Samsung Galaxy Tab 4 8.0, be sure it is powered off.

    • At the top of the tablet, nudge the blue plastic opening tool between the back plastic casing and the front panel's metal rim.

    • Do not use excessive force when prying the clips, fastening the casing together, open because they can easily break.

  2. Samsung Galaxy Tab 4 8.0 Verizon Rear Case Replacement: step 2, image 1 of 2 Samsung Galaxy Tab 4 8.0 Verizon Rear Case Replacement: step 2, image 2 of 2
    • Continue prying the blue plastic opening tool along the perimeter of the tablet to separate the back plastic casing from the front assembly panel.

    • As right-handers, we found it easiest to move clockwise and use more pressure around the corners to facilitate the process.

    • You might hear several popping noises caused by the plastic clips coming undone.

  3. Samsung Galaxy Tab 4 8.0 Verizon Rear Case Replacement: step 3, image 1 of 2 Samsung Galaxy Tab 4 8.0 Verizon Rear Case Replacement: step 3, image 2 of 2
    • To avoid damaging the screen, gently set the tablet with the LCD screen faced down.

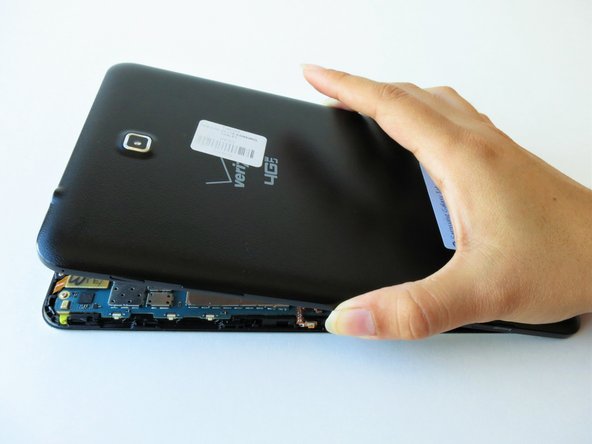
    • Firmly grasp the back plastic casing and lift it away from the front assembly panel.

Ofelia Cruz

Member since: 09/14/15

1,119 Reputation

5 Guides authored

Team

CSU Fullerton, Team 1-3, Bruce Fall 2015 Member of CSU Fullerton, Team 1-3, Bruce Fall 2015

CSUF-BRUCE-F15S1G3

4 Members

12 Guides authored

View Statistics:

Past 24 Hours: 0

Past 7 Days: 2

Past 30 Days: 2

All Time: 893