
Samsung Galaxy Tab 3 8.0 Motherboard Replacement

What you need

  1. Samsung Galaxy Tab 3 8.0 Motherboard Replacement, Battery - Open up the tablet: step 1, image 1 of 2 Samsung Galaxy Tab 3 8.0 Motherboard Replacement, Battery - Open up the tablet: step 1, image 2 of 2
    • Start out by separating the screen from the back cover using the larger plastic opening tool to pry them apart.

    • Be careful when removing the screen as negligence can cause damage.

  2. Samsung Galaxy Tab 3 8.0 Motherboard Replacement, Remove Back Cover: step 2, image 1 of 2 Samsung Galaxy Tab 3 8.0 Motherboard Replacement, Remove Back Cover: step 2, image 2 of 2
    • Once every part of the screen is separated from the back cover, you should be able to fully remove it with your hands.

  3. Samsung Galaxy Tab 3 8.0 Motherboard Replacement, Disconnect Battery: step 3, image 1 of 2 Samsung Galaxy Tab 3 8.0 Motherboard Replacement, Disconnect Battery: step 3, image 2 of 2
    • To remove the battery you must use something small, such as tweezers, to disconnect the battery from its port.

    • Note: the connection lifts up to remove.

  4. Samsung Galaxy Tab 3 8.0 Motherboard Replacement, Remove Battery: step 4, image 1 of 1
    • After the battery is disconnected, use the pulling tab to safely remove the battery.

  5. Samsung Galaxy Tab 3 8.0 Motherboard Replacement, Disconnect Speakers: step 5, image 1 of 2 Samsung Galaxy Tab 3 8.0 Motherboard Replacement, Disconnect Speakers: step 5, image 2 of 2
    • Disconnect the relays attached to the motherboard.

  6. Samsung Galaxy Tab 3 8.0 Motherboard Replacement, Unscrew Speakers: step 6, image 1 of 3 Samsung Galaxy Tab 3 8.0 Motherboard Replacement, Unscrew Speakers: step 6, image 2 of 3 Samsung Galaxy Tab 3 8.0 Motherboard Replacement, Unscrew Speakers: step 6, image 3 of 3
    • Unscrew the 2.9mm screws from the speakers using a Phillips head #000 screwdriver, then lift the speakers from the device.

  7. Samsung Galaxy Tab 3 8.0 Motherboard Replacement, Disconnect All Relays: step 7, image 1 of 2 Samsung Galaxy Tab 3 8.0 Motherboard Replacement, Disconnect All Relays: step 7, image 2 of 2
    • Using the plastic remover tool carefully unseat the four rectangular electric leads from the board. Each rectangle is a different size, the first one is large, the second one is medium, and the last two are small.

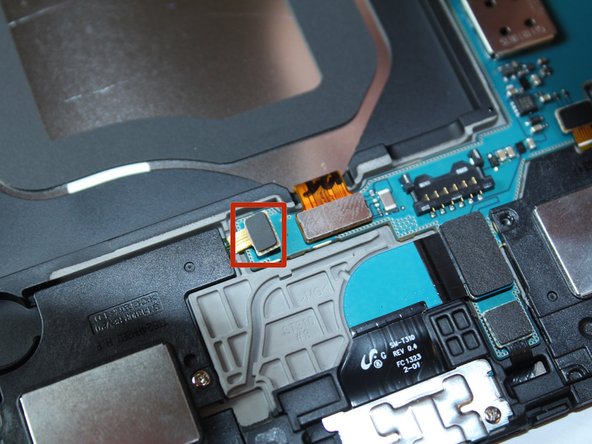
    • Using the plastic remover tool carefully unseat the square electric lead (marked in orange) from the board.

    • Using the plastic remover tool carefully unseat the small square and the two rectangular electric leads (marked in yellow) from the board.

  8. Samsung Galaxy Tab 3 8.0 Motherboard Replacement, Unscrew Motherboard: step 8, image 1 of 3 Samsung Galaxy Tab 3 8.0 Motherboard Replacement, Unscrew Motherboard: step 8, image 2 of 3 Samsung Galaxy Tab 3 8.0 Motherboard Replacement, Unscrew Motherboard: step 8, image 3 of 3
    • Unscrew the one 2.9mm Phillips #000 screw above the battery, and the three 2.9mm Phillips #000 screws to the right of the battery.

  9. Samsung Galaxy Tab 3 8.0 Motherboard Replacement, Remove the Motherboard: step 9, image 1 of 2 Samsung Galaxy Tab 3 8.0 Motherboard Replacement, Remove the Motherboard: step 9, image 2 of 2
    • Carefully lift the board from the device.

Conclusion

To reassemble your device, follow these instructions in reverse order.

12 other people completed this guide.

Kyle Ballard

Member since: 09/22/14

939 Reputation

2 Guides authored

Team

USF Tampa, Team 4-2, Brown Fall 2014 Member of USF Tampa, Team 4-2, Brown Fall 2014

USFT-BROWN-F14S4G2

3 Members

26 Guides authored

2 Comments

Be sure to include screw lengths to the nearest mm on all repair guides.

Dan Brown - Reply

You don’t need to remove the battery in order to remove the motherboard. Just disconnect the battery!

matt greece - Reply

Add Comment

View Statistics:

Past 24 Hours: 0

Past 7 Days: 3

Past 30 Days: 16

All Time: 11,042