Introduction
Use this guide to replace the USB-C charging port and daughterboard on your Samsung Galaxy S21 Ultra.
Before you begin, refer to the Samsung Self-Repair document for safety information.
Note: Retaining water resistance after the repair will depend on how well you reapply the adhesive, but your device will lose its IP (Ingress Protection) rating.
What you need
-
-
Insert a SIM eject tool, bit, or straightened paper clip into the SIM card tray hole on the top edge of the phone.
-
Press the SIM eject tool into the SIM card tray hole to eject the SIM card tray.
-
Remove the SIM card tray.
-
-
-
Prepare an iOpener and apply it to the back cover for at least three minutes to loosen the adhesive underneath.
-
-
-
Secure a suction handle to the bottom edge of the back cover, as close to the edge as possible.
-
Lift the back cover with the suction handle to create a small gap between the back cover and the frame.
-
Insert an opening pick into the gap you created.
-
Slide the opening pick to the bottom left corner to slice the adhesive.
-
Leave the opening pick in place to prevent the adhesive from resealing.
-
-
-
Insert a second opening pick at the bottom edge of your phone.
-
Slide the opening pick to the bottom right corner to slice the adhesive.
-
Leave the opening picks in place to prevent the adhesive from resealing.
-
-
-
-
Remove the back cover.
-
This is a good point to power on your phone and test all functions before sealing it up. Be sure to power your phone back down completely before you continue working.
-
Remove any adhesive chunks with a pair of tweezers or your fingers. Apply heat if you're having trouble separating the adhesive.
-
If you're using Samsung custom-cut adhesives, follow this guide.
-
If you're using double-sided tape, follow this guide.
-
-
-
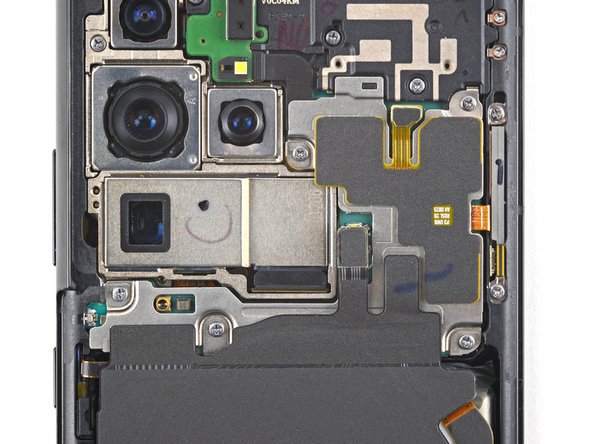
Insert an opening pick underneath the left bottom end of the NFC antenna and charging coil assembly.
-
Carefully slide the opening pick along the bottom left edge of the assembly to separate it from the battery.
-
-
-
Use a spudger to disconnect the charging coil by prying the connector straight up from its socket.
-
-
-
Use a spudger to disconnect the NFC antenna by prying the connector straight up from its socket.
-
-
-
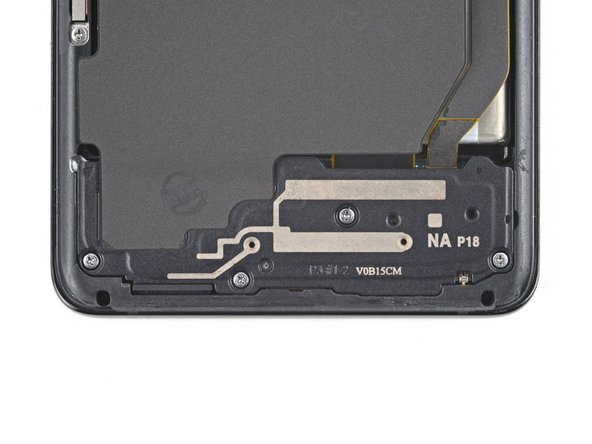
Use a Phillips screwdriver to remove the five 3.9 mm-long screws securing the NFC antenna and charging coil assembly.
-
-
-
Use a Phillips screwdriver to remove the four 3.9 mm-long screws securing the loudspeaker assembly.
-
-
-
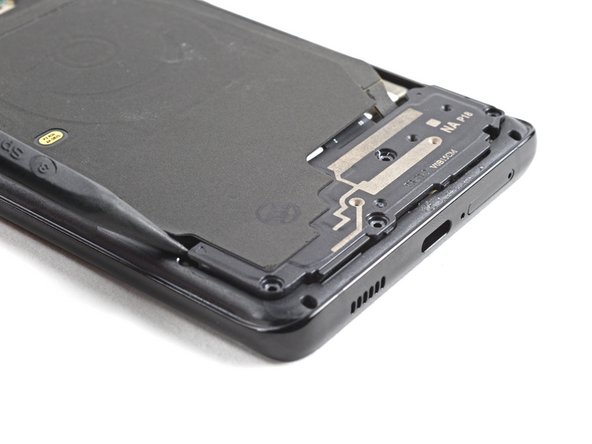
Insert the tip of a spudger between the frame and the upper-left notch in the loudspeaker.
-
Pry up with the spudger to release the loudspeaker from its plastic clips.
-
-
-
Use a pair of tweezers or your fingers to carefully remove the NFC antenna, charging coil, and loudspeaker assembly.
-
-
-
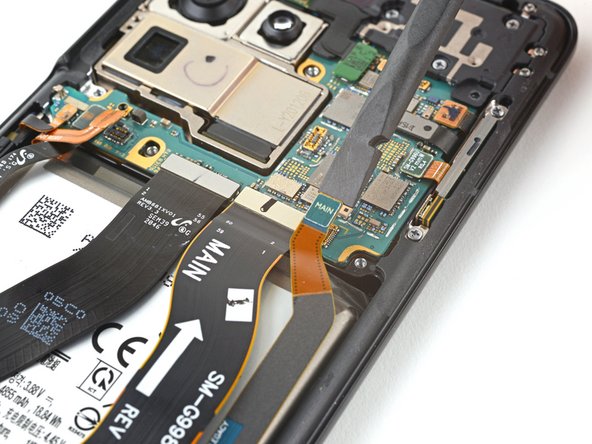
Use a spudger to pry up and disconnect the primary and secondary interconnect cables' press connectors on the motherboard.
-
-
-
Use a spudger to disconnect the secondary interconnect cable from the daughterboard by prying its bottom connector straight up from its socket.
-
Use your fingers or a pair of tweezers to carefully remove the secondary interconnect cable.
-
-
-
Use a spudger to disconnect the primary interconnect cable from the daughterboard by prying its bottom connector straight up from its socket.
-
Use your fingers or a pair of tweezers to carefully remove the primary interconnect cable.
-
-
-
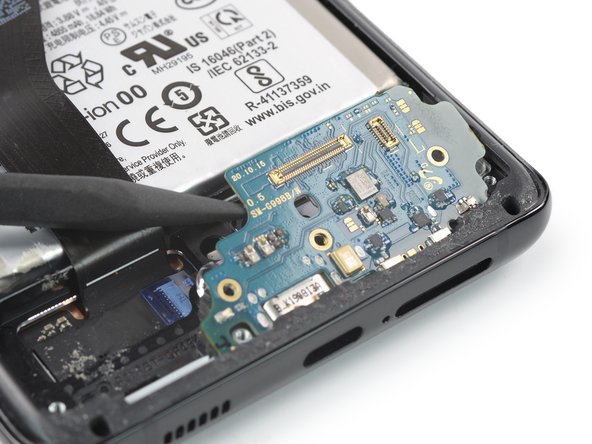
Use a Phillips screwdriver to remove the three 3.4 mm-long screws securing the charging board.
-
-
-
Insert the pointed end of a spudger underneath the left edge of the charging board next to the main flex cable connector.
-
Use your spudger to pry up the charging board.
-
-
-
Use a pair of blunt tweezers or your fingers to remove the charging board. Start by lifting its top edge up and then carefully slide the USB-C connector out of its recess.
-


To reassemble your device, follow the instructions in reverse order and perform the opposite actions, e.g., "reattach" instead of "removing." Skip steps that use heating and prying, and pay close attention to the 📌 bullets as you work through the steps.
After you've completed the repair, download the Samsung Members App from the Galaxy Store or the Play Store, and follow the Samsung Self-Repair document (beginning page 10) to make sure your device is fully functional.
Take your e-waste to an R2 or e-Stewards certified recycler.
Repair didn’t go as planned? Try some basic troubleshooting, or ask our Answers community for help.
Cancel: I did not complete this guide.
6 other people completed this guide.


8 Comments
Hi,
One month ago I dropped my phone in pool and I took it to the service center where they have dried out the phone. Everything was working fine but later only I was able to find out that the primary microphone is not working and also sim doesn't get detect. So couple of times I did resetting the phone pressing the volume down and power button and that fixed the SIM related issue. After couple of weeks again there was an error saying SIM can't be detected and I tried the same solution , after several attempts it detected again. Then again after two days the issue pops up once again. So I was able to find out that primary microphone and SIM card slot is in the same daughter board and thought of replacing it by myself. I got the new board and replaced it yesterday and still my microphone is not working. What would be the solution ? Is there anything I need to check/replace further like flex cables and all ? Please advise. Appreciate your help.
Thanks
Hi Rahul!
If your speaker still isn't working after you replaced your daughterboard, then I would suggest replacing the loudspeaker itself. Unfortunately, we don't sell the loudspeaker currently, so you would have to find it from a different source. I wish you the best of luck in your repair!
Hi
Everytime i put my phone on charge sometimes it works fine but if i take it out and put it back in again it keeps coming up with the moisture detected but theres no water inside there i dried it out and left it alone but before i didnt realise my lead was a little wet would that cause i massive problem charging
The tools kit for this job is inadequate you're better off saving your money and getting the correct one's. The gel heat pad doesn't produce enough heat to loosen the adhesive. The suction cup is worthless as it just pulls right off pretty easily. And the included picks are just not thin enough to slide in. I tried setting the gel heat pad on just the bottom edge to try and put as much heat as possible and then tried to get the pick into there but all that happened was the back glass started to shatter. So now I've got to buy a new back glass piece. You'll need to use a heat gun or hair dryer, find a strong suction cup and some kind of thin enough blade/tool to get in there. I'd make future purchases from IFIXIT if they'd just say hey get and use these tools instead of selling a kit that doesn't work just wasting their customers money.
Thanks for the guide. The only suggestion I have is to make sure to separate the camera glass from the back cover while the glue is still warm. I tried to separate them when putting things back together and needed to add the new glue tape and broke the back cover. ifixit shows they are out of stock but luckily "A" online retailer had them in-stock, awesome price, and next day delivery.