Introduction
Use this guide to remove or replace the glass back cover on a Samsung Galaxy S10e.
What you need
-
-
Turn your phone off completely before you begin this repair.
-
Prepare an iOpener and heat the back of the phone along the right edge for about two minutes. This will help soften the adhesive securing the back cover.
-
-
-
In the following steps, you'll be cutting through the adhesive securing the back cover.
-
As seen from the outside of the phone, you'll be slicing through the adhesive in the highlighted areas.
-
The adhesive is the thinnest on the right side of the phone, just below the Bixby button.
My S10e was two years old so the adhesive was really weak, and it was really simple to open. Still, this guide was totally useful.
That's encouraging, hopefully the older-than-2 years S10e I'm looking to do proves as easy to open-
Gee Foe -
-
-
-
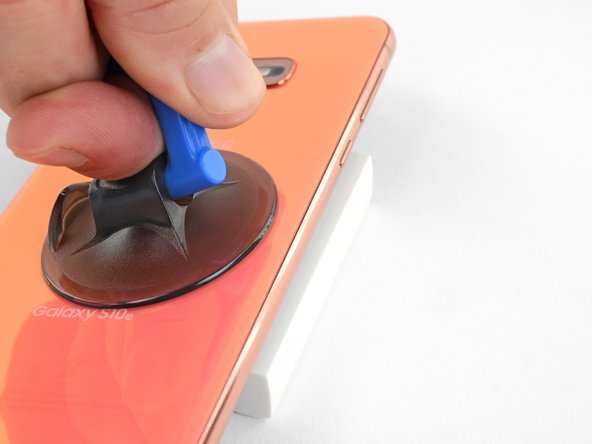
Secure a suction cup to the back cover, as close to the heated edge as possible, just under the Bixby button where the adhesive is thinnest.
La ventouse n'adhérera pas correctement sur la partie incurvée de la vitre ,
Sur la partie incurvée de la coque.
-
-
-
Prop up the heated edge of the phone on something that is about 0.5 inches (13 mm) thick. This will angle the phone so that the opening tool is easier to insert.
-
Lift the back cover's right edge with your suction cup, opening a slight gap between the back cover and the frame.
-
This may require a significant amount of force. If you have trouble, apply more heat to further soften the adhesive, and try again. The adhesive cools very fast, so you may need to heat it repeatedly.
-
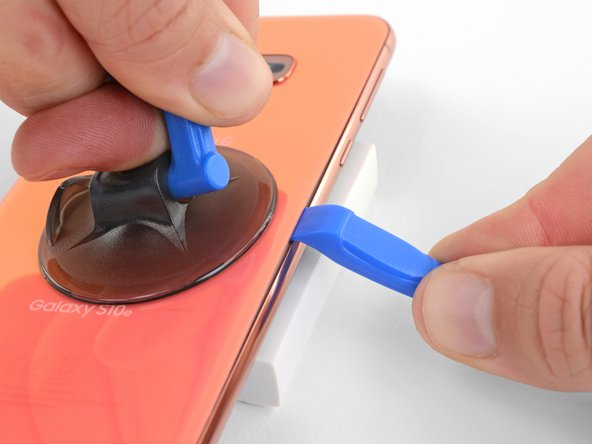
Press the edge of an opening tool into the gap.
-
-
-
Slide the opening tool along the right edge of the phone to slice through the adhesive securing the back cover.
I found that using opening picks for the entire repair was much easier then the pry tool, but that could just be me
You are criminals! This "tutorial" is full of destructive instructions. And whenever trying to make a comment, iFixid admin hides behind the bot personality telling: "Your comment was marked as spam"
People, do not trust them! They tell you everything to break your phone so you will need to bring it to service!You are criminals! No one ever should use the triangular "mediator" pick for iPhones, or planar connector picks! The back cover is NOT gorilla-glass, and it will crack in multiple places immediately! Only very thin "watchmaker" opening plates(initial pickup) and 0.1mm rigid PP stripes (cut from cheap tool packages, or 7-eleven food packs) may be used there. Before that the side rim - not the cover itself should be heated to boiling point and constantly re-heated while tearing the two-sided scotch. The opening strip may be replaced 2-3 times while reaching the opposite side, because it collects the torn glue. This instruction from iFixit is a pure sabotage for tricking non-expecting users to repair-shops.
The same goes to battery, if you don't risk using solvents, which may damage the screen and the circuit. Only rounded PP strips may tear off the battery scotch. It should be preheated from the screen side, until the battery becomes hot.The commenter who keeps saying "you are criminals" over and over may have been using this guide to repair a different phone, so he or she is confused. On the Galaxy S10e, I had no trouble heating and lifting the cover as described (though I had to reheat the iOpener several times). If you heat it gently with the iOpener and long enough, you're not stressing the back cover because the glue will come loose almost immediately. (I could have almost lifted it with a fingernail).
-
-
-
-
Insert an opening pick near the top right corner of the phone and slide it around the corner and across the top edge of the phone.
-
Leave the opening pick in place to prevent the adhesive from re-adhering.
-
-
-
Apply a heated iOpener to the left edge of the phone for two minutes.
-
-
-
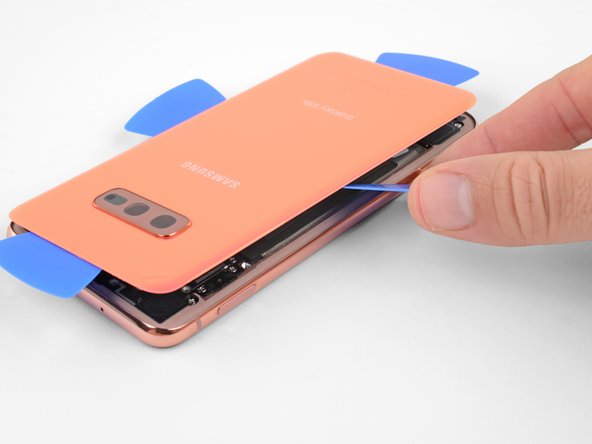
Use the opening picks to very carefully pry up the back cover.
-
If you encounter any resistance, stop prying and use an opening pick to cut any remaining adhesive.
-
Remove the back cover.
-
-
This should be the very last step in the guide, but the edit button seems to only allow editing the content, not the positioning in the guide. Not sure how to fix this.
The photo seems to show someone lifting the old glue off with tweezers. That certainly wasn't true for my glue! I scrubbed it off with isopropyl alcohol and fabric. (Don't use a paper towel or Kleenex because they fall apart. I used a postage-stamp-size square cut from an old athletic sock. With this and the alcohol I was able to get the cover and the phone as clean as they were at the factory.
When doing this, hold the phone at an angle in your other hand so any alcohol dribble to the outside and not to anywhere important.


To reassemble your device, follow these instructions in reverse order.
Take your e-waste to an R2 or e-Stewards certified recycler.
After you've completed the repair, follow this guide to test your repair.
Repair didn’t go as planned? Check out our Answers community for troubleshooting help.
To reassemble your device, follow these instructions in reverse order.
Take your e-waste to an R2 or e-Stewards certified recycler.
After you've completed the repair, follow this guide to test your repair.
Repair didn’t go as planned? Check out our Answers community for troubleshooting help.
Cancel: I did not complete this guide.
9 other people completed this guide.

5 Comments
I just replaced the lens today. I discovered you actually don't even have to remove the back of the phone IF all you're doing is replacing the glass.
L'écran OLED et la la batterie
Isidore LECHAT - Reply
My s10e is 4 years old now and I found glue had weakend and heating was uneccissary.
ervan.hady - Reply
I purchased my S10e refurbished, so the exact age and prior repairs are unknown. I believe it had ~200 charge cycles. After 2.5 years, the side adhesive started to fail and there was a noticeable slit under the rear cover. It was unclear if the lithium battery was starting to swell, which would have been a more dangerous thing. As such, 3 out of the 4 sides were easy to open just with sliding the pick.
I heated the iOpeners for 30s in my 1000W microwave and it reached a temp of 180oF. I placed this on the final corner and it released fairly easily.
WL1 - Reply
Is 180 degrees a good temperature to set the air temperature to if a heat gun is used?
Gee Foe -
Mine released without heat, just caught the edge with a fingernail and was able to work it free without any tools.
Gee Foe - Reply
I would definitely NOT use a heat gun; the iOpener is the right thing to use. I've repaired many devices and I have lots of heat guns, but a heat gun puts out a tremendous amount of heat, and spreads it everywhere instead of in a controlled manner. The iOpener is about 150 F -- just getting uncomfortable to touch -- and the heat is all in a thin strip. You want to gently heat the edges of the cover, not cook the battery and electronics. Smart phones are expensive and the iFixit tools are cheap. Don't risk your phone to save a few bucks.
MikeT-NYC - Reply