Introduction
Use this guide to remove or replace the screen on your Samsung Galaxy Note10+ 5G.
Due to the Note10+ 5G’s design, you will have to remove the back panel in order to disconnect the screen cable.
Before you begin this procedure, be sure to have a set of replacement adhesives for both the back panel and the screen.
This guide uses steps written for the non-5G Note10+. Some images in this guide may show minor discontinuities. They shouldn’t affect the overall guide procedure.
What you need
-
-
Prepare an iOpener and apply it to the left edge of the rear cover for one minute.
-
-
-
Apply a suction cup to the heated edge of the rear cover, as close to the edge as possible.
-
Pull up on the suction cup with strong, steady force to create a gap between the rear cover and the frame.
-
Insert the point of an opening pick into the gap.
-
-
-
Slide the opening pick along the left edge towards the bottom left corner to slice the adhesive.
-
Leave the pick inserted in the bottom left corner to prevent the adhesive from re-sealing.
-
-
-
Repeat the previous heating and cutting procedure for the remaining three sides of the phone.
-
Leave an opening pick on each side as you continue to the next to prevent the adhesive from resealing.
-
-
-
Use a Phillips screwdriver to remove the five 4 mm screws securing the wireless charging coil.
-
-
-
Use a pair of tweezers to lift up and flip back the metal shield covering the battery connector.
-
-
-
While holding the metal shield up and out of the way, use the pointed end of a spudger to pry up the battery connector to disconnect it.
-
-
-
-
Use the pointed end of a spudger to disconnect the wireless charging coil connector from the motherboard.
-
-
-
Tilt the metal shielding up so you can grip it with your fingers.
-
Peel the wireless charging coil up and away from the device.
-
Remove the wireless charging coil.
-
-
-
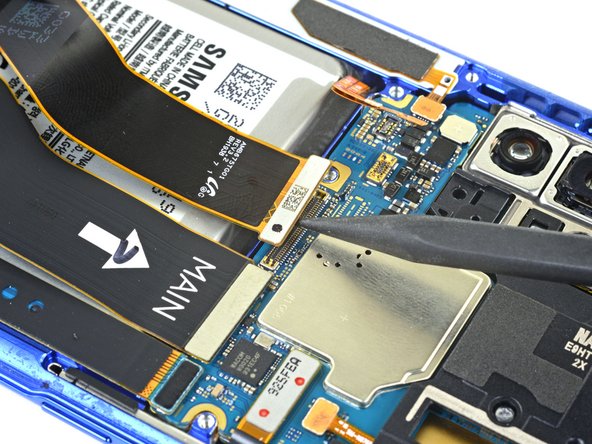
Use the pointed end of a spudger to disconnect the display cable from the motherboard.
-
-
-
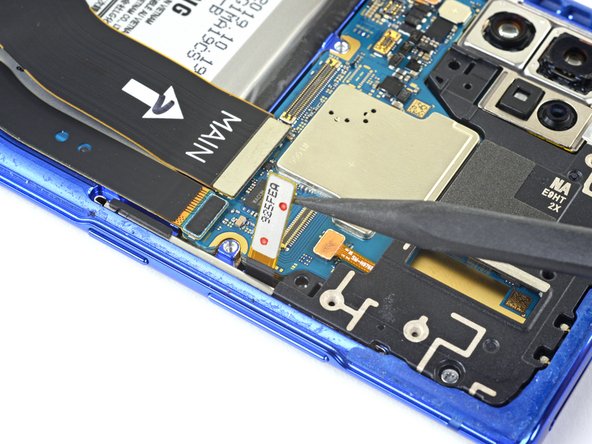
Use the pointed end of a spudger to disconnect the S-Pen touch layer cable connector from the motherboard.
-
-
-
Prepare an iOpener and apply it to the left edge of the display for one minute.
-
-
-
Apply a suction cup to the heated edge of the display, as close to the edge as possible.
-
Pull up on the suction cup with strong, steady force to create a gap between the display and the frame.
-
Insert the point of an opening pick into the gap.
-
-
-
Slide the opening pick along the left side towards the bottom left corner to slice the adhesive.
-
Leave the pick inserted in the bottom left corner to prevent the adhesive from re-sealing.
-
-
-
Insert a second opening pick and slide it along the left side towards the top left corner to slice the adhesive.
-
Leave the pick inserted in the top left corner to prevent the adhesive from re-sealing.
-
-
-
Prepare an iOpener and apply it to the bottom edge of the phone for one minute.
-
-
-
Insert a third opening pick into the gap on the bottom edge of the phone.
-
Slide the opening pick to the bottom right corner, slicing the adhesive.
-
Leave the pick inserted in the bottom right corner to prevent the adhesive from re-sealing.
-
-
-
Prepare an iOpener and apply it to the top edge of the phone for one minute.
-
-
-
Insert a fourth opening pick into the gap on the top edge of the phone.
-
Slide the opening pick to the top right corner, slicing the adhesive.
-
Leave the pick inserted in the top right corner to prevent the adhesive from re-sealing.
-
-
-
Prepare an iOpener and apply it to the right edge of the phone for one minute.
-
-
-
Slide the opening pick from the top right corner down towards the bottom right corner of the phone to slice the adhesive.
-
Slide an opening pick back and forth around the entire perimeter of the phone to release any missed adhesive, reheating if you find any extra-stubborn adhesive.
-
-
-
Thread the display and S-Pen touch layer cables through their cutouts on the phone frame.
-
Remove the display.
-
Remove any leftover adhesive before installing a new display.
-
Be sure to test your repairs before installing new adhesives.
-