
Samsung Galaxy A5 (2016) Battery Replacement

What you need

  1. Samsung Galaxy A5 (2016) Battery Replacement, Back Cover: step 1, image 1 of 3 Samsung Galaxy A5 (2016) Battery Replacement, Back Cover: step 1, image 2 of 3 Samsung Galaxy A5 (2016) Battery Replacement, Back Cover: step 1, image 3 of 3
    • Start by switching off your phone.

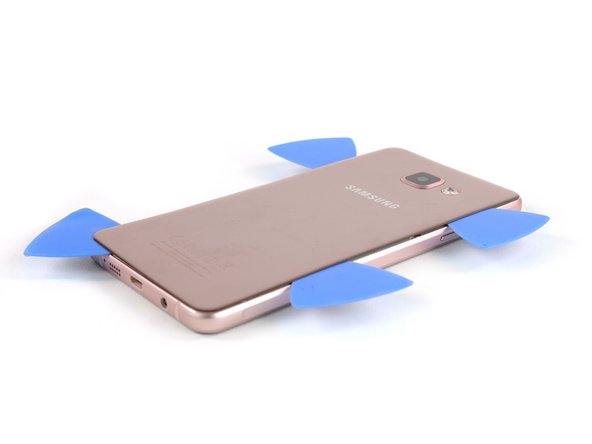
    • Take an iOpener to heat up and soften the glue behind the back cover.

    • With a suction handle lift the back cover to insert an opening pick.

  2. Samsung Galaxy A5 (2016) Battery Replacement: step 2, image 1 of 3 Samsung Galaxy A5 (2016) Battery Replacement: step 2, image 2 of 3 Samsung Galaxy A5 (2016) Battery Replacement: step 2, image 3 of 3
    • Slide the pick up to the middle to separate the back cover from the frame.

    • Insert a second opening pick and move around the right corner along the bottom and around the left corner.

  3. Samsung Galaxy A5 (2016) Battery Replacement: step 3, image 1 of 3 Samsung Galaxy A5 (2016) Battery Replacement: step 3, image 2 of 3 Samsung Galaxy A5 (2016) Battery Replacement: step 3, image 3 of 3
    • Take another opening pick and continue towards the top corner.

    • Here you want to use one more pick for the last part at the top.

  4. Samsung Galaxy A5 (2016) Battery Replacement: step 4, image 1 of 3 Samsung Galaxy A5 (2016) Battery Replacement: step 4, image 2 of 3 Samsung Galaxy A5 (2016) Battery Replacement: step 4, image 3 of 3
    Tool used on this step:
    Plastic Cards
    $2.99
    Buy
    • Insert a plastic card at the bottom and slide it underneath the back cover.

  5. Samsung Galaxy A5 (2016) Battery Replacement: step 5, image 1 of 3 Samsung Galaxy A5 (2016) Battery Replacement: step 5, image 2 of 3 Samsung Galaxy A5 (2016) Battery Replacement: step 5, image 3 of 3
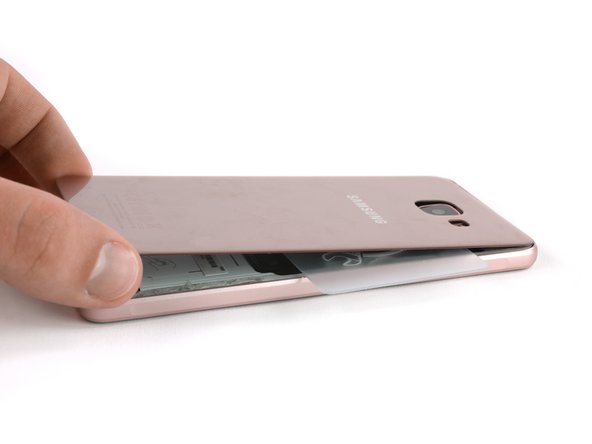
    • Heat up the back cover once again so you can slide the plastic card towards the top.

    • Always take a peek underneath the back cover to not damage any parts like the NFC antenna.

    • Move the plastic card until you reach the camera bump. Now slowly lift up the back cover and finally remove it.

    • Be sure to remove any residue from the glue and apply new adhesive when reassembling.

  6. Samsung Galaxy A5 (2016) Battery Replacement, Battery: step 6, image 1 of 2 Samsung Galaxy A5 (2016) Battery Replacement, Battery: step 6, image 2 of 2
    • Remove the SIM card tray.

    • Remove the 17 Phillips #00 (3.4 mm) screws on the midframe.

  7. Samsung Galaxy A5 (2016) Battery Replacement: step 7, image 1 of 3 Samsung Galaxy A5 (2016) Battery Replacement: step 7, image 2 of 3 Samsung Galaxy A5 (2016) Battery Replacement: step 7, image 3 of 3
    • Push the exposed part of the battery away from the midframe to separate the components.

    • You may need the IMEI sticker on your old battery to identify your phone in the future, be sure to transfer it to the replacement battery.

  8. Samsung Galaxy A5 (2016) Battery Replacement: step 8, image 1 of 3 Samsung Galaxy A5 (2016) Battery Replacement: step 8, image 2 of 3 Samsung Galaxy A5 (2016) Battery Replacement: step 8, image 3 of 3
    • There is a plastic spacer between the battery and the midframe that requires a metal prying tool to remove before the battery can be replaced. Be extremely careful not to puncture the battery.

    • Use the Jimmy to carefully pry the plastic battery spacer out from the daughterboard end of the battery cavity.

    • Remove the plastic spacer from the phone.

    Bei mir war der Plastikabstandhalter fest am Akku. Am Ersatzakku allerdings auch.

    Miautier - Reply

  9. Samsung Galaxy A5 (2016) Battery Replacement: step 9, image 1 of 1
    • Again carefully pry up the battery and insert the tip of an opening pick on the left side.

    • Now you can use a second opening pick and slide it in on the right side. Also don't insert too far to avoid damaging the LCD screen underneath.

    Very hard to do from this side. I recommend removing the mainboard and trying this from the top where the battery connector is. There is an area flush with the base surface.

    Felix - Reply

  10. Samsung Galaxy A5 (2016) Battery Replacement: step 10, image 1 of 2 Samsung Galaxy A5 (2016) Battery Replacement: step 10, image 2 of 2
    • Slide with the opening picks towards the top to free the battery of the adhesive.

    • Now you can remove the battery.

    Take care not to dent or break the copper plate under the battery. That is your screen and any deformation will damage the display causing bleeding and/or pixel loss.

    taz - Reply

Conclusion

To reassemble your device, follow these instructions in reverse order. Reapply adhesive where necessary.

54 other people completed this guide.

Tobias Isakeit

Member since: 03/31/14

117,289 Reputation

188 Guides authored

Team

Master Techs Member of Master Techs

Community

322 Members

2,521 Guides authored

19 Comments

Guten Tag,

Ich habe meinem Battery ausgetauscht, nach dem Austausch das Volume Taste und sim slat 2 funktioniert nicht mehr.

wie kann ich die reparieren?

vielen dank

peyman - Reply

Prüfe, ob die Kontakte der Lautstärkeknöpfe und das Flachbandkabel noch in Ordnung sind (nicht verschmutzt oder verbogen). Das mit dem Sim Slot klingt schon etwas seltsam. Das Modell in dieser Anleitung hat nur einen Sim Slot und einen micro-SD Slot.

Tobias Isakeit -

Hi in step 7 you can see a black thin plastic over the battery. Is it the NFC antenna?

carolinaaires - Reply

Yes, this is the NFC antenna.

Tobias Isakeit -

Just saved 2k INR by following this guide !!! Thanks Man

priyadarshi - Reply

Can i get some screws of this mobile i mean like this mobile ,actually i have also a a5 but i have no mobile screws then i want

Hayat hesham -

Then how can you put everything back together as strong as before? any glue needed? thanks

Hayden - Reply

بدلت البطارية متمل اشتغل واستقبل رسائل الحل

Abd Aln - Reply

بدلت بطارية جلاكسي a5

Abd Aln - Reply

The glue is too strong, it's exaggerated! You will easily kill the display.

Easy Repair - Reply

The glue is too strong, it's exaggerated! You will easily kill the display!

Easy Repair - Reply

Super Anleitung, es hat geklappt! Danke :)

pld1 - Reply

عندي ضعف في شبكة الاتصال ايش السبب

محمد المخلافي - Reply

اذا تركت بعض الغراء علي الهوائي هل يسبب له

محمد المخلافي - Reply

Whats the screw size

Hayat hesham - Reply

The screws are 3.4 mm long (information added in the step). Unfortunately not sure where to get them.

Tobias Isakeit -

Danke für die Anleitung, hat super funktioniert. Ich habe meine Bemühungen auf Video festgehalten: https://youtu.be/yfY4Jk4IhO0

Miautier - Reply

Gratulation zur gelungenen Reparatur und Danke für den Link zum Video.

Tobias Isakeit -

The battery is very hard to remove because it has adhesive under it.

I recommend you to disassemble the mainboard and lever up the battery from the top as there you will have the only accessible flush area to really slide something under.

Felix - Reply

Add Comment

View Statistics:

Past 24 Hours: 7

Past 7 Days: 30

Past 30 Days: 159

All Time: 91,564