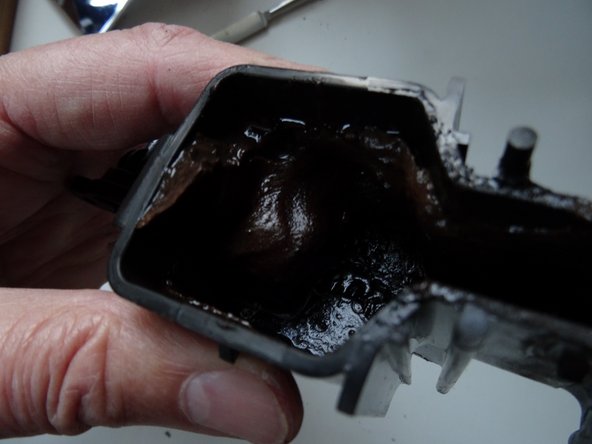
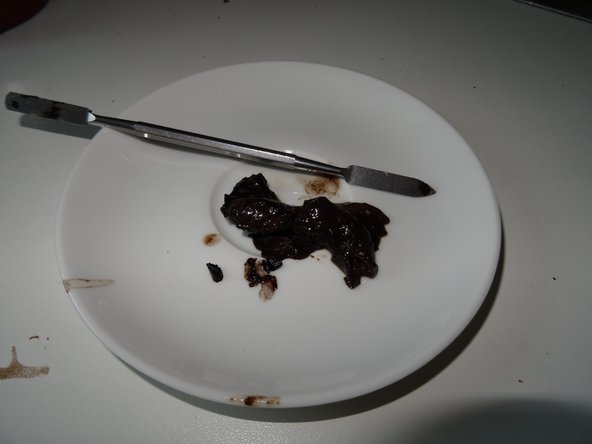
Saeco Minuto coffee spout replacement

What you need

  1. Saeco Minuto coffee spout replacement, Open a Saeco Minuto: step 1, image 1 of 1
    • Disconnect the power plug!

    • Remove the water tank.

    • Remove all the coffee beans.

    • Remove the brewing assembly.

    • Remove the drip tray and the coffee grounds drawer.

  2. Saeco Minuto coffee spout replacement: step 2, image 1 of 3 Saeco Minuto coffee spout replacement: step 2, image 2 of 3 Saeco Minuto coffee spout replacement: step 2, image 3 of 3
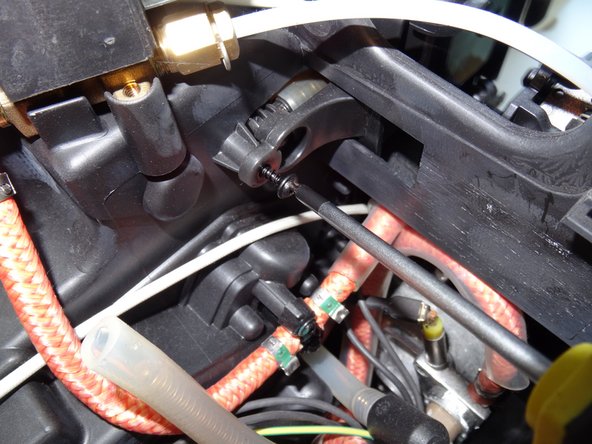
    • Pry up with a plastic opening tool at the bottom edge of the chrome-plated cover to lift up the coffee dispensing spout. This cover is often very tight, so you have to pry hard and hope that the part does not break.

    • When the lower edge of the spout is released, you can pry on the side edge until the chrome cover comes off completely.

  3. Saeco Minuto coffee spout replacement: step 3, image 1 of 2 Saeco Minuto coffee spout replacement: step 3, image 2 of 2
    • Remove the Torx T10 screw at the top edge of the coffee dispensing spout.

  4. Saeco Minuto coffee spout replacement: step 4, image 1 of 2 Saeco Minuto coffee spout replacement: step 4, image 2 of 2
    • Lift off the black cover over the coffee dispensing spout. The sliding nozzles will come off at the same time.

  5. Saeco Minuto coffee spout replacement: step 5, image 1 of 1
    • Remove both Torx T10 screws on the left and right at the bottom edge of the coffee dispensing spout.

    • Pull off the hot water dispensing spout.

  6. Saeco Minuto coffee spout replacement: step 6, image 1 of 2 Saeco Minuto coffee spout replacement: step 6, image 2 of 2
    • Remove the Torx T20 screw on the finger guard of the grinder. Remove the finger guard.

    • If the screws are covered with coffee remains, you should first clean them with a needle and a vacuum cleaner.

    • Remove three Torx T10 screws in the bean container.

  7. Saeco Minuto coffee spout replacement: step 7, image 1 of 1
    • Remove the three Torx T10 screws under the water tank.

  8. Saeco Minuto coffee spout replacement: step 8, image 1 of 3 Saeco Minuto coffee spout replacement: step 8, image 2 of 3 Saeco Minuto coffee spout replacement: step 8, image 3 of 3
    • Grab the upper cover on the sides and lift it up.

    • The cover is still connected with a cable and a tube.

    • Take off the silicone tube.

  9. Saeco Minuto coffee spout replacement: step 9, image 1 of 1
    • Remove the water level sensor cable from its brackets.

    • Carefully remove the plug from the water level sensor.

    • The cover is now free and can be removed.

  10. Saeco Minuto coffee spout replacement, Coffee spout: step 10, image 1 of 2 Saeco Minuto coffee spout replacement, Coffee spout: step 10, image 2 of 2
    • Remove the Torx T10 screw at the lower edge of the coffee spout.

  11. Saeco Minuto coffee spout replacement: step 11, image 1 of 2 Saeco Minuto coffee spout replacement: step 11, image 2 of 2
    • Remove the Torx T10 screw holding the coffee distribution unit in place.

    • This screw is a little difficult to access. You will need a short screwdriver or one with a flex extension.

  12. Saeco Minuto coffee spout replacement: step 12, image 1 of 1
    • Remove the Torx T10 screws below the coffee distribution unit.

  13. Saeco Minuto coffee spout replacement: step 13, image 1 of 1
    • Lift out the coffee spout. It may stick a little.

  14. Saeco Minuto coffee spout replacement: step 14, image 1 of 1
    • There are two tabs and clips on either side of the coffee spout that hold together the upper and lower half.

    • Push up the tabs using a blunt tool to release all four clips.

    • Separate the two halves of the coffee spout.

    • Between the two you will find a white silicone gasket. Be careful not to damage or loose it. Reposition it carefully and precisely when reassembling.

  15. Saeco Minuto coffee spout replacement: step 15, image 1 of 3 Saeco Minuto coffee spout replacement: step 15, image 2 of 3 Saeco Minuto coffee spout replacement: step 15, image 3 of 3
    • This spout was grimy with coffee oils!

    • Clean everything well or replace the spout with a new one.

    • In the meantime, there is a recommended conversion kit that does not get so dirty: Saeco Minuto Coffee Spout V2 Conversion Kit 421941309991

Conclusion

Follow the steps in reverse order to reassemble your device.

21 other people completed this guide.

Special thanks to these translators:

de en

100%

These translators are helping us fix the world! Want to contribute?
Start translating ›

VauWeh

Member since: 10/19/15

202,421 Reputation

246 Guides authored

Team

Repair is War on Entropy Member of Repair is War on Entropy

Community

25 Members

1,103 Guides authored

16 Comments

Es gibt mittlerweile einen Umbausatz der dieses eklige Kaffeelabyrinth was u.a. auch in der Incanto HD Reihe verbaut ist ersetzt .

Saeco Minuto Kaffeeauslauf V2 Umbau Kit 421941309991

Richard - Reply

Guter Hinweis! Sollte man auf jeden Fall verwenden.

VauWeh -

Vielen Dank, dank der bebilderten guten Beschreibung läuft meine Maschine wieder normal. Davor kam der Kaffee verzögert und tropfte nach…

durofb - Reply

I had to remove 1 extra screw because i had different hot water output for tea. This was protected by a little cap; remove the round cap and then unscrew the bolt and pull out the hot water pipe for tea.

Henry Doornekamp - Reply

Thanks so much, excellent instructions. There was so much crap in the spout and now I'm making beautiful coffee again.

Peter Cleary - Reply

Add Comment

View Statistics:

Past 24 Hours: 11

Past 7 Days: 69

Past 30 Days: 339

All Time: 35,910