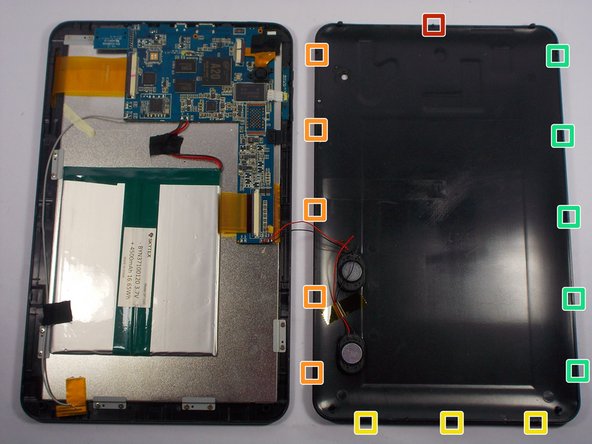
SKYTEX SP1020 Rear Case Replacement

What you need

  1. SKYTEX SP1020 Rear Case Replacement, Rear Case: step 1, image 1 of 2 SKYTEX SP1020 Rear Case Replacement, Rear Case: step 1, image 2 of 2
    • Prior to any repairs make sure that you are familiar with the device as well as the location of its buttons and ports.

    • Turn off device prior to continuing to further steps.

  2. SKYTEX SP1020 Rear Case Replacement: step 2, image 1 of 3 SKYTEX SP1020 Rear Case Replacement: step 2, image 2 of 3 SKYTEX SP1020 Rear Case Replacement: step 2, image 3 of 3
    • Set the tablet back panel facing down, with the SKYTEX logo facing you. You will find that this step will start from the right side of the device.

    • Insert the plastic opening tool between the bottom seam of the back panel and the micro SD port. The tool's edge should point toward the rear panel to prevent any scratching or damage.

    • Follow up with the plastic opening tool, releasing the clips as you go all the way around the device.

  3. SKYTEX SP1020 Rear Case Replacement: step 3, image 1 of 1
    • The clips will be released in the order specified as the spudger tool is moved along the seam around the device.

  4. SKYTEX SP1020 Rear Case Replacement: step 4, image 1 of 1
    • Use a plastic opening tool to pry the speakers out of the rear case.

    • The rear case will now be free from the rest of the device.

Conclusion

To reassemble your device, follow these instructions in reverse order.

One other person completed this guide.

yuriy16899

Member since: 04/20/15

243 Reputation

2 Guides authored

Team

0 Comments

Add Comment

View Statistics:

Past 24 Hours: 0

Past 7 Days: 0

Past 30 Days: 0

All Time: 152