
Replace bObsweep's Contact Points for the Dustbin

What you need

  1. Replace bObsweep's Contact Points for the Dustbin, bObsweep's cover: step 1, image 1 of 3 Replace bObsweep's Contact Points for the Dustbin, bObsweep's cover: step 1, image 2 of 3 Replace bObsweep's Contact Points for the Dustbin, bObsweep's cover: step 1, image 3 of 3
    • Flip Bob over and remove the 7 screws around which hold the cover together.

    • Remove the main brush. Unscrew the holder, and lift the brush out. Reminder: Keep this screw separate from the others so you can use it later to reinstall.

    • Depending on your model, there may be only 6 screws installed on bObsweep.

  2. Replace bObsweep's Contact Points for the Dustbin: step 2, image 1 of 3 Replace bObsweep's Contact Points for the Dustbin: step 2, image 2 of 3 Replace bObsweep's Contact Points for the Dustbin: step 2, image 3 of 3
    • There are two screw holes inside the brush compartment: one in the centre, one on the left end. Remove both and keep aside for reassembly.

    • There are five more screws around bObsweep's edges. Two are installed at the top and bottom, and one on the right end of the main brush.

  3. Replace bObsweep's Contact Points for the Dustbin: step 3, image 1 of 2 Replace bObsweep's Contact Points for the Dustbin: step 3, image 2 of 2
    • Flip bOb back over so you can see the screen. Lift the cover up to reveal bObsweep’s main board.

    • Detach the power inlet from the cover. Grip and slide it out.

  4. Replace bObsweep's Contact Points for the Dustbin: step 4, image 1 of 2 Replace bObsweep's Contact Points for the Dustbin: step 4, image 2 of 2
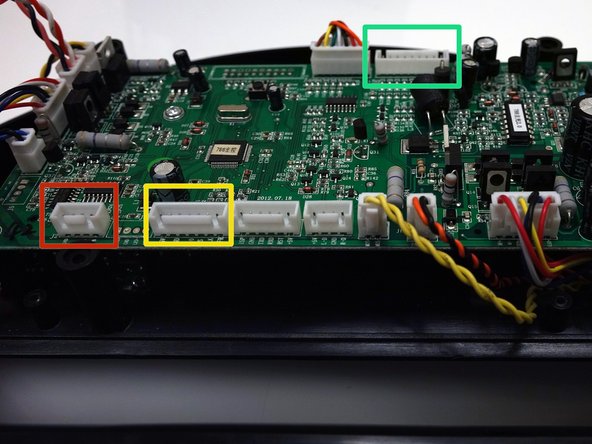
    • Remove three circuit plugs from the motherboard. Pinch the small white tab on the side of each circuit plug and pull straight up to release each from the motherboard.

    • 1. On the bottom left corner: a small connector with red, black and white wires.

    • 2. One thick white wire that attaches on the right side of the previous connector.

    • 3. On the top edge of bOb’s motherboard: a wide multicoloured connector.

    • Place the cover aside and begin your repair.

  5. Replace bObsweep's Contact Points for the Dustbin, Remove the Whole Cover: step 5, image 1 of 3 Replace bObsweep's Contact Points for the Dustbin, Remove the Whole Cover: step 5, image 2 of 3 Replace bObsweep's Contact Points for the Dustbin, Remove the Whole Cover: step 5, image 3 of 3
    • If your bOb's mainboard looks different than previously pictures, you need to disconnect 4 circuit plugs to remove the cover.

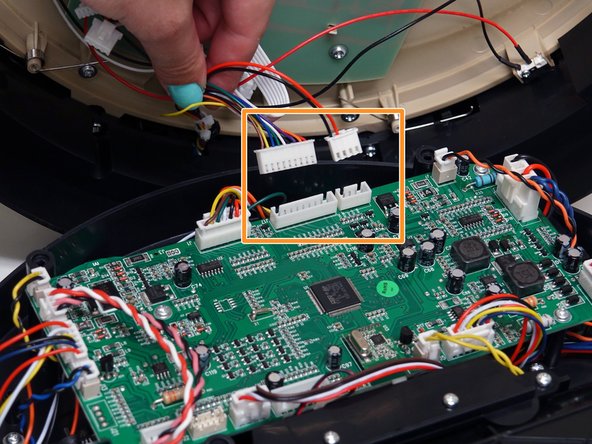
    • If your mainboard looks like this one, remove the two circuit plugs at the lower edge of the mainboard, near Bob’s wheels.

    • Then remove two more are at the top edge of the mainboard, attached to Bob’s bumper.

    • The power inlet should already be removed as described in the previous step.

  6. Replace bObsweep's Contact Points for the Dustbin, Move the Brush Motor Aside - Optional: step 6, image 1 of 3 Replace bObsweep's Contact Points for the Dustbin, Move the Brush Motor Aside - Optional: step 6, image 2 of 3 Replace bObsweep's Contact Points for the Dustbin, Move the Brush Motor Aside - Optional: step 6, image 3 of 3
    • Once the cover is detached completely, you may wish to lift and move the main brush motor out of the way for the rest of this repair.

    • Slide it straight up to place aside.

  7. Replace bObsweep's Contact Points for the Dustbin, Remove the Wheels' Cover: step 7, image 1 of 3 Replace bObsweep's Contact Points for the Dustbin, Remove the Wheels' Cover: step 7, image 2 of 3 Replace bObsweep's Contact Points for the Dustbin, Remove the Wheels' Cover: step 7, image 3 of 3
    • To access the dustbin’s contact points, you will need to remove the wheels' cover. Remove the 6 screws securing the cover onto Bob:

    • Two are next to the mainboard.

    • Two are on either side of the left wheel, one above and one below.

    • Lastly, two more screws are on the right wheel, one above and one below.

  8. Replace bObsweep's Contact Points for the Dustbin, Expose the Wheels: step 8, image 1 of 3 Replace bObsweep's Contact Points for the Dustbin, Expose the Wheels: step 8, image 2 of 3 Replace bObsweep's Contact Points for the Dustbin, Expose the Wheels: step 8, image 3 of 3
    • Once all 6 screws are removed, lift the wheel cover up and unplug it from the mainboard. Place it aside for now.

    • For ease of access, you may wish to place the left and right wheels aside, just be sure to keep their springs safely on-hand for later reassembly.

  9. Replace bObsweep's Contact Points for the Dustbin, Remove the Brush Barrier: step 9, image 1 of 3 Replace bObsweep's Contact Points for the Dustbin, Remove the Brush Barrier: step 9, image 2 of 3 Replace bObsweep's Contact Points for the Dustbin, Remove the Brush Barrier: step 9, image 3 of 3
    • It may help to prop Bob’s back up for the rest of the repair.

    • There are 5 more screws to remove to access the contact points.

    • Remove all and lift the main brush compartment’s plastic barrier.

  10. Replace bObsweep's Contact Points for the Dustbin, Remove the Contact Points: step 10, image 1 of 3 Replace bObsweep's Contact Points for the Dustbin, Remove the Contact Points: step 10, image 2 of 3 Replace bObsweep's Contact Points for the Dustbin, Remove the Contact Points: step 10, image 3 of 3
    • Flip the barrier over and slide Bob’s contact points out of their spaces.

    • Place the barrier aside for now.

    • Keep bOb's back propped up so the rubber strip near the brush compartment does not slide out of place.

  11. Replace bObsweep's Contact Points for the Dustbin, Unplug bOb's Contact Points: step 11, image 1 of 3 Replace bObsweep's Contact Points for the Dustbin, Unplug bOb's Contact Points: step 11, image 2 of 3 Replace bObsweep's Contact Points for the Dustbin, Unplug bOb's Contact Points: step 11, image 3 of 3
    • Follow their wiring to the correct circuit plug on the mainboard.

    • The circuit plug may be situated differently depending on your bObsweep model.

    • Remove the old circuit plug and feed the wires out from underneath the mainboard.

  12. Replace bObsweep's Contact Points for the Dustbin, Connect New Contacts: step 12, image 1 of 3 Replace bObsweep's Contact Points for the Dustbin, Connect New Contacts: step 12, image 2 of 3 Replace bObsweep's Contact Points for the Dustbin, Connect New Contacts: step 12, image 3 of 3
    • Connect your new contact point sensors in the open space.

    • Feed the wiring back underneath the screw posts for the mainboard, then move toward Bob’s back.

  13. Replace bObsweep's Contact Points for the Dustbin, Carefully Replace the Contacts and Wiring: step 13, image 1 of 3 Replace bObsweep's Contact Points for the Dustbin, Carefully Replace the Contacts and Wiring: step 13, image 2 of 3 Replace bObsweep's Contact Points for the Dustbin, Carefully Replace the Contacts and Wiring: step 13, image 3 of 3
    • Place Bob’s contact points back in their spaces on the main brush barrier so that the black wire is on the left.

    • Push down to ensure that each contact point sits flat in its space.The rest of the wiring should be fed toward Bob’s right wheel.

    • There are gaps in the brush barrier where the wiring fits.

  14. Replace bObsweep's Contact Points for the Dustbin, Replace the Brush Barrier: step 14, image 1 of 3 Replace bObsweep's Contact Points for the Dustbin, Replace the Brush Barrier: step 14, image 2 of 3 Replace bObsweep's Contact Points for the Dustbin, Replace the Brush Barrier: step 14, image 3 of 3
    • Hold down the contact points as you replace their holder.

    • Align the holder with all of Bob’s screw posts without compressing the wiring underneath.

    • Push each contact point toward the brush compartment as you hold the main brush barrier on Bob to ensure they have not shifted out of alignment.

    • Then reinstall all of the barrier’s 5 screws.

  15. Replace bObsweep's Contact Points for the Dustbin, Replace the Wheels: step 15, image 1 of 3 Replace bObsweep's Contact Points for the Dustbin, Replace the Wheels: step 15, image 2 of 3 Replace bObsweep's Contact Points for the Dustbin, Replace the Wheels: step 15, image 3 of 3
    • With the back of Bob still tilted up, replace the left and right wheels if you have moved them.

    • Replace the two springs on top of the wheels.

  16. Replace bObsweep's Contact Points for the Dustbin, Secure the Wheels' Cover: step 16, image 1 of 3 Replace bObsweep's Contact Points for the Dustbin, Secure the Wheels' Cover: step 16, image 2 of 3 Replace bObsweep's Contact Points for the Dustbin, Secure the Wheels' Cover: step 16, image 3 of 3
    • Plug the wheel cover back onto the mainboard. Then, carefully align the cover with the screw posts on Bob.

    • Make sure the springs on top of the wheels do not move out of place and no other wires will be compressed beneath the wheels' cover as you push it down.

    • When the cover sits flat against Bob, reinstall all of its 6 screws. Hold the cover down against bOb as you do so.

    • Replace the main brush motor if you have removed it before you begin closing Bob.

  17. Replace bObsweep's Contact Points for the Dustbin, Start Closing the Cover: step 17, image 1 of 3 Replace bObsweep's Contact Points for the Dustbin, Start Closing the Cover: step 17, image 2 of 3 Replace bObsweep's Contact Points for the Dustbin, Start Closing the Cover: step 17, image 3 of 3
    • If you have four circuit plugs for your mainboard, follow this step before proceeding to the Closing bOb Guide.

    • If your bObsweep only has three circuit plugs connecting the cover, go to the tutorial Closing bObsweep's cover after repair

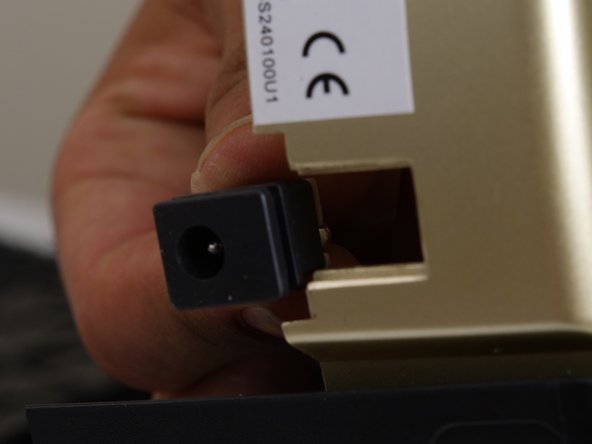
    • First slide the power inlet back into its space on the cover.

    • Connect the two circuit plugs from bOb's bumper to the top of the mainboard.

    • The circuit plug with all white wires connects in the middle of the mainboard's bottom edge.

    • The final circuit plug connects to the bottom left corner of the mainboard. When finished, see the closing bOb guide and skip step 1.

Conclusion

To reassemble your device, see the guide on Closing Bobsweep.

Remember, there may be some differences.

Tatiana

Member since: 06/28/14

737 Reputation

17 Guides authored

0 Comments

Add Comment

View Statistics:

Past 24 Hours: 0

Past 7 Days: 0

Past 30 Days: 2

All Time: 517