What you need
-
-
As it has been previously observed on various Garmin models, the protective glass gets damaged without notice. This guide will show you step by step how to replace the various components of the clock.
-
-
-
Heat the outer edge with a heat gun to a temperature no higher than 356°F (180°C).
-
It doesn't require a high temperature. To the touch it should feel warm or cold, but not extremely hot.
-
Slide the spudger through the outer edge of the screen. We will be able to see white colored glue. It shouldn't require too much force. Sliding your tool through the edge to remove the glue should do the trick.
-
-
-
Once opened, remove carefully the screen's ribbon cable. It is recommended to use plastic tools during the whole process. You should consider that the battery is still connected.
-
-
-
-
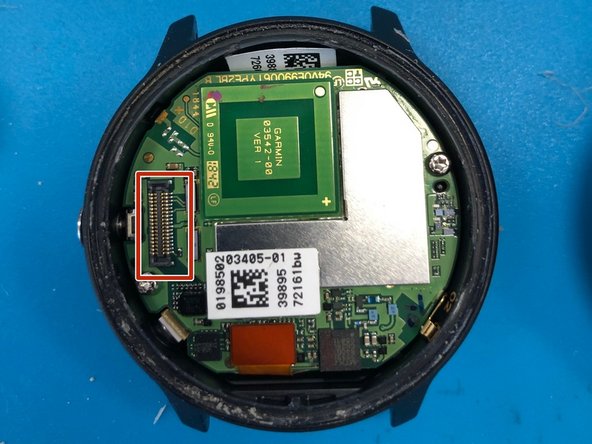
Thus, the bottom part of the board with all the sensors is exposed.
-
In the second picture, you will be able to observe the screen, with the connector being highlighted.
-
-
-
Remove the screws using a torx screwdriver.
-
Disconnect the clock's sensors connection bus using a spudger.
-
The small golden piece exerts pressure in between the case and the clock's processor.
-
-
-
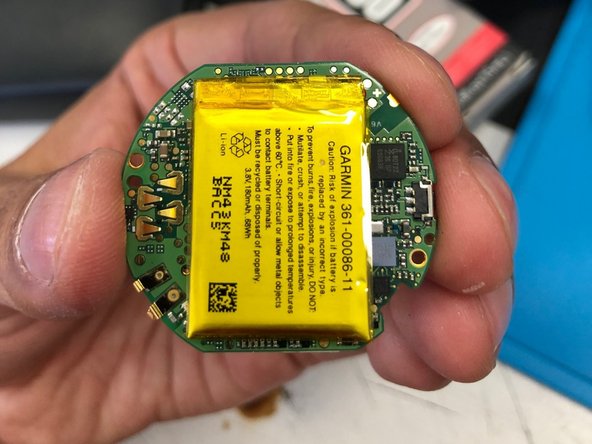
Here you can replace the battery if needed. It is soldered through two cables to the clock's motherboard.
-
-
-
Regrettably, the hearth sensor's cover is glued to the backplate. Because of this, it is only possible to find the entire backplate as a replacement. It comes with the following parts.
-
Vibrator motor.
-
Barometric altimeter. This item comes snap-fit with the processor. Check if it is installed well and in the right position, since it is only isolated by an o-ring that could allow access to water if poorly installed.
-
Hearth rate sensor.
-
-
-
To reassemble the watch, follow these steps in reverse.
-
To glue the screen use T-7000 black adhesive. Use a small amount of glue for the screen, let it rest while pressing the screen for two hours. Then, apply more glue by the edge and remove excess with a wet cloth. Keep pressing the screen for two more hours.
-


This is a practical guide to learn how to disassemble the watch and replace other parts.
This is a practical guide to learn how to disassemble the watch and replace other parts.
Special thanks to these translators:
100%

These translators are helping us fix the world! Want to contribute?
Start translating ›
