
Razer Kraken 7.1 Chroma Microphone Replacement

What you need

  1. Razer Kraken 7.1 Chroma Microphone Replacement, Ear Cushion: step 1, image 1 of 1
    • Grab the ear cushion between your thumb and forefinger.

  2. Razer Kraken 7.1 Chroma Microphone Replacement: step 2, image 1 of 1
    • Pull the ear cushion away from the speaker by sliding down to release the cushion from the plastic covering.

  3. Razer Kraken 7.1 Chroma Microphone Replacement: step 3, image 1 of 1
    • Continue sliding downwards around all edges of the ear cushion until the cushion is fully removed.

  4. Razer Kraken 7.1 Chroma Microphone Replacement, Speaker: step 4, image 1 of 3 Razer Kraken 7.1 Chroma Microphone Replacement, Speaker: step 4, image 2 of 3 Razer Kraken 7.1 Chroma Microphone Replacement, Speaker: step 4, image 3 of 3
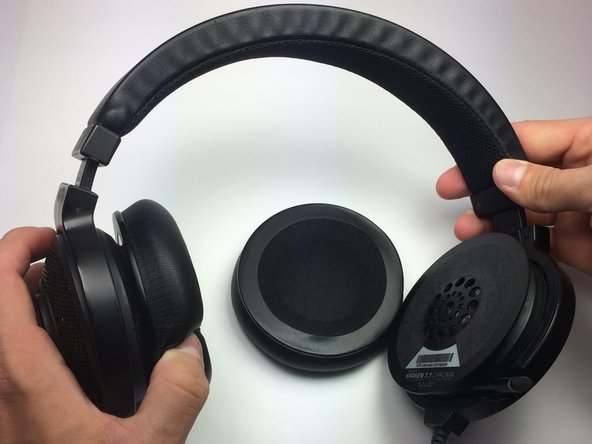
    • Use the broad edge of the plastic spudger and a lot of force to pop off the speaker from the headset.

    • Insert the plastic spudger in between the speaker and the headset directly in line with one of the exposed screws of the headset casing, since that is where the four clamps that hold the speaker to the headset are located. These clamps are not visible until after speaker removal.

    • Make sure to insert the spudger in between the foam buffer-ring and the headset casing instead of in between the speaker and the foam buffer-ring.

    • Reassembly may be tricky, there is one clamp smaller than others, so you have to align it correctly.

  5. Razer Kraken 7.1 Chroma Microphone Replacement: step 5, image 1 of 1
    • Cut both wires connecting the speaker to the headset by using a wire stripper or pair of scissors.

    • Cut as close as possible to the connections on the speaker circuit board.

  6. Razer Kraken 7.1 Chroma Microphone Replacement, Speaker Casing: step 6, image 1 of 2 Razer Kraken 7.1 Chroma Microphone Replacement, Speaker Casing: step 6, image 2 of 2
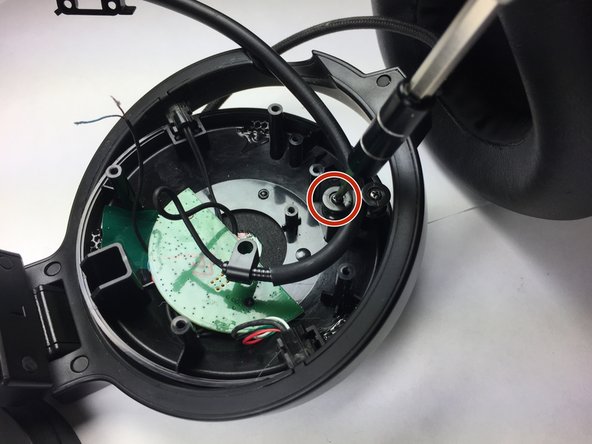
    • Use the Phillips #00 screwdriver to remove all four 9mm screws.

    • Rotate the screwdriver counterclockwise when removing each screw.

  7. Razer Kraken 7.1 Chroma Microphone Replacement: step 7, image 1 of 3 Razer Kraken 7.1 Chroma Microphone Replacement: step 7, image 2 of 3 Razer Kraken 7.1 Chroma Microphone Replacement: step 7, image 3 of 3
    • Pull the casing upwards to remove it from the headset.

    • If you are removing the casing on the side of the microphone, slide the casing towards you along the length of the microphone until the casing is completely removed.

  8. Razer Kraken 7.1 Chroma Microphone Replacement, Microphone: step 8, image 1 of 2 Razer Kraken 7.1 Chroma Microphone Replacement, Microphone: step 8, image 2 of 2
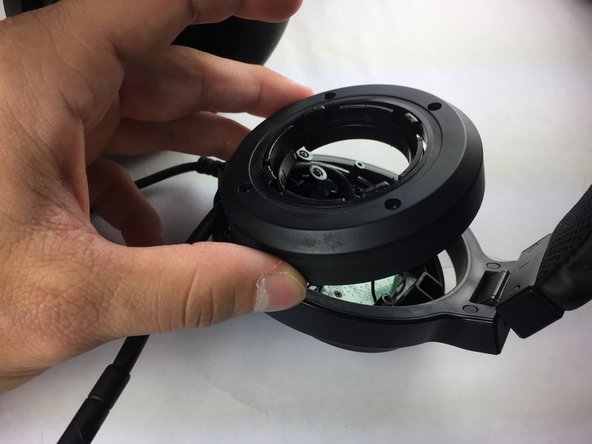
    • Slide the speaker case laterally along the length of the microphone until the casing is completely detached from the headset.

  9. Razer Kraken 7.1 Chroma Microphone Replacement: step 9, image 1 of 3 Razer Kraken 7.1 Chroma Microphone Replacement: step 9, image 2 of 3 Razer Kraken 7.1 Chroma Microphone Replacement: step 9, image 3 of 3
    • Use the Phillips #00 screwdriver to remove the 9 mm screws circled in red.

    • Rotate the screwdriver in a counterclockwise direction to remove each screw.

    • There is a total of four 9mm screws that must be unscrewed.

    • While unscrewing the spinning-wheel apparatus, remove only one wheel to free the microphone cable.

    • When removing the two-screw anchoring piece, slide it off of the broken microphone and make sure to slide the piece back on to the new microphone before soldering.

  10. Razer Kraken 7.1 Chroma Microphone Replacement: step 10, image 1 of 1
    • Pull the microphone out towards you until it is no longer confined within the headset.

  11. Razer Kraken 7.1 Chroma Microphone Replacement: step 11, image 1 of 2 Razer Kraken 7.1 Chroma Microphone Replacement: step 11, image 2 of 2
    • Pull the plastic attachment with the screw-hole away from the rubber microphone casing to expose the microphone wire.

    • Cut the microphone wire as close to the rubber microphone casing as possible to give enough wire to work with for re-soldering the new microphone to the headset.

Conclusion

To reassemble your device, follow these instructions in reverse order.

6 other people completed this guide.

Karissa Sealey

Member since: 03/24/17

995 Reputation

4 Guides authored

Team

Baylor, Team S5-G3, Williams Spring 2017 Member of Baylor, Team S5-G3, Williams Spring 2017

BU-WILLIAMS-S17S5G3

3 Members

8 Guides authored

9 Comments

Hey, Please answer I need your help. Where can I buy only the microphone?

BeN KazaV - Reply

I’ve come so far as the last picture but is it possible to post a picture of the cirquit board? as to where to solder the microphone to ( wich points ) since all my wires came unudone i cant tell i tried looking online for a schematic no luck.

Yoshiharu Sakurai - Reply

is it possible to post a picture of the cirquit board with locations where components need to be soldered on to? all my connections became undone so im trying to figure out where each of them is attached i cannot find any schematic online.

Yoshiharu Sakurai - Reply

Nice guide. But not very useful, since I can’t find any place to buy a new microphone. Has anyone found a place to buy a replacement?

Michael Engesgaard - Reply

I was able to do this repair (on the non-Chroma version) without using a spudger or cutting the speaker wires by just poking through the black paper around the speaker to get access to the screws, skipping steps 4 and 5.

gary600 - Reply

Add Comment

View Statistics:

Past 24 Hours: 3

Past 7 Days: 10

Past 30 Days: 56

All Time: 17,122