
Razer DeathAdder Chroma Motherboard Replacement Guide

What you need

  1. Razer DeathAdder Chroma Motherboard Replacement Guide, Outer Casing: step 1, image 1 of 1
    • Opening the mouse casing will void any warranty that exists for the mouse.

    • Turn the mouse over so the bottom is facing up.

  2. Razer DeathAdder Chroma Motherboard Replacement Guide: step 2, image 1 of 2 Razer DeathAdder Chroma Motherboard Replacement Guide: step 2, image 2 of 2
    • Use the blunt end of the spudger to pry the adhesive rubber pads from the top left and right edges.

  3. Razer DeathAdder Chroma Motherboard Replacement Guide: step 3, image 1 of 2 Razer DeathAdder Chroma Motherboard Replacement Guide: step 3, image 2 of 2
    • Use a Phillips #0 screwdriver to remove two 6.7 mm screws.

  4. Razer DeathAdder Chroma Motherboard Replacement Guide: step 4, image 1 of 1
    • Use your fingers to identify the location of the screw under the bottom label.

  5. Razer DeathAdder Chroma Motherboard Replacement Guide: step 5, image 1 of 1
    • Use a Phillips #0 screwdriver to remove one 6.7 mm screw.

    • Clear the label away from around the screw for easier removal.

  6. Razer DeathAdder Chroma Motherboard Replacement Guide: step 6, image 1 of 3 Razer DeathAdder Chroma Motherboard Replacement Guide: step 6, image 2 of 3 Razer DeathAdder Chroma Motherboard Replacement Guide: step 6, image 3 of 3
    • Turn the mouse over so the bottom is facing down.

    • Separate the top casing from the bottom base by pulling the top casing upwards.

    • Separating the casing too quickly could damage the ribbon connector between the motherboard and the LED lights.

  7. Razer DeathAdder Chroma Motherboard Replacement Guide: step 7, image 1 of 2 Razer DeathAdder Chroma Motherboard Replacement Guide: step 7, image 2 of 2
    • Disconnect the ribbon connector between the motherboard and the LED lights by pulling upward.

    • Pulling too hard could damage the wire connections.

  8. Razer DeathAdder Chroma Motherboard Replacement Guide, Motherboard: step 8, image 1 of 2 Razer DeathAdder Chroma Motherboard Replacement Guide, Motherboard: step 8, image 2 of 2
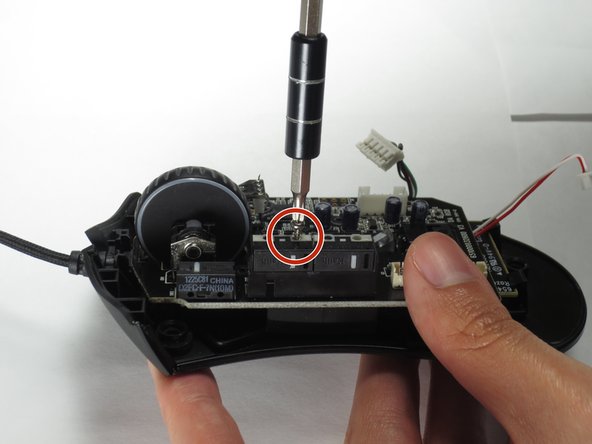
    • Disconnect the ribbon connector between the motherboard and the USB cable by pulling upward.

  9. Razer DeathAdder Chroma Motherboard Replacement Guide: step 9, image 1 of 1
    • Use a Phillips #0 screwdriver to remove three 5.5 mm screws.

  10. Razer DeathAdder Chroma Motherboard Replacement Guide: step 10, image 1 of 2 Razer DeathAdder Chroma Motherboard Replacement Guide: step 10, image 2 of 2
    • Use a Phillips #0 screwdriver to remove two 11.5 mm screws on the side buttons.

  11. Razer DeathAdder Chroma Motherboard Replacement Guide: step 11, image 1 of 1
    • Use a Phillips #000 screwdriver to remove one 5.0 mm screw.

  12. Razer DeathAdder Chroma Motherboard Replacement Guide: step 12, image 1 of 2 Razer DeathAdder Chroma Motherboard Replacement Guide: step 12, image 2 of 2
    • Disconnect the ribbon connector between the motherboard and the optical sensor.

  13. Razer DeathAdder Chroma Motherboard Replacement Guide: step 13, image 1 of 2 Razer DeathAdder Chroma Motherboard Replacement Guide: step 13, image 2 of 2
    • Remove the motherboard by grasping the sides and gently pulling upward.

Conclusion

To reassemble your device, follow these instructions in reverse order.

5 other people completed this guide.

Nathan D. Kappler

Member since: 03/27/17

343 Reputation

2 Guides authored

Team

Baylor, Team S5-G2, Williams Spring 2017 Member of Baylor, Team S5-G2, Williams Spring 2017

BU-WILLIAMS-S17S5G2

3 Members

6 Guides authored

0 Comments

Add Comment

View Statistics:

Past 24 Hours: 3

Past 7 Days: 11

Past 30 Days: 51

All Time: 9,819