
PlayStation 4 Slim Motherboard Replacement

What you need

  1. PlayStation 4 Slim Motherboard Replacement, Bottom Cover: step 1, image 1 of 3 PlayStation 4 Slim Motherboard Replacement, Bottom Cover: step 1, image 2 of 3 PlayStation 4 Slim Motherboard Replacement, Bottom Cover: step 1, image 3 of 3
    • Locate the plastic warranty sticker next to the three ports on the side of the console.

    • Remove the warranty sticker by peeling it off with any kind of spudger.

    • Removing the warranty sticker will NOT cause your warranty to be null and void.

  2. PlayStation 4 Slim Motherboard Replacement: step 2, image 1 of 2 PlayStation 4 Slim Motherboard Replacement: step 2, image 2 of 2
    • Unscrew and remove the now exposed 5.0mm screw using a T8 security Torx screwdriver with a counter-clockwise motion.

  3. PlayStation 4 Slim Motherboard Replacement: step 3, image 1 of 3 PlayStation 4 Slim Motherboard Replacement: step 3, image 2 of 3 PlayStation 4 Slim Motherboard Replacement: step 3, image 3 of 3
    • Place the Playstation 4 Slim upside down with the side of the screw you just removed facing you.

    • Pry up on the two corners that are facing you with your fingers.

    • This may take a bit of force to open up and you will hear a fairly loud click when the bottom cover detaches.

    • Remove the bottom cover by sliding it towards the back corners and lifting up.

  4. PlayStation 4 Slim Motherboard Replacement, Power Supply: step 4, image 1 of 3 PlayStation 4 Slim Motherboard Replacement, Power Supply: step 4, image 2 of 3 PlayStation 4 Slim Motherboard Replacement, Power Supply: step 4, image 3 of 3
    • Place the Playstation 4 Slim right side up, with the PS logo on top and the side with the words "SONY" and "PS4" facing you.

    • Pry up on the two corners that are facing you with your fingers.

    • This may take a bit of force to open and you will hear a fairly loud click when the top cover detaches.

    • Remove the top cover by sliding it towards the back corners and lifting up.

  5. PlayStation 4 Slim Motherboard Replacement: step 5, image 1 of 3 PlayStation 4 Slim Motherboard Replacement: step 5, image 2 of 3 PlayStation 4 Slim Motherboard Replacement: step 5, image 3 of 3
    • Unscrew and remove the two screws (left one 31.0mm and right one 24.0mm) using a T8 screwdriver with a counter-clockwise motion.

    • Unscrew and remove the 3.0mm screw using a Phillips #1 screwdriver with a counter-clockwise motion.

  6. PlayStation 4 Slim Motherboard Replacement: step 6, image 1 of 1
    • Remove the four 16mm Philips screws holding the power supply in place.

  7. PlayStation 4 Slim Motherboard Replacement: step 7, image 1 of 2 PlayStation 4 Slim Motherboard Replacement: step 7, image 2 of 2
    • Remove the metal sheet from the top of the power supply by grabbing and lifting up with your hands.

  8. PlayStation 4 Slim Motherboard Replacement: step 8, image 1 of 2 PlayStation 4 Slim Motherboard Replacement: step 8, image 2 of 2
    • Remove the antenna from the top of the power supply by guiding the wire with your fingers through the groves underneath the metal panel.

  9. PlayStation 4 Slim Motherboard Replacement: step 9, image 1 of 2 PlayStation 4 Slim Motherboard Replacement: step 9, image 2 of 2
    • Flip the Playstation 4 Slim onto its back.

    • Unscrew and remove the 4.0mm screw using a Phillips #1 screwdriver with a counter-clockwise motion.

  10. PlayStation 4 Slim Motherboard Replacement: step 10, image 1 of 3 PlayStation 4 Slim Motherboard Replacement: step 10, image 2 of 3 PlayStation 4 Slim Motherboard Replacement: step 10, image 3 of 3
    • Use a plastic opening tool to make space between the power supply and console by wedging and wiggling it in-between the two.

    • Lift the power supply up and onto its back on the metal sheet using your hands.

  11. PlayStation 4 Slim Motherboard Replacement: step 11, image 1 of 3 PlayStation 4 Slim Motherboard Replacement: step 11, image 2 of 3 PlayStation 4 Slim Motherboard Replacement: step 11, image 3 of 3
    • Disconnect the wire connection from the power supply by firmly gripping it with your fingers or tweezers and pulling out.

    • Remove the power supply completely by grabbing and lifting up with your hands.

  12. PlayStation 4 Slim Motherboard Replacement, Motherboard: step 12, image 1 of 2 PlayStation 4 Slim Motherboard Replacement, Motherboard: step 12, image 2 of 2
    • Unscrew and remove the 31.0mm safety screw using a T8 screwdriver with a counter-clockwise motion.

  13. PlayStation 4 Slim Motherboard Replacement: step 13, image 1 of 2 PlayStation 4 Slim Motherboard Replacement: step 13, image 2 of 2
    • Locate the two wires connected to the bottom of the motherboard.

    • Remove the wires by firmly grasping the metal connections with your fingers or tweezers and pulling up until they disconnect.

  14. PlayStation 4 Slim Motherboard Replacement: step 14, image 1 of 2 PlayStation 4 Slim Motherboard Replacement: step 14, image 2 of 2
    • Flip the device to the backside.

    • Unscrew and remove 14x 4.0mm black screws using a Phillips #1 screwdriver with a counter-clockwise motion.

    • Unscrew and remove 8x 6.0mm silver screws using a Phillips #1 screwdriver with a counter-clockwise motion.

    • Unscrew and remove 4x 3.0mm silver screws using a Phillips #1 screwdriver with a counter-clockwise motion.

  15. PlayStation 4 Slim Motherboard Replacement: step 15, image 1 of 2 PlayStation 4 Slim Motherboard Replacement: step 15, image 2 of 2
    • Unscrew and remove the two 5.0mm screws on the side of the console using a Phillips #1 screwdriver with a counter-clockwise motion.

  16. PlayStation 4 Slim Motherboard Replacement: step 16, image 1 of 3 PlayStation 4 Slim Motherboard Replacement: step 16, image 2 of 3 PlayStation 4 Slim Motherboard Replacement: step 16, image 3 of 3
    • Locate the white wire connected to the corner of the top of the motherboard.

    • Disconnect the wire by firmly grasping the metal connection with your fingers or tweezers and pulling up until it detaches.

    • Unthread the wire from the tape and move it off to the side using tweezers or your fingers.

  17. PlayStation 4 Slim Motherboard Replacement: step 17, image 1 of 3 PlayStation 4 Slim Motherboard Replacement: step 17, image 2 of 3 PlayStation 4 Slim Motherboard Replacement: step 17, image 3 of 3
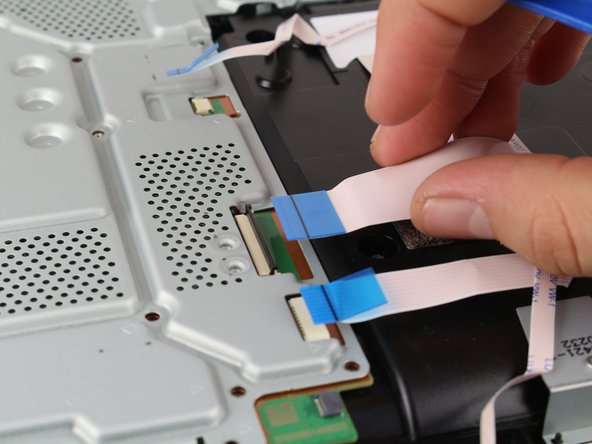
    • Remove the connections by pulling out on the blue tabs with your fingers.

    • Flip up the black clip on the largest tab with your finger before removing it.

    • Remove this wire connection by firmly gripping the wire with your fingers and pulling it out.

  18. PlayStation 4 Slim Motherboard Replacement: step 18, image 1 of 2 PlayStation 4 Slim Motherboard Replacement: step 18, image 2 of 2
    • Remove the metal plate by grabbing two sides of the plate and lifting up and away from yourself.

    • You may need to wiggle the plate a bit to get it loose before you lift it out.

    • Do not lose any of the black pads attached to the motherboard while performing this step.

  19. PlayStation 4 Slim Motherboard Replacement: step 19, image 1 of 3 PlayStation 4 Slim Motherboard Replacement: step 19, image 2 of 3 PlayStation 4 Slim Motherboard Replacement: step 19, image 3 of 3
    • Unscrew and remove the two 10.0mm screws (one silver and one black) using a Phillips #1 screwdriver with a counter-clockwise motion.

    • Remove the small metal plate by grabbing it with your fingers and lifting up.

  20. PlayStation 4 Slim Motherboard Replacement: step 20, image 1 of 3 PlayStation 4 Slim Motherboard Replacement: step 20, image 2 of 3 PlayStation 4 Slim Motherboard Replacement: step 20, image 3 of 3
    • Remove this wire connection by firmly grasping it with tweezers and pulling out.

    • This might require a bit of force to disconnect, but be sure not to break any of the wires.

  21. PlayStation 4 Slim Motherboard Replacement: step 21, image 1 of 2 PlayStation 4 Slim Motherboard Replacement: step 21, image 2 of 2
    • Remove the motherboard by grabbing the edge of the board with one or two hands and pulling away and up.

    • You may need to wiggle the board a bit to get it loose before you remove it.

Harry Koos

Member since: 01/24/18

4,910 Reputation

2 Guides authored

Team

Cal Poly, Team S19-G4, Livingston Winter 2018 Member of Cal Poly, Team S19-G4, Livingston Winter 2018

CPSU-LIVINGSTON-W18S19G4

4 Members

35 Guides authored

View Statistics:

Past 24 Hours: 45

Past 7 Days: 293

Past 30 Days: 1,361

All Time: 102,247