PlayStation 4 Optical Drive Replacement

What you need

  1. PlayStation 4 Optical Drive Replacement, Flip over the PS4: step 1, image 1 of 1
    • Flip the PS4 upside-down with the back side facing towards you.

  2. PlayStation 4 Optical Drive Replacement, Remove the warranty stickers: step 2, image 1 of 3 PlayStation 4 Optical Drive Replacement, Remove the warranty stickers: step 2, image 2 of 3 PlayStation 4 Optical Drive Replacement, Remove the warranty stickers: step 2, image 3 of 3
    • Use tweezers to remove the two stickers in the center of the back of the PS4 exposing two case screws.

  3. PlayStation 4 Optical Drive Replacement, Remove the plastic screw covers: step 3, image 1 of 2 PlayStation 4 Optical Drive Replacement, Remove the plastic screw covers: step 3, image 2 of 2
    • Use tweezers to carefully remove the plastic screw covers in each corner, exposing two more case screws.

  4. PlayStation 4 Optical Drive Replacement, Remove the rear case screws: step 4, image 1 of 2 PlayStation 4 Optical Drive Replacement, Remove the rear case screws: step 4, image 2 of 2
    • Remove the four 7.2 mm Torx security screws on the back of the PS4.

  5. PlayStation 4 Optical Drive Replacement, Remove the lower case: step 5, image 1 of 2 PlayStation 4 Optical Drive Replacement, Remove the lower case: step 5, image 2 of 2
    • Use your thumbs to lift the lower case up and off the PS4.

    • The lower case is held into place by plastic clips. You may need to use significant force to release the lower case.

  6. PlayStation 4 Optical Drive Replacement: step 6, image 1 of 2 PlayStation 4 Optical Drive Replacement: step 6, image 2 of 2
    • Use a pair of tweezers to pull the power supply cable straight out and disconnect the power supply unit from the motherboard.

    • If your connector feels stuck, use a spudger to gently pry the connector out.

  7. PlayStation 4 Optical Drive Replacement, Remove the Wi-Fi antenna: step 7, image 1 of 2 PlayStation 4 Optical Drive Replacement, Remove the Wi-Fi antenna: step 7, image 2 of 2
    • Use the tip of a spudger to disconnect the antenna cable from the motherboard.

  8. PlayStation 4 Optical Drive Replacement: step 8, image 1 of 3 PlayStation 4 Optical Drive Replacement: step 8, image 2 of 3 PlayStation 4 Optical Drive Replacement: step 8, image 3 of 3
    • Use a pair of tweezers or your fingers to grab the antenna cable and move it out from the cable guides.

  9. PlayStation 4 Optical Drive Replacement: step 9, image 1 of 3 PlayStation 4 Optical Drive Replacement: step 9, image 2 of 3 PlayStation 4 Optical Drive Replacement: step 9, image 3 of 3
    • Use a pair of tweezers or your fingers to thread the antenna cable out from underneath the optical drive cable.

  10. PlayStation 4 Optical Drive Replacement: step 10, image 1 of 2 PlayStation 4 Optical Drive Replacement: step 10, image 2 of 2
    • Remove the 9.7 mm Torx security screw securing the antenna.

  11. PlayStation 4 Optical Drive Replacement: step 11, image 1 of 2 PlayStation 4 Optical Drive Replacement: step 11, image 2 of 2
    • Remove the Wi-Fi antenna.

  12. PlayStation 4 Optical Drive Replacement, Disconnect the optical drive: step 12, image 1 of 3 PlayStation 4 Optical Drive Replacement, Disconnect the optical drive: step 12, image 2 of 3 PlayStation 4 Optical Drive Replacement, Disconnect the optical drive: step 12, image 3 of 3
    • Use your fingernail to press down on the metal release lever of the ribbon cable on top of the optical drive.

    • Use your fingers or a pair of tweezers to disconnect the ribbon cable by pulling on the black tab.

    • You do not need to press the metal lever when inserting the ribbon cable back in. You will hear a click once it is fully inserted.

  13. PlayStation 4 Optical Drive Replacement: step 13, image 1 of 3 PlayStation 4 Optical Drive Replacement: step 13, image 2 of 3 PlayStation 4 Optical Drive Replacement: step 13, image 3 of 3
    • Use your fingernail to press down the metal release lever for the ribbon cable connected to the motherboard.

    • Use your fingers or a pair of tweezers to disconnect the ribbon cable by pulling on the black tab.

    • Set the ribbon cable aside for reassembly.

    • You do not need to press the metal lever when inserting the ribbon cable back in. You will hear a click once it is fully inserted.

  14. PlayStation 4 Optical Drive Replacement: step 14, image 1 of 2 PlayStation 4 Optical Drive Replacement: step 14, image 2 of 2
    • Use your fingers or a pair of tweezers to disconnect the optical drive cable from the motherboard.

  15. PlayStation 4 Optical Drive Replacement: step 15, image 1 of 3 PlayStation 4 Optical Drive Replacement: step 15, image 2 of 3 PlayStation 4 Optical Drive Replacement: step 15, image 3 of 3
    • Use your fingers or a pair of tweezers to remove the optical drive cable from the cable guides that hold it in place.

  16. PlayStation 4 Optical Drive Replacement, Remove the optical drive: step 16, image 1 of 2 PlayStation 4 Optical Drive Replacement, Remove the optical drive: step 16, image 2 of 2
    • Remove the four screws securing the optical drive.

    • Three 9.7 mm Torx screws

    • One 6.2 mm Phillips screw

  17. PlayStation 4 Optical Drive Replacement: step 17, image 1 of 2 PlayStation 4 Optical Drive Replacement: step 17, image 2 of 2
    • Lift the optical drive straight up and out of the PS4.

  18. PlayStation 4 Optical Drive Replacement, Remove the PCB: step 18, image 1 of 2 PlayStation 4 Optical Drive Replacement, Remove the PCB: step 18, image 2 of 2
    • If you purchased an optical drive with the PCB board and bracket included, skip the remaining steps and begin reassembly.

    • Remove the three 6.2 mm Phillips screws from the metal bracket.

  19. PlayStation 4 Optical Drive Replacement: step 19, image 1 of 2 PlayStation 4 Optical Drive Replacement: step 19, image 2 of 2
    • Lift the metal bracket straight up to separate it from the optical drive.

  20. PlayStation 4 Optical Drive Replacement: step 20, image 1 of 2 PlayStation 4 Optical Drive Replacement: step 20, image 2 of 2
    • Remove the 6.4 mm Phillips screw from the PCB board.

  21. PlayStation 4 Optical Drive Replacement: step 21, image 1 of 2 PlayStation 4 Optical Drive Replacement: step 21, image 2 of 2
    • Use the tip of a spudger to flip open the ZIF connector locking bar.

  22. PlayStation 4 Optical Drive Replacement: step 22, image 1 of 2 PlayStation 4 Optical Drive Replacement: step 22, image 2 of 2
    • Pull the ribbon cable straight out of the ZIF connector.

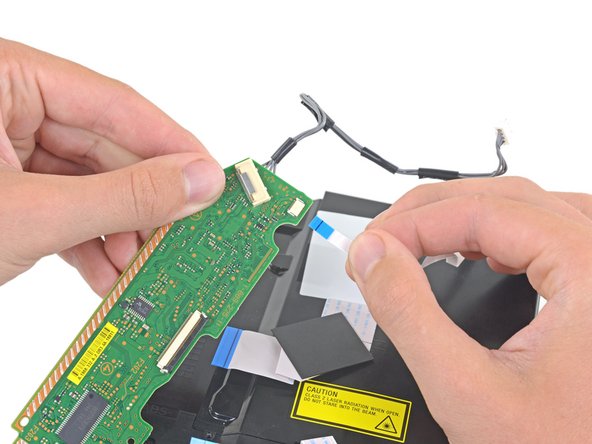
  23. PlayStation 4 Optical Drive Replacement: step 23, image 1 of 2 PlayStation 4 Optical Drive Replacement: step 23, image 2 of 2
    • Hold the PCB in one hand and the lower ribbon cable in the other.

    • Gently pull the lower ribbon cable straight out of the socket.

  24. PlayStation 4 Optical Drive Replacement: step 24, image 1 of 2 PlayStation 4 Optical Drive Replacement: step 24, image 2 of 2
    • Hold the PCB in one hand and the upper ribbon cable in the other.

    • Pull the upper ribbon cable straight out of the socket.

  25. PlayStation 4 Optical Drive Replacement: step 25, image 1 of 1
    • Remove the PCB.

Sam Omiotek

Member since: 02/25/19

72,547 Reputation

288 Guides authored

View Statistics:

Past 24 Hours: 63

Past 7 Days: 530

Past 30 Days: 2,860

All Time: 454,929