
Phillips Azure Steam Iron Disassembly

What you need

  1. Phillips Azure Steam Iron Disassembly, Phillips Azure Steam Iron Disassembly: step 1, image 1 of 3 Phillips Azure Steam Iron Disassembly, Phillips Azure Steam Iron Disassembly: step 1, image 2 of 3 Phillips Azure Steam Iron Disassembly, Phillips Azure Steam Iron Disassembly: step 1, image 3 of 3
    • Start your disassembly on a clean desk, make sure you have trays to store screws and other components, to prevent losing them

  2. Phillips Azure Steam Iron Disassembly: step 2, image 1 of 3 Phillips Azure Steam Iron Disassembly: step 2, image 2 of 3 Phillips Azure Steam Iron Disassembly: step 2, image 3 of 3
    • Image 1: Remove the plastic cover to expose the screw

    • Image 2: Unscrew the screw with your screwdriver

    • Image 3: Detatch the top of the handle with your hand.

    • The handle can't be fully detatched at this point , because the plug cable goes trough the handle in the back

  3. Phillips Azure Steam Iron Disassembly: step 3, image 1 of 3 Phillips Azure Steam Iron Disassembly: step 3, image 2 of 3 Phillips Azure Steam Iron Disassembly: step 3, image 3 of 3
    • Take the top part of the handle, which you removed from the iron in the step before.

    • Image 1&2: remove the two large buttons from the handle by pushing them down if they didn't fall out allready

    • Rotate the handle so you see the inner side of the part

    • Image 3: Remove the small sliding button by pushing one of the legs outwards. The sliding button pops from the handle.

  4. Phillips Azure Steam Iron Disassembly: step 4, image 1 of 1
    • To replace the rubber component in the front of the appliance, remove it with your hand and replace it with a new one.

    • This component needs to be replaced if the rubber is dameged, this rubber prevents water leaking into parts of the appliance it is not supposed to be.

  5. Phillips Azure Steam Iron Disassembly: step 5, image 1 of 1
    • To replace the lamp on top of the handle of the steaming iron, detatch te wires carefully from the plastic components

  6. Phillips Azure Steam Iron Disassembly: step 6, image 1 of 3 Phillips Azure Steam Iron Disassembly: step 6, image 2 of 3 Phillips Azure Steam Iron Disassembly: step 6, image 3 of 3
    • Follow the instructions at this step if you experience trouble with the top sliding button of the appliance

    • Image 1: Remove the screws which connect the white plastic part to the main part of the appliance. (these are the screws on the left and right of the white plastic part, closest to it)

    • Image 2: Use your hand to lift the white plastic part, which covers the component you will remove in image 3

    • Image 3: Use your hand to lift the part to remove it from the steaming iron. If a spring or another component is broken, replace it and put the part back at its place.

    • After replacing one of the components put the part back with the tallest pin facing the front of the iron!! See image 3

  7. Phillips Azure Steam Iron Disassembly: step 7, image 1 of 3 Phillips Azure Steam Iron Disassembly: step 7, image 2 of 3 Phillips Azure Steam Iron Disassembly: step 7, image 3 of 3
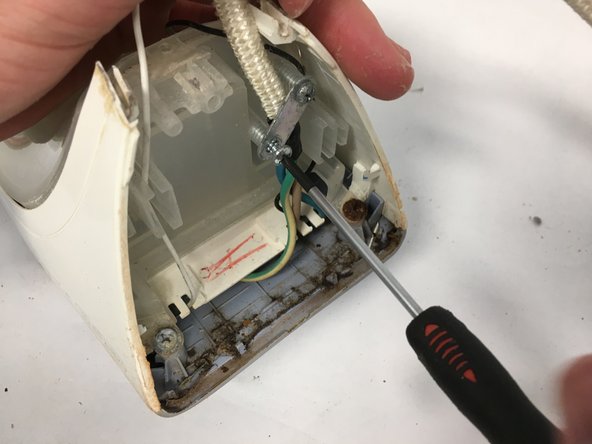
    • This step removes the remaining part of the handle to gain acces to the bottom part of the steaming iron

    • Image 1: Remove both screws at the front top of the product

    • Image 2: Remove the screw at the top back of the steaming iron. This screw is located near the power wire

    • Image 3: Remove the remaining part of the handle with your hand

  8. Phillips Azure Steam Iron Disassembly: step 8, image 1 of 3 Phillips Azure Steam Iron Disassembly: step 8, image 2 of 3 Phillips Azure Steam Iron Disassembly: step 8, image 3 of 3
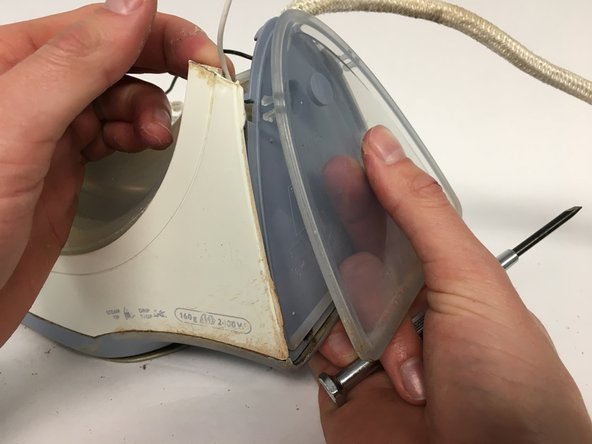
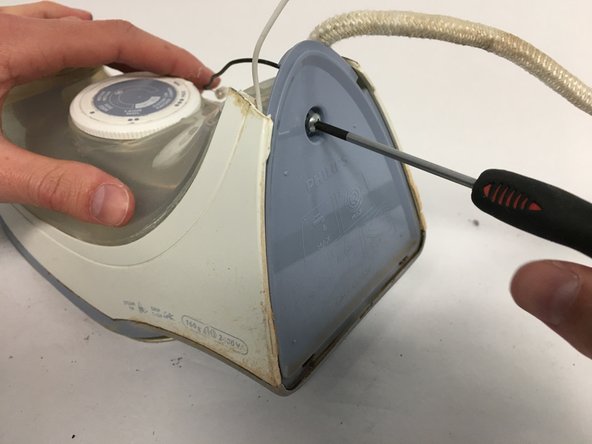
    • By following step 8 and 9 you will detatch the back surface of the steaming iron and expose the electrical wires. These steps also need to be completed to remove the water tank

    • The plastic covering plate is connected by snapfits to the product. A hinch is placed between both. apply some pressure with a lever (we used a flathead screwdriver) and pull the part back with your hand to remove the transparent plastic part

    • Image 3: Unscrew the exposed screw to remove the blue plastic part

    • Be carefull with the snapjoints!! You don't want to break them

  9. Phillips Azure Steam Iron Disassembly: step 9, image 1 of 3 Phillips Azure Steam Iron Disassembly: step 9, image 2 of 3 Phillips Azure Steam Iron Disassembly: step 9, image 3 of 3
    • Image 1: Remove the 'back' of the steam iron with your hand

    • Image 2 & 3: Unscrew the 2 screws next to the electrical wire. This step is needed if you want to replace the power cord

  10. Phillips Azure Steam Iron Disassembly: step 10, image 1 of 2 Phillips Azure Steam Iron Disassembly: step 10, image 2 of 2
    • Step 10,11 &12 will help you remove the water tank

    • Remove the 2 screws at the back of the screwdriver as shown in the images

  11. Phillips Azure Steam Iron Disassembly: step 11, image 1 of 2 Phillips Azure Steam Iron Disassembly: step 11, image 2 of 2
    • Remove the 2 screws in front of the steaming iron as shown in the pictures. After removing these pictures the watertank can be removed, which is described in the next step

  12. Phillips Azure Steam Iron Disassembly: step 12, image 1 of 2 Phillips Azure Steam Iron Disassembly: step 12, image 2 of 2
    • Image 1: Use your screwdriver to 'unclick' the snapjoint at the front to detach the water tank from the bottom of the product , as shown in the image.

    • Make sure you don't apply too much force to the snapjoint! You don''t want to break it

    • Image 2: Detatch the water tank bylifiting it up with your hands.

    • Make sure you don't pull any of the cables in the back while lifting the water tank

  13. Phillips Azure Steam Iron Disassembly: step 13, image 1 of 2 Phillips Azure Steam Iron Disassembly: step 13, image 2 of 2
    • This step shows how to remove the metal plate

    • Image 1: Remove the screw at the front of the steaming iron

    • Image 2: Lift the plate with your hand to remove it

  14. Phillips Azure Steam Iron Disassembly: step 14, image 1 of 2 Phillips Azure Steam Iron Disassembly: step 14, image 2 of 2
    • Image 1: Detach the white sides of the steam iron by pulling them away from the assembly.

    • Image 2: Due to rusted screws, further disassembly was not possible. Our apologies!

Conclusion

Om het apparaat weer te monteren, volg je deze instructies in omgekeerde volgorde.

9 other people completed this guide.

One Comment

Hi

Thank you very much

steel aram - Reply

Add Comment

View Statistics:

Past 24 Hours: 14

Past 7 Days: 111

Past 30 Days: 348

All Time: 33,857