Introduction
I decided to open her up and see it can be repaired - and it could!
Apparently this guide also works for a similar camera, the Lumix Panasonic DMC-ZS10, with the exception that in Step 3 there are 4 extra screws to remove, two on each end.
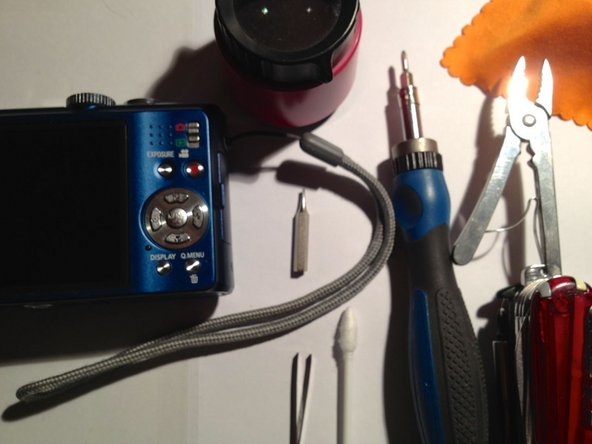
What you need
-
-
Magnifying Glas
-
Electronics Screwdriver set
-
Cloth and Q-Tips
-
tweezers
-
My Swiss-Army Knife :-)
-
TIP! have a sheet of letter paper to put the parts on as you remove them. You can keep them in removal order so it's easy to reverse the sequence on reassembly.
-
-
-
Remove Bottom screws
-
3 visible in the picture
-
2 off screen
-
Only for the DMC-ZS10: there are 4 extra screws to remove, two on each end.
-
Remove front panel
I have a similar camera, the Lumix Panasonic DMC-ZS10, and I found there was 4 extra screws to remove, two on each end.
Alan, can you provide an image of the 4 additional screws?
Also, the battery door was removed simply for better handling, there is no other necessitiy. Same goes for the switch, as it is only losely connected and I hate for stuff to fall off and not remembering where it came from :-)
1. DMC-ZS10 has only the three pictured screws.
2. The end covers should be popped off after removing the two screws at each end but before removing the front cover.
-
-
-
-
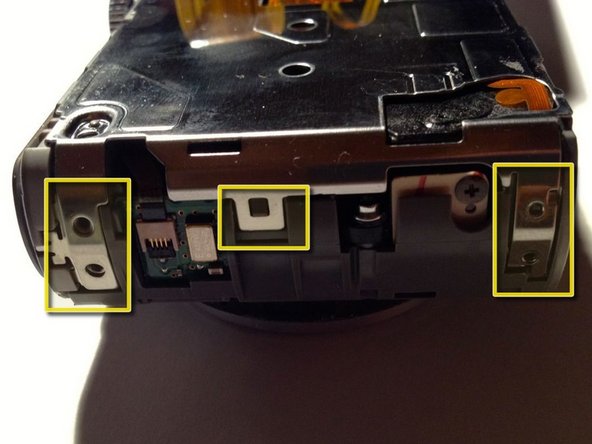
slide pin to side
-
use small pliers to pull or pin to push
-
Caution
-
remove cover
Dont do this, its like taking off a wig when you got to clip someones toenails
-
-
-
Carefully lift the cover slightly upwards
-
Remove the switch
-
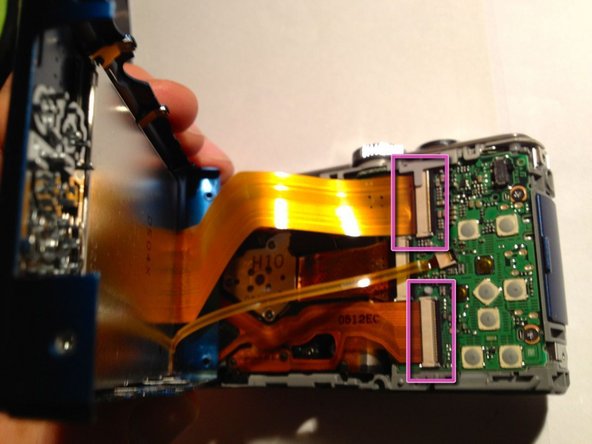
Lift sideways and remove the two PCB connectors
-
Best use your fingernail or a soft plastic spudger to gently flip the black plastic on the side of the connector to the right until it flips over
-
Then gently pull the PCB to the left outwards without damaging it or bending it too sharply
-
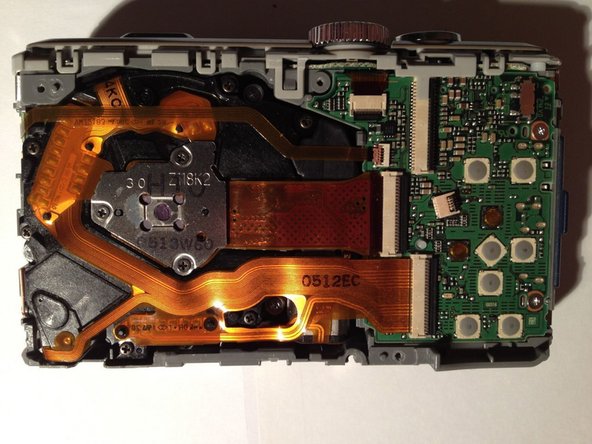
Remove back cover completely
In the DMC-ZS10, the view screen can be removed to the side without disconnecting the (3) PCB connectors. This provides enough room to remove the protective cover and then the image sensor. Just be careful not to accidentally bump into the display while it's hanging in the breeze.
-
-
-
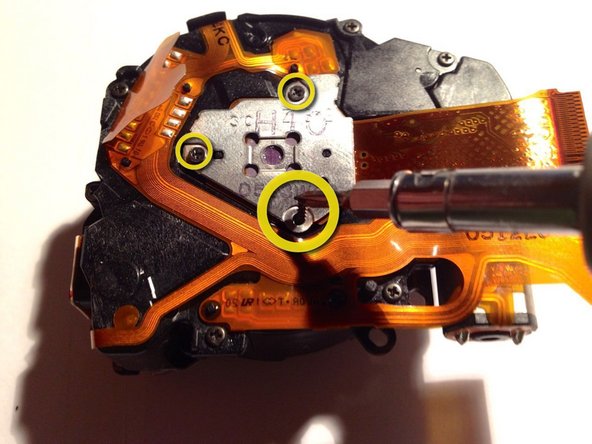
Remove screws holding the Chip assembly
-
Remove PCB Connector (optional) or simply and carefully flip the assembly over
-
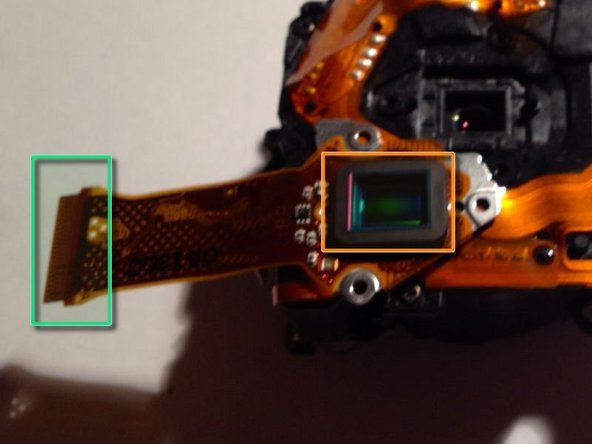
Now the Chip with its protective cover is accessible
-
-
-
Clean the protective cover (without any cleaning fluid so to not leave residue on the glass)
-
Use a Q-Tip or a lint-free cloth like for glases and check with the magnifier for success
I used a compressed gas "duster" from an office supply store. The dust on my image sensor was easily blown away.
I took the back cover off and just used compressed air in al the small holes around the chip. put the back on and the dust was gone (and it was a lot of dust ). I did it on a panasonic DMC-TZ18 .
thank you ever so much.
-


To reassemble your device, follow these instructions in reverse order.
To reassemble your device, follow these instructions in reverse order.
Cancel: I did not complete this guide.
14 other people completed this guide.

8 Comments
I just tore open my ZS10, and here are some notes for that model.
- remove the wrist strap if it is attached to the camera.
Step 3: there are only 3 screws in the bottom; as commented by others, there are 2 screws on each side plate. Note that each side plate slides in at the top.
Step 5: there are three PCB connectors; 1 wide, 2 narrow. NOTE: one of the narrow ones (on mine) had the gold connector side facing down, the other 2 had the gold facing up. (I learned this the hard way after putting all with gold up, reassembling the camera, and the screen did not work.)
Step 5: the display screen did not stay with the camera back when I removed the back; it is clipped into the body. There is some black sticky gasket material around most of the inside of the back piece; a small part of this pulled away from the back piece, so I used a tiny amount of glue stick to stick it back down. I figure this helps keep dust out.
General notes:
(see next comment - I'm at the character limit)
(continued from previous) a. the side piece screws had some thread lock on them, and were very difficult to remove. I resorted to using a small pliers on the jewelers screwdriver while pressing down to break each one loose. Be careful. (I also used a teeny amount of locktite on each one when I put it back together.)
b. Once I had the camera reassembled, I noticed a very small piece of grey foam that had fallen out. I have no idea where it goes, so it is not back in the camera.
c. Some instructions for these jobs suggests a bulb-type air blower to get dust out. I used a rubber ear irrigator bulb that I happen to have - just be certain that it is dry inside!
I have some pix of this repair; if you want them, let me know how to upload them.
Thanks folks - this is a terrific resource.
I did a dust remove on a similar camera for a friend. It is a DMC-TZ-20.
From outside it looks very similar to the TZ-10 pictured here. I encountered the same problem with the narrow PCB connector as Paul Fishman. It was quite hard to stick it back into the connector. The golden side is also facing the other way.
Also the side plates need to be removed for this camera.
Thx, I did it with a TZ8 and it works with the same mechanical design.
My big dust in blue sky is no more there and I'll enjoy my camera for a couple of month more ;-)
Only one comment about PCB connector, I disconnected it to make it easier but not so easy to replug during reassembling! But it's done. So if you can avoid it, my recomendation is to not disconnect any cable.
I did a dust removement three times without any need to remove the front panel oder battery lid. Just backside will do.
Be carefull when cleaning the IR filter - you will blow it away easily.
Exactly the same for TZ18, except Step 5.2 the switch is on the back panel and doesn’t need removal.
Thank you so much for posting this, you have saved me £50+ for a cleaning from an online company, and £85 from my high street store!! I only had to purchase a small cross (Philips) screwdriver and was able to get to the area to clean without taking out any connectors (Panasonic Lumix DMC TZ10 AVC HD Lite), I just had to be careful not to damage them in the process.
I have a DMC-TZ10 which I purchased in 2013. The camera photos are okay but there are marks and lines on the monitor. Does anyone know what causes this problem? Since I purchased the camera outside the US and Canada, I am told that the parts will not be available in the US. Thanks for any advice.