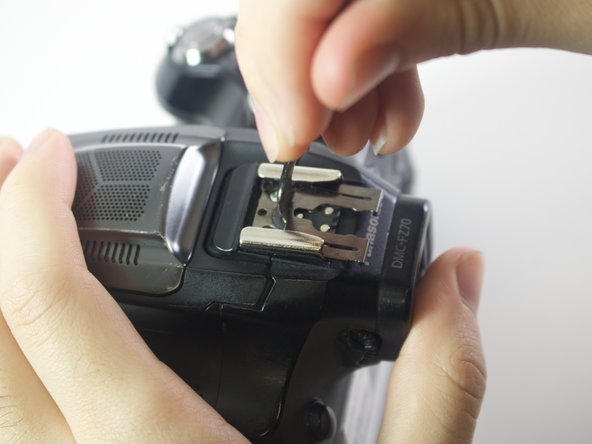
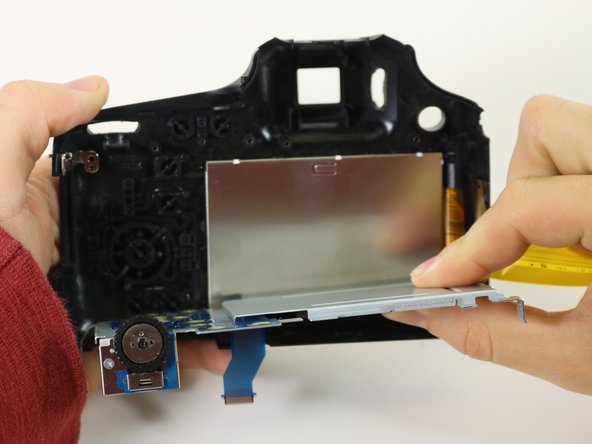
Panasonic DMC-FZ70 LCD Screen Replacement

What you need

  1. Panasonic DMC-FZ70 LCD Screen Replacement, Back Panel: step 1, image 1 of 2 Panasonic DMC-FZ70 LCD Screen Replacement, Back Panel: step 1, image 2 of 2
    • All screws should be removed using a Phillips #0 screwdriver.

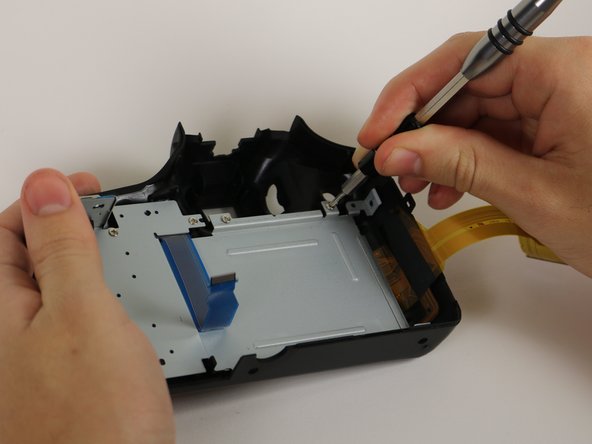
    • Using your screwdriver, unscrew the two 5.0 mm Philips screws to the right of the LCD screen.

  2. Panasonic DMC-FZ70 LCD Screen Replacement: step 2, image 1 of 2 Panasonic DMC-FZ70 LCD Screen Replacement: step 2, image 2 of 2
    • Flip the camera over to the left side of the screen and unscrew the 5mm Phillips screw found there.

  3. Panasonic DMC-FZ70 LCD Screen Replacement: step 3, image 1 of 2 Panasonic DMC-FZ70 LCD Screen Replacement: step 3, image 2 of 2
    • Turn the camera upside down and unscrew the three 5mm screws found on the bottom.

  4. Panasonic DMC-FZ70 LCD Screen Replacement: step 4, image 1 of 2 Panasonic DMC-FZ70 LCD Screen Replacement: step 4, image 2 of 2
    • On the top of the camera locate the two rails with a thin sheet of metal on the floor between them.

    • With a metal spudger, lift this sheet and push it out of the rail device to detach it from the camera.

  5. Panasonic DMC-FZ70 LCD Screen Replacement: step 5, image 1 of 1
    • Proceed to remove the four 5mm Phillips screws that you just uncovered.

  6. Panasonic DMC-FZ70 LCD Screen Replacement: step 6, image 1 of 1
    • Slowly pull on both side of the camera, until both halves begin to separate from each other.

    • Do not pull too hard, as both halves are held together with ZIF connector cables.

  7. Panasonic DMC-FZ70 LCD Screen Replacement: step 7, image 1 of 3 Panasonic DMC-FZ70 LCD Screen Replacement: step 7, image 2 of 3 Panasonic DMC-FZ70 LCD Screen Replacement: step 7, image 3 of 3
    • Using a plastic opening tool, carefully flip up the small black levers that attach the ribbon cables to the ZIF connectors on the motherboard.

    • Carefully pull the ribbon cables out of the slot once they have been released.

    • Only the two indicated connectors need to be removed to separate the two halves of the camera.

  8. Panasonic DMC-FZ70 LCD Screen Replacement, LCD Screen: step 8, image 1 of 2 Panasonic DMC-FZ70 LCD Screen Replacement, LCD Screen: step 8, image 2 of 2
    • Unscrew the five 5mm screws on the panel that you just removed.

  9. Panasonic DMC-FZ70 LCD Screen Replacement: step 9, image 1 of 2 Panasonic DMC-FZ70 LCD Screen Replacement: step 9, image 2 of 2
    • Remove the entire silver panel to reveal the back of the LCD screen

  10. Panasonic DMC-FZ70 LCD Screen Replacement: step 10, image 1 of 1
    • Remove the LCD screen.

Conclusion

To reassemble your device, follow these instructions in reverse order.

4 other people completed this guide.

Alberto Rodriguez

Member since: 01/24/17

531 Reputation

4 Guides authored

Team

Cal Poly, Team 21-3, Maness Winter 2017 Member of Cal Poly, Team 21-3, Maness Winter 2017

CPSU-MANESS-W17S21G3

6 Members

12 Guides authored

5 Comments

Where can I find the screen to replace the one that is cracked?

tim krikston - Reply

i am not able to find the new display where-in they could ship it to INDIA

if u find any please mail me - ppavanshetty@gmail.com

Ppavan Shetty - Reply

After replacement the camera won't work, turn on but it doesn't work.

Harold De La Matta - Reply

After the LCD replacement my camera turn on but it doesn't work. Any ideas?

Harold De La Matta - Reply

Add Comment

View Statistics:

Past 24 Hours: 0

Past 7 Days: 10

Past 30 Days: 26

All Time: 2,427