Mar 18, 2016 - 12:04:22
Feb 24, 2016 - 06:10:29
Feb 24, 2016 - 01:42:56
Feb 24, 2016 - 01:42:50
Feb 24, 2016 - 01:25:54
Feb 24, 2016 - 01:25:41
Feb 24, 2016 - 01:14:51
Feb 24, 2016 - 01:14:13
Feb 24, 2016 - 01:14:02
Feb 24, 2016 - 01:07:29
Feb 24, 2016 - 01:07:12
Feb 24, 2016 - 12:40:09
Feb 24, 2016 - 12:38:00
Feb 24, 2016 - 12:33:19
Feb 23, 2016 - 04:58:21
Feb 23, 2016 - 04:55:45
Feb 23, 2016 - 04:54:59
Feb 23, 2016 - 04:54:57
Feb 23, 2016 - 04:54:50
Feb 23, 2016 - 04:54:38
Feb 23, 2016 - 04:54:25
Feb 23, 2016 - 04:53:26
Feb 23, 2016 - 04:53:11
Feb 23, 2016 - 04:52:14
Feb 23, 2016 - 04:12:47
Feb 17, 2016 - 06:12:41
Feb 17, 2016 - 06:11:18
Feb 17, 2016 - 05:27:25
Feb 17, 2016 - 05:26:36
Feb 16, 2016 - 03:27:23
Feb 10, 2016 - 04:29:38
Feb 09, 2016 - 11:52:52
Feb 09, 2016 - 11:51:34
Feb 09, 2016 - 11:47:31
Feb 05, 2016 - 02:40:53
Feb 05, 2016 - 02:38:43
Feb 05, 2016 - 02:36:27
Feb 05, 2016 - 02:19:19
Feb 05, 2016 - 02:17:51
Feb 05, 2016 - 02:16:12
Feb 05, 2016 - 02:14:35
Feb 05, 2016 - 02:13:55
Feb 05, 2016 - 01:54:36
Feb 05, 2016 - 01:53:40
Feb 04, 2016 - 02:40:13
Feb 04, 2016 - 02:39:19
Feb 04, 2016 - 02:37:24
Feb 04, 2016 - 02:32:45
Feb 04, 2016 - 01:07:03
Feb 04, 2016 - 12:36:40
Feb 04, 2016 - 12:25:50
Feb 04, 2016 - 12:24:02
Feb 04, 2016 - 12:23:23
Feb 04, 2016 - 12:18:32
Feb 04, 2016 - 12:17:08
Feb 04, 2016 - 12:16:51
Feb 04, 2016 - 12:08:02
Feb 04, 2016 - 11:09:06
Feb 04, 2016 - 11:08:43
Feb 04, 2016 - 10:52:13
Feb 04, 2016 - 10:51:53
Feb 04, 2016 - 10:47:24
Feb 04, 2016 - 10:45:36
Feb 03, 2016 - 05:45:15
Feb 03, 2016 - 03:26:07
Feb 03, 2016 - 03:24:43
Feb 03, 2016 - 03:24:35
Feb 03, 2016 - 03:09:38
Feb 03, 2016 - 03:07:52
Feb 03, 2016 - 03:07:39
Feb 03, 2016 - 03:06:48
Feb 03, 2016 - 03:05:35
Feb 03, 2016 - 03:05:13
Feb 03, 2016 - 03:03:36
Feb 03, 2016 - 03:00:10
Feb 03, 2016 - 02:59:52
Feb 02, 2016 - 05:43:43
Feb 01, 2016 - 03:23:22
Feb 01, 2016 - 03:11:59
Feb 01, 2016 - 03:11:41
Feb 01, 2016 - 02:51:08
Feb 01, 2016 - 02:50:26
Feb 01, 2016 - 02:49:45
Feb 01, 2016 - 02:49:34
Feb 01, 2016 - 02:49:25
Feb 01, 2016 - 02:49:16
Feb 01, 2016 - 02:49:07
Feb 01, 2016 - 02:48:57
Feb 01, 2016 - 02:48:52
Feb 01, 2016 - 02:47:37
Feb 01, 2016 - 02:47:10
Feb 01, 2016 - 02:46:58
Feb 01, 2016 - 02:46:42
Feb 01, 2016 - 02:45:01
Feb 01, 2016 - 02:44:50
Feb 01, 2016 - 02:44:40
Feb 01, 2016 - 11:55:30
Feb 01, 2016 - 11:50:38
Feb 01, 2016 - 11:50:17
Jan 29, 2016 - 05:17:10
Jan 29, 2016 - 05:12:21
Jan 29, 2016 - 04:52:26
Jan 29, 2016 - 04:49:58
Jan 29, 2016 - 04:48:54
Jan 29, 2016 - 04:46:51
Jan 29, 2016 - 04:46:42
Jan 29, 2016 - 04:44:54
Jan 29, 2016 - 04:38:18
Jan 29, 2016 - 04:00:35
Jan 29, 2016 - 03:10:24
Jan 29, 2016 - 02:27:21
Jan 29, 2016 - 02:21:29
Jan 29, 2016 - 02:17:32
Jan 29, 2016 - 02:17:10
Jan 29, 2016 - 02:13:44
Jan 29, 2016 - 02:13:11
Jan 29, 2016 - 02:11:24
Jan 29, 2016 - 12:38:43
Jan 29, 2016 - 12:35:44
Jan 29, 2016 - 12:33:47
Jan 29, 2016 - 12:32:16
Jan 29, 2016 - 12:24:45
Jan 15, 2016 - 11:40:13
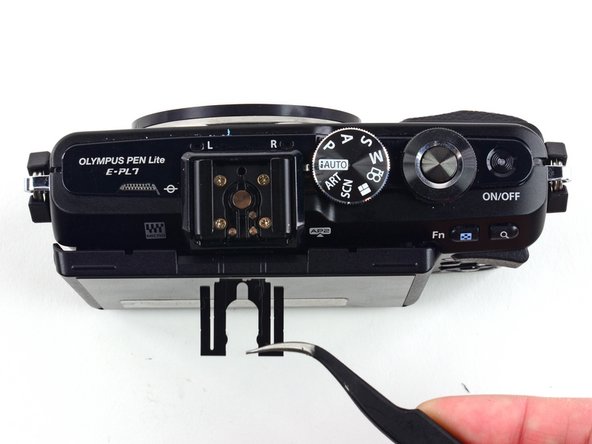
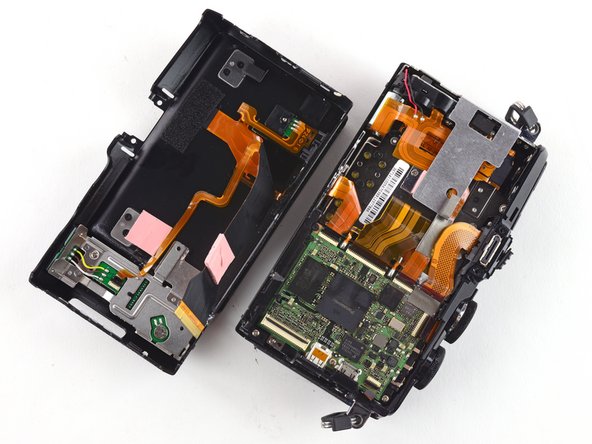
Use this guide to replace a damaged back case, or open the case to access other components of your camera.
We highly suggest you use a magnetic project mat or an organization tray. This camera has many different types of screws and keeping them organized is key to proper reassembly.