
Nokia Lumia 530 Touch screen, LCD Display Replacement

What you need

Video Overview

  1. Nokia Lumia 530 Touch screen, LCD Display Replacement, Loudspeaker and Earpiece: step 1, image 1 of 3 Nokia Lumia 530 Touch screen, LCD Display Replacement, Loudspeaker and Earpiece: step 1, image 2 of 3 Nokia Lumia 530 Touch screen, LCD Display Replacement, Loudspeaker and Earpiece: step 1, image 3 of 3
    • Turn off the phone.

    • Remove the battery and any installed SIM and memory cards. There are two tapes screws:

    • 4x Torx T6

    • 5x Torx T5

    • Remove the middle bezel.

    • Earpiece

    • Earpiece Flex Cable

    • Loudspeaker / Ringer

  2. Nokia Lumia 530 Touch screen, LCD Display Replacement, Logic Board: step 2, image 1 of 3 Nokia Lumia 530 Touch screen, LCD Display Replacement, Logic Board: step 2, image 2 of 3 Nokia Lumia 530 Touch screen, LCD Display Replacement, Logic Board: step 2, image 3 of 3
    • Disconnect the touch screen & display flex cable.

    • Remove the main board.

  3. Nokia Lumia 530 Touch screen, LCD Display Replacement, Touch screen or LCD Display Replacement: step 3, image 1 of 3 Nokia Lumia 530 Touch screen, LCD Display Replacement, Touch screen or LCD Display Replacement: step 3, image 2 of 3 Nokia Lumia 530 Touch screen, LCD Display Replacement, Touch screen or LCD Display Replacement: step 3, image 3 of 3
    • If the glass is broken, put some scotch tape to prevent it breake to pieces.

    • Use a hot air to make adhesive tape more soften.

    • For this operation you can use a hairdryer.

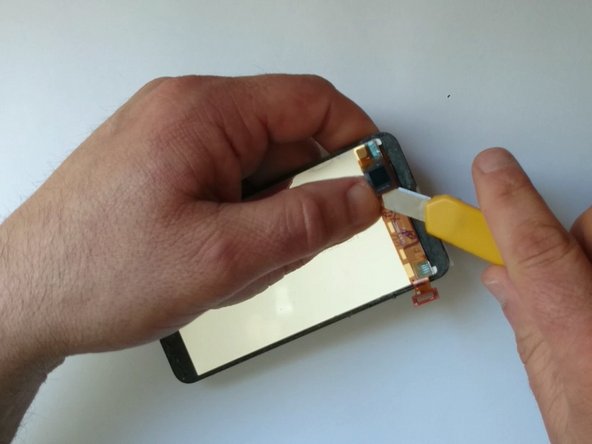
    • Use a cutter and make small room to insert a plastic pick.

  4. Nokia Lumia 530 Touch screen, LCD Display Replacement: step 4, image 1 of 3 Nokia Lumia 530 Touch screen, LCD Display Replacement: step 4, image 2 of 3 Nokia Lumia 530 Touch screen, LCD Display Replacement: step 4, image 3 of 3
    • Continue with the separation by using a plastic tools.

    • If necessary, use the hot air again

  5. Nokia Lumia 530 Touch screen, LCD Display Replacement: step 5, image 1 of 2 Nokia Lumia 530 Touch screen, LCD Display Replacement: step 5, image 2 of 2
    • Unstuck the Touch screen flex cable from the display.

    • If you have a broken glass, you can cut the touch screen flex cable, otherwise unsolder it careful like in the next step.

  6. Nokia Lumia 530 Touch screen, LCD Display Replacement: step 6, image 1 of 3 Nokia Lumia 530 Touch screen, LCD Display Replacement: step 6, image 2 of 3 Nokia Lumia 530 Touch screen, LCD Display Replacement: step 6, image 3 of 3
    • The display edges are glued to the glass with adhesive tape.

    • Use only thin plastic tools for the separation.

  7. Nokia Lumia 530 Touch screen, LCD Display Replacement: step 7, image 1 of 3 Nokia Lumia 530 Touch screen, LCD Display Replacement: step 7, image 2 of 3 Nokia Lumia 530 Touch screen, LCD Display Replacement: step 7, image 3 of 3
    • Remove the blue sticker.

    • With a soldering iron, remove the touch screen flex cable and install the new one.

    • Put back the blue sticker.

  8. Nokia Lumia 530 Touch screen, LCD Display Replacement: step 8, image 1 of 3 Nokia Lumia 530 Touch screen, LCD Display Replacement: step 8, image 2 of 3 Nokia Lumia 530 Touch screen, LCD Display Replacement: step 8, image 3 of 3
    • If the spare part is without tape, install a new one.

    • Carefully put the display in place, then install the glass.

    • Start with reassembling.

  9. Nokia Lumia 530 Touch screen, LCD Display Replacement: step 9, image 1 of 1
    • That's all.

    • .

    • .

    • .

    • .

    • .

    • Did you do it successfully?

Conclusion

To reassemble your device, follow these instructions in reverse order.

15 other people completed this guide.

ZFix

Member since: 12/09/13

191,182 Reputation

330 Guides authored

Team

Master Techs Member of Master Techs

Community

322 Members

2,521 Guides authored

10 Comments

What did you apply in the first frame of step 7? 4:15 in the video.

Paul Reich - Reply

soldering flux

ZFix -

Thanks for confirming

Paul Reich -

I didn't end up doing it correctly - it didn't work.

I think the mistake I made was not heating the old flex cable off the connector. I didn't follow instructions correctly and I pulled it off. I was able to heat the leftover connectors off but after soldering the new flex onto the board and sealing up it didnt work - screen still unresponsive :-(

It was my first attempt at replacing a screen (and I don't have any experience) so I'm not too bummed.

I just ordered a complete LCD and digitizer instead :-)

Paul Reich - Reply

Failed miserably... Soldering iron not adapted. Might want to emphasise that is critical. At least I tried...

ricochapuis - Reply

Add Comment

View Statistics:

Past 24 Hours: 0

Past 7 Days: 6

Past 30 Days: 12

All Time: 37,156