
Nobis NB07 Screen Replacement

What you need

  1. Nobis NB07 Screen Replacement, Opening the case: step 1, image 1 of 1
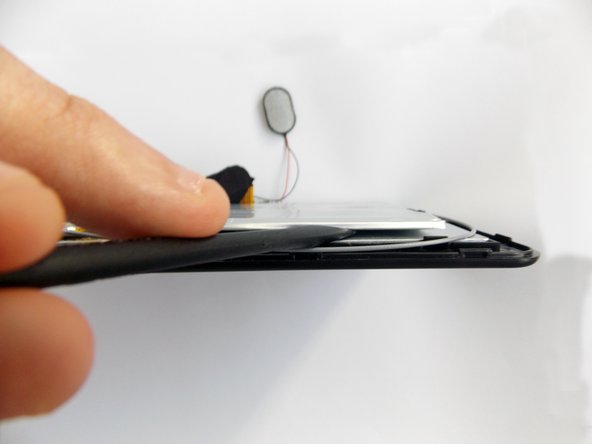
    • Look towards the topside of the tablet, where the power button is located.

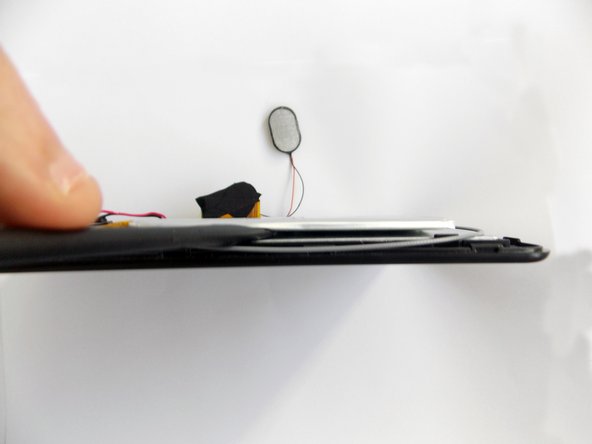
    • Insert a plastic opening tool in the crack between the two parts of the case.

    • Move it gently back and forth to open the case.

  2. Nobis NB07 Screen Replacement: step 2, image 1 of 3 Nobis NB07 Screen Replacement: step 2, image 2 of 3 Nobis NB07 Screen Replacement: step 2, image 3 of 3
    • With the plastic opening tool in the opening between the two sides of the case, slide the tool along the tablet's border to separate the two sides completely.

    • Be careful when you separate the two halves. Open the case from the opposite side of the camera, there is a cable connecting both halves of the case.

  3. Nobis NB07 Screen Replacement, Replacing the battery: step 3, image 1 of 3 Nobis NB07 Screen Replacement, Replacing the battery: step 3, image 2 of 3 Nobis NB07 Screen Replacement, Replacing the battery: step 3, image 3 of 3
    • Remove the tape holding the battery in place.

  4. Nobis NB07 Screen Replacement: step 4, image 1 of 3 Nobis NB07 Screen Replacement: step 4, image 2 of 3 Nobis NB07 Screen Replacement: step 4, image 3 of 3
    • Insert the flat end of the spudger tool in the crack beneath the battery.

    • Move the spudger tool carefully side to side to remove the glue that is holding the battery in place.

    • This is a soft battery, so a little bending is expected.

  5. Nobis NB07 Screen Replacement: step 5, image 1 of 1
    • After the battery is unglued, locate the cables that connect it to the motherboard.

    • Annotate where each color goes to make the reassembly easier.

  6. Nobis NB07 Screen Replacement: step 6, image 1 of 2 Nobis NB07 Screen Replacement: step 6, image 2 of 2
    • Desolder the cables with a soldering iron and use a desoldering braid to remove the solder.

    • Review the Ifixit soldering guide if you need help soldering.

    • You can now remove the battery.

  7. Nobis NB07 Screen Replacement, Removing the speaker: step 7, image 1 of 3 Nobis NB07 Screen Replacement, Removing the speaker: step 7, image 2 of 3 Nobis NB07 Screen Replacement, Removing the speaker: step 7, image 3 of 3
    • Remove the tape holding the speaker in its socket.

  8. Nobis NB07 Screen Replacement: step 8, image 1 of 2 Nobis NB07 Screen Replacement: step 8, image 2 of 2
    • After you remove the tape, remove the speaker from its socket. You can place the speaker on one side of the tablet to have more freedom.

    • Look for the place where the speaker's cables meet with the motherboard.

    • Annotate where which color goes to make the reassembly easier.

  9. Nobis NB07 Screen Replacement: step 9, image 1 of 2 Nobis NB07 Screen Replacement: step 9, image 2 of 2
    • Use a soldering iron to desolder the cables and extract the solder using a desoldering braid.

    • Review the Ifixit soldering guide if you need help soldering.

    • You can now remove the speaker.

  10. Nobis NB07 Screen Replacement, Removing the cameras: step 10, image 1 of 3 Nobis NB07 Screen Replacement, Removing the cameras: step 10, image 2 of 3 Nobis NB07 Screen Replacement, Removing the cameras: step 10, image 3 of 3
    • Remove the black tape covering the cameras power cable.

  11. Nobis NB07 Screen Replacement: step 11, image 1 of 2 Nobis NB07 Screen Replacement: step 11, image 2 of 2
    • Use the spudger tool to pry upwards the ZIF connector and release the power cable.

  12. Nobis NB07 Screen Replacement: step 12, image 1 of 3 Nobis NB07 Screen Replacement: step 12, image 2 of 3 Nobis NB07 Screen Replacement: step 12, image 3 of 3
    • With the power cable disconnected, the backside camera is free. However, both cameras are sequentially connected through the power cable; the front side camera is glued to the motherboard.

    • Using tweezers, carefully grab the front camera and twist slowly.

    • The camera should release easily, do not twist too hard.

    • You can now remove the cameras.

  13. Nobis NB07 Screen Replacement, Removing the microphone: step 13, image 1 of 1
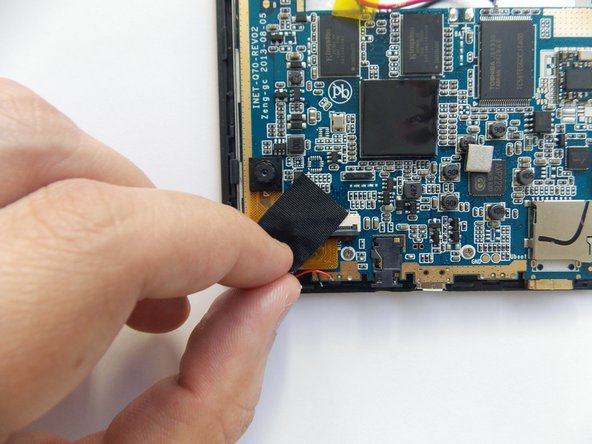
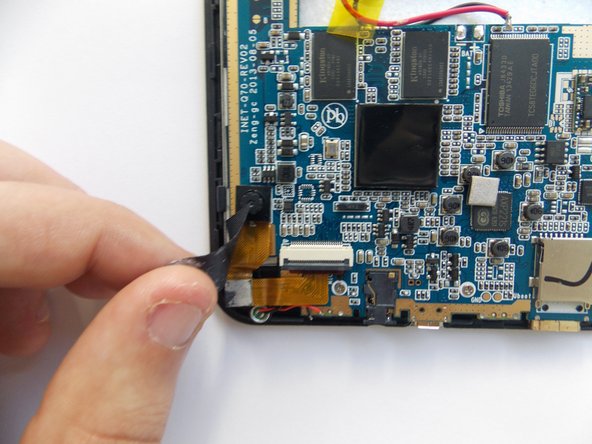
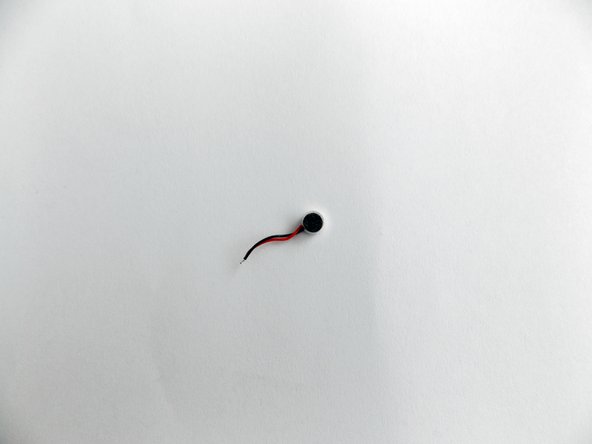
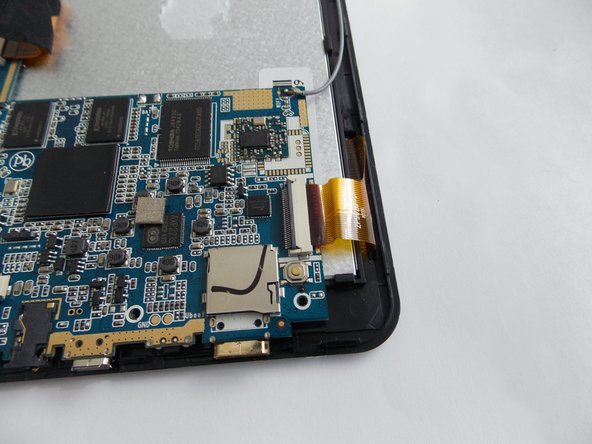
    • Locate the microphone's cables in front of the cameras' ZIF connector.

    • Annotate where each color goes to make the reassembly easier.

  14. Nobis NB07 Screen Replacement: step 14, image 1 of 1
    • Desolder the cables with a soldering iron and use a desoldering braid to remove the solder.

    • Review the Ifixit soldering guide if you need help soldering.

  15. Nobis NB07 Screen Replacement: step 15, image 1 of 2 Nobis NB07 Screen Replacement: step 15, image 2 of 2
    • Use the pointy end of the tweezers to retrieve the microphone from its socket.

    • You can now remove the microphone.

  16. Nobis NB07 Screen Replacement, Screen: step 16, image 1 of 2 Nobis NB07 Screen Replacement, Screen: step 16, image 2 of 2
    • Use the T4 Torx screwdriver to remove the 4.0 mm T4 Torx screws.

  17. Nobis NB07 Screen Replacement: step 17, image 1 of 3 Nobis NB07 Screen Replacement: step 17, image 2 of 3 Nobis NB07 Screen Replacement: step 17, image 3 of 3
    • Remove the black tape covering one of the screen power cables.

  18. Nobis NB07 Screen Replacement: step 18, image 1 of 2 Nobis NB07 Screen Replacement: step 18, image 2 of 2
    • Use the spudger tool to pry the ZIF connector upwards so that it releases the power cable.

  19. Nobis NB07 Screen Replacement: step 19, image 1 of 2 Nobis NB07 Screen Replacement: step 19, image 2 of 2
    • Grab the power cable and pull backwards gently.

  20. Nobis NB07 Screen Replacement: step 20, image 1 of 2 Nobis NB07 Screen Replacement: step 20, image 2 of 2
    • Use the spudger tool to pry the ZIF connector on the other side of the tablet upwards so that it releases the power cable.

  21. Nobis NB07 Screen Replacement: step 21, image 1 of 2 Nobis NB07 Screen Replacement: step 21, image 2 of 2
    • Grab the power cable and pull backwards gently.

  22. Nobis NB07 Screen Replacement: step 22, image 1 of 2 Nobis NB07 Screen Replacement: step 22, image 2 of 2
    • Grab the now loose motherboard and move it to any side of the case.

    • There is still one cable connecting the motherboard to the screen. Since it does not hurts the process, you can leave it there until the end. If you want to remove it now, go to Step 25 and then come back.

  23. Nobis NB07 Screen Replacement: step 23, image 1 of 3 Nobis NB07 Screen Replacement: step 23, image 2 of 3 Nobis NB07 Screen Replacement: step 23, image 3 of 3
    • Insert the plastic opening tool between the screen and the case to release the clasps holding the screen.

  24. Nobis NB07 Screen Replacement: step 24, image 1 of 2 Nobis NB07 Screen Replacement: step 24, image 2 of 2
    • Remove the screen from the case.

  25. Nobis NB07 Screen Replacement: step 25, image 1 of 2 Nobis NB07 Screen Replacement: step 25, image 2 of 2
    • Remove the taped cable from the screen.

    • You can now remove the screen.

Conclusion

To reassemble your device, follow these instructions in reverse order.

3 other people completed this guide.

Daniel Gomero

Member since: 01/21/15

966 Reputation

5 Guides authored

Team

USF Tampa, Team 5-5, Brown Winter 2015 Member of USF Tampa, Team 5-5, Brown Winter 2015

USFT-BROWN-W15S5G5

3 Members

10 Guides authored

One Comment

I think that remove the microphone, speakers and cameras are unnecessary. I had change the digiter and don't remove anything just the screws and be careful with the speaker and unlock the digiter cable in the left upper side and that's the parts that I had removed then the parts that you need remove is the battery and the 3 screws and unlock all the cables and the parts attached to the screen and that's it....

Karen De Leon - Reply

Add Comment

View Statistics:

Past 24 Hours: 0

Past 7 Days: 0

Past 30 Days: 3

All Time: 707