Free Shipping on Domestic Orders $75+

Nintendo Wii U Motherboard Replacement

What you need

    1. Nintendo Wii U Motherboard Replacement, Console Outer Case: step 1, image 1 of 1
      • With the bottom of the console facing up, remove the following 6 screws hidden underneath the white square stickers:

      • Three 5.1mm Phillips #000 screws

      • Two 6.1mm Tri-wing Y0 screws

      • One 13.2mm Tri-wing Y1 screw

      Ask FixBot

      Add Comment

    2. Nintendo Wii U Motherboard Replacement: step 2, image 1 of 1
      • Rotate the console 180 degrees so that the exhaust vents are facing you.

      • Remove the two 7.1mm Phillips #00 screws.

      Ask FixBot

      Add Comment

    3. Nintendo Wii U Motherboard Replacement: step 3, image 1 of 2 Nintendo Wii U Motherboard Replacement: step 3, image 2 of 2
      • On the side opposite of the exhaust vents, slide the cover faceplate towards the back of the console and pull upwards to release it.

      Ask FixBot

      Add Comment

    4. Nintendo Wii U Motherboard Replacement: step 4, image 1 of 1
      • On the bottom of the console beneath the previously removed faceplate, remove the three 13.2mm Tri-wing Y1 screws.

      Ask FixBot

      Add Comment

    5. Nintendo Wii U Motherboard Replacement: step 5, image 1 of 3 Nintendo Wii U Motherboard Replacement: step 5, image 2 of 3 Nintendo Wii U Motherboard Replacement: step 5, image 3 of 3
      • On the back of the console, lift up and release the main top cover.

      Ask FixBot

      Add Comment

    1. Nintendo Wii U Motherboard Replacement, Front Faceplate: step 6, image 1 of 2 Nintendo Wii U Motherboard Replacement, Front Faceplate: step 6, image 2 of 2
      • Rotate the device so that the front plate is facing you.

      • On each side of the console, remove the 3.5mm Phillips #0 screw connecting the DVD drive to the faceplate.

      Ask FixBot

      Add Comment

    2. Nintendo Wii U Motherboard Replacement: step 7, image 1 of 1
      • Rotate the device so that the front plate is on the right side and the ribbon cable is visible.

      • The ribbon cable is connected to the system by a latch which holds in the blue tab. Flip this latch up to unlock it.

      • Lift up on the blue tab to release the ribbon cable.

      Ask FixBot

      Add Comment

    3. Nintendo Wii U Motherboard Replacement: step 8, image 1 of 1
      • Remove the front faceplate.

      Ask FixBot

      Add Comment

    1. Nintendo Wii U Motherboard Replacement, DVD Drive: step 9, image 1 of 1
      • On each side of the DVD drive, remove the two 4.6mm Phillips #0 mounting screws.

      Ask FixBot

      Add Comment

    2. Nintendo Wii U Motherboard Replacement: step 10, image 1 of 2 Nintendo Wii U Motherboard Replacement: step 10, image 2 of 2
      • Rotate the device so that the disc drive slot is visible.

      • A ribbon cable is attached to the bottom right side of the disc drive. The ribbon cable can rip if it isn't removed properly.

      • Lift the disc drive out of the mount and turn over to the right so it lies like a book.

      • Use a spudger to release the ribbon cable.

      Ask FixBot

      Add Comment

    3. Nintendo Wii U Motherboard Replacement: step 11, image 1 of 1
      • Remove the disc drive.

      Ask FixBot

      Add Comment

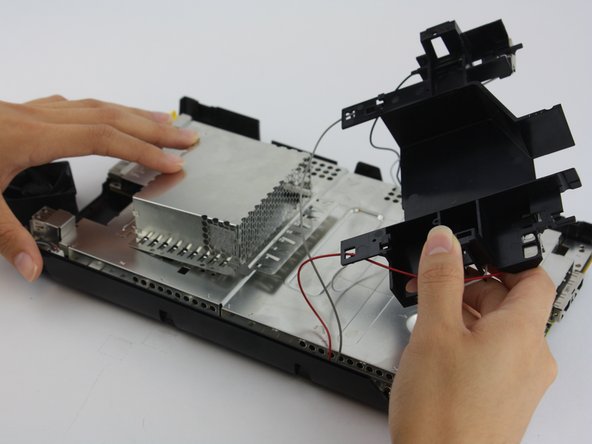
    1. Nintendo Wii U Motherboard Replacement, Motherboard: step 12, image 1 of 3 Nintendo Wii U Motherboard Replacement, Motherboard: step 12, image 2 of 3 Nintendo Wii U Motherboard Replacement, Motherboard: step 12, image 3 of 3
      • Remove the black plastic shielding by unscrewing connecting screws with a Phillip's Head screwdriver.

      • You will have to carefully adjust the antenna cables out of the way in order to proceed comfortably.

      Ask FixBot

      Add Comment

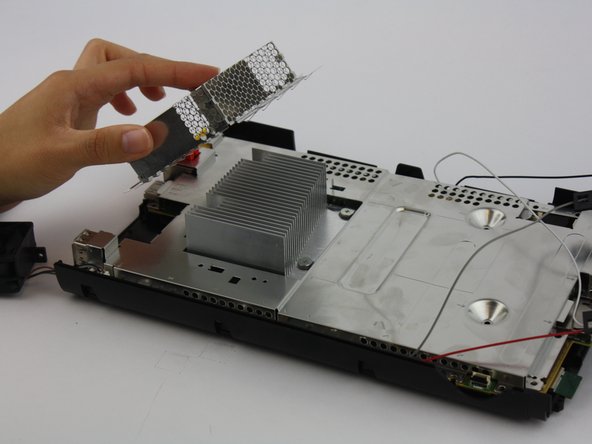
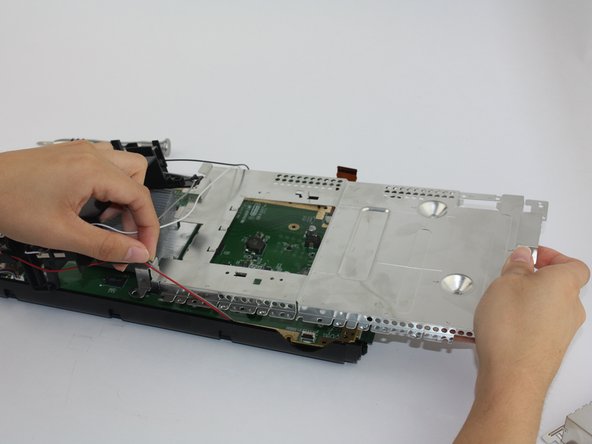
    2. Nintendo Wii U Motherboard Replacement: step 13, image 1 of 3 Nintendo Wii U Motherboard Replacement: step 13, image 2 of 3 Nintendo Wii U Motherboard Replacement: step 13, image 3 of 3
      • The metal cap does not require unscrewing and should lift up with ease.

      • Unscrew all the screws that outline the perimeter of the board using a Phillips Head (PH1) screwdriver.

      • Remove the silver shielding plate once all screws are removed. Be careful when pulling it under the affixed antenna cables.

      Ask FixBot

      Add Comment

    3. Nintendo Wii U Motherboard Replacement: step 14, image 1 of 2 Nintendo Wii U Motherboard Replacement: step 14, image 2 of 2
      • At this point, the motherboard should easily separate from the lower tray.

      Ask FixBot

      Add Comment

Conclusion

To reassemble your device, follow these instructions in reverse order.

Cancel: I did not complete this guide.

20 other people completed this guide.

Emily Vasquez

Member since: 02/24/16

1,058 Reputation

3 Guides authored

Team

USF Tampa, Team 1-2, Leahy Spring 2016 Member of USF Tampa, Team 1-2, Leahy Spring 2016

USFT-LEAHY-S16S1G2

3 Members

48 Guides authored

3 Guide Comments

Does anyone knows where I can buy a Wii U Motherboard? mine has a dead CPU/GPU :(((((

AppleTopic - Reply Share

This really feels like a "draw the rest of the f***ing owl" kind of guide. "Remove the black plastic shielding by unscrewing connecting screws"? Which ones???

Lucas Newton - Reply Share

Everything from Step 12 on is honestly not helpful. Someone needs to address this, especially with the Wii U starting to gain in popularity and the number of known issues with the systems... Call out the screw locations like the earlier steps, show an actual top/bottom photo of the motherboard once it has been removed, etc...

Nick Exarhos - Reply Share

Add Comment

View Statistics:

Past 24 Hours: 17

Past 7 Days: 78

Past 30 Days: 363

All Time: 28,526