Nintendo Wii U GamePad Analog Stick Replacement

What you need

  1. Nintendo Wii U GamePad Analog Stick Replacement, Battery: step 1, image 1 of 2 Nintendo Wii U GamePad Analog Stick Replacement, Battery: step 1, image 2 of 2
    • Face the GamePad down and unscrew the two Phillips #00 screws which are attached to the battery cover.

    • Lift up and remove the battery cover.

  2. Nintendo Wii U GamePad Analog Stick Replacement: step 2, image 1 of 3 Nintendo Wii U GamePad Analog Stick Replacement: step 2, image 2 of 3 Nintendo Wii U GamePad Analog Stick Replacement: step 2, image 3 of 3
    • With your finger on the battery connector, pull downwards toward the base of the GamePad to disconnect it.

    • Pull upwards from the bottom of the battery to release it.

  3. Nintendo Wii U GamePad Analog Stick Replacement, Outer Case: step 3, image 1 of 3 Nintendo Wii U GamePad Analog Stick Replacement, Outer Case: step 3, image 2 of 3 Nintendo Wii U GamePad Analog Stick Replacement, Outer Case: step 3, image 3 of 3
    • Remove the ten 8.9mm Tri-wing Y1 screws hidden underneath square stickers.

    • Lift up the back plate.

    • The back plate is still connected by a cable to the motherboard.

  4. Nintendo Wii U GamePad Analog Stick Replacement: step 4, image 1 of 2 Nintendo Wii U GamePad Analog Stick Replacement: step 4, image 2 of 2
    • Unplug the connector that connects the back plate to the motherboard.

    • Remove the back plate.

  5. Nintendo Wii U GamePad Analog Stick Replacement, Analog Stick: step 5, image 1 of 2 Nintendo Wii U GamePad Analog Stick Replacement, Analog Stick: step 5, image 2 of 2
    • Take out the left and right shoulder buttons in the upper corners.

    • Remove the ZR and ZL trigger buttons by lifting up and sliding outward.

  6. Nintendo Wii U GamePad Analog Stick Replacement: step 6, image 1 of 2 Nintendo Wii U GamePad Analog Stick Replacement: step 6, image 2 of 2
    • Remove the top rubber cover by pulling it off of its mounts to access one of the mounting screws.

    • Remove the four 5.2mm Phillips #0 screws.

  7. Nintendo Wii U GamePad Analog Stick Replacement: step 7, image 1 of 2 Nintendo Wii U GamePad Analog Stick Replacement: step 7, image 2 of 2
    • Use a spudger to lift the tab which releases the blue ribbon cable.

    • Remove the analog stick and button cover.

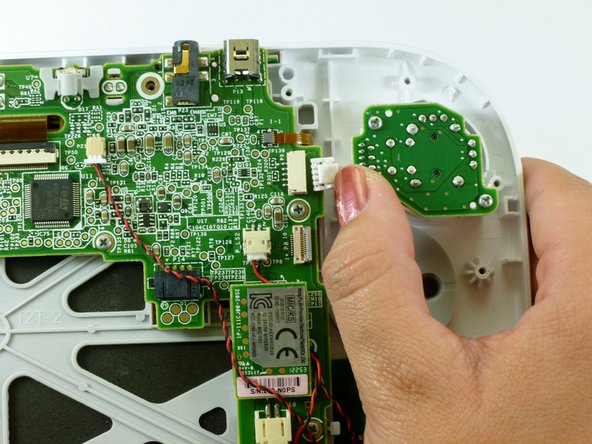
  8. Nintendo Wii U GamePad Analog Stick Replacement: step 8, image 1 of 1
    • Use your thumb and push the connector towards the rightmost edge to disconnect the analog stick cable connector.

  9. Nintendo Wii U GamePad Analog Stick Replacement: step 9, image 1 of 2 Nintendo Wii U GamePad Analog Stick Replacement: step 9, image 2 of 2
    • Remove the two 9.0mm Tri-wing Y0 screws.

    • Lift out the analog stick.

Conclusion

To reassemble your device, follow these instructions in reverse order.

85 other people completed this guide.

Kim Arre

Member since: 01/11/13

4,918 Reputation

8 Guides authored

Team

Cal Poly, Team 17-20, Forte Winter 2013 Member of Cal Poly, Team 17-20, Forte Winter 2013

CPSU-FORTE-W13S17G20

5 Members

38 Guides authored

35 Comments

where can i find replacement analogs for wiiu gamepad and wiiu procontoller?

Victor Torres - Reply

www.ebay.com

mhuntersr -

They are available at ebay.com Cost around 7,50 $ Left & Right (different - look what you need). Comes all from china or hong Kong but Quality is 1A (so far i can tell).

Frederik Rischmann -

Bump previous question because dogs seem to enjoy their texture.

maskedpainter - Reply

Has anyone tried this?

http://dx.com/p/replacement-3d-analog-st...

I know it says for the pro controller. But based from the images, the pins could be compatible.

wandererwk - Reply

Add Comment

View Statistics:

Past 24 Hours: 23

Past 7 Days: 164

Past 30 Days: 720

All Time: 99,897