
Nikon Coolpix E5700 Top Cover Replacement

What you need

  1. Nikon Coolpix E5700 Top Cover Replacement, Battery: step 1, image 1 of 2 Nikon Coolpix E5700 Top Cover Replacement, Battery: step 1, image 2 of 2
    • Use your finger tip to slide the battery release tab toward the battery symbol on the E5700.

    • Open the battery door.

  2. Nikon Coolpix E5700 Top Cover Replacement: step 2, image 1 of 1
    • Pull the battery out of the E5700.

    • It may be necessary to wiggle the battery while pulling to free it from its pocket in the case.

  3. Nikon Coolpix E5700 Top Cover Replacement, Back Panel: step 3, image 1 of 1
    • Turn to the bottom of the camera.

    • Remove the two Phillips screws located directly below the back monitor

  4. Nikon Coolpix E5700 Top Cover Replacement: step 4, image 1 of 2 Nikon Coolpix E5700 Top Cover Replacement: step 4, image 2 of 2
    • Turn the camera to the side with the memory card slot and open the compartment for the CF card.

    • Remove the top two Phillips screws closest to the back panel.

  5. Nikon Coolpix E5700 Top Cover Replacement: step 5, image 1 of 1
    • Turn to the back of the camera.

    • Remove the top most Phillips screw on the back panel.

  6. Nikon Coolpix E5700 Top Cover Replacement: step 6, image 1 of 1
    • Turn to the last side of the back panel.

    • Remove the Phillips screw below the eyepiece.

    • Remove the Phillips screw located above the speaker.

  7. Nikon Coolpix E5700 Top Cover Replacement: step 7, image 1 of 2 Nikon Coolpix E5700 Top Cover Replacement: step 7, image 2 of 2
    • Gently begin to remove the back panel.

    • Caution: There are two bundles of wires connecting the back panel to the camera. Be sure not to pull too hard and yank these out.

  8. Nikon Coolpix E5700 Top Cover Replacement: step 8, image 1 of 2 Nikon Coolpix E5700 Top Cover Replacement: step 8, image 2 of 2
    • Now gently unplug the two wires at the bottom of the panel.

  9. Nikon Coolpix E5700 Top Cover Replacement, Top Cover: step 9, image 1 of 1
    • Finish pulling away the back panel.

    • Turn the camera to its non-grip side.

    • Remove the Phillips screw located above the strap holder.

  10. Nikon Coolpix E5700 Top Cover Replacement: step 10, image 1 of 2 Nikon Coolpix E5700 Top Cover Replacement: step 10, image 2 of 2
    • Open the CF card slot.

    • Remove the Phillips screw near the top of the camera.

  11. Nikon Coolpix E5700 Top Cover Replacement: step 11, image 1 of 1
    • Turn to the front of the camera.

    • Lift up the corner of the grip pad nearest to the flash bulb.

    • Remove the Phillips screw underneath the grip pad.

  12. Nikon Coolpix E5700 Top Cover Replacement: step 12, image 1 of 2 Nikon Coolpix E5700 Top Cover Replacement: step 12, image 2 of 2
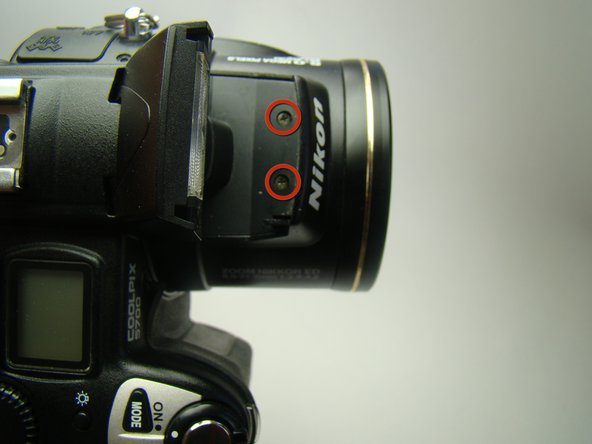
    • Lift up the flash bulb container.

    • Remove the two Phillips screws located near the base of the section.

  13. Nikon Coolpix E5700 Top Cover Replacement: step 13, image 1 of 2 Nikon Coolpix E5700 Top Cover Replacement: step 13, image 2 of 2
    • Open the battery compartment.

    • Remove the Phillips screw located at the bottom of the battery compartment.

  14. Nikon Coolpix E5700 Top Cover Replacement: step 14, image 1 of 1
    • Begin to lift the top cover from the rest of the camera.

    • Be careful when doing this because many wires are connecting the top piece to the camera. Pulling too hard may pull these wires out.

  15. Nikon Coolpix E5700 Top Cover Replacement: step 15, image 1 of 1
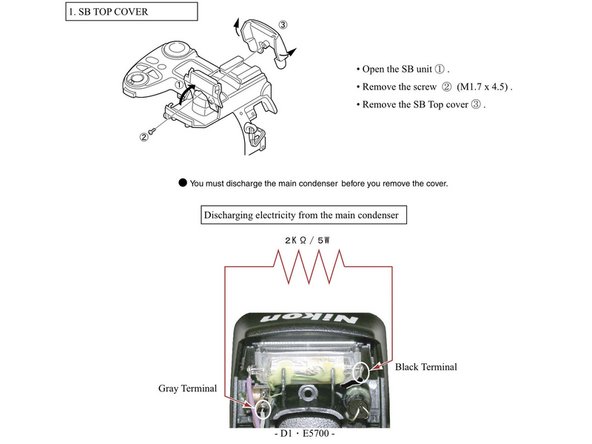
    • In order to pull the top panel without removing the flash unit. You must remove the flash top cover, taking away the screw under the bulb (see image). then gently remove the plastic top cover. IMPORTANT: discharge the condenser as soon as possible (the flash wires are now exposed, and dangerous ).

  16. Nikon Coolpix E5700 Top Cover Replacement: step 16, image 1 of 2 Nikon Coolpix E5700 Top Cover Replacement: step 16, image 2 of 2
    • Unplug the orange ribbon wire from the back of the camera.

    • Unplug the two blue ribbon wires from the back of the camera.

  17. Nikon Coolpix E5700 Top Cover Replacement: step 17, image 1 of 2 Nikon Coolpix E5700 Top Cover Replacement: step 17, image 2 of 2
    • Remove the Phillips screws on both sides of the flash bulb mount.

  18. Nikon Coolpix E5700 Top Cover Replacement: step 18, image 1 of 2 Nikon Coolpix E5700 Top Cover Replacement: step 18, image 2 of 2
    • Lift the top panel up and pull the flash bulb housing away from the rest of the top panel.

    • Note: The top panel will be difficult to separate from the flash bulb housing. Place your hands as shown in the picture and push upward with your thumb while holding the flash bulb housing stationary

  19. Nikon Coolpix E5700 Top Cover Replacement: step 19, image 1 of 1
    • Unplug the orange ribbon and the other wires and finish carefully removing the top panel.

Kyle Sitton

Member since: 04/17/11

351 Reputation

7 Guides authored

Team

Cal Poly, Team 24-58, Amido Spring 2011 Member of Cal Poly, Team 24-58, Amido Spring 2011

CPSU-AMIDO-S11S24G58

4 Members

18 Guides authored

View Statistics:

Past 24 Hours: 0

Past 7 Days: 2

Past 30 Days: 10

All Time: 2,519