
Nike+ Sportband Motherboard Replacement

What you need

  1. Nike+ Sportband Motherboard Replacement, External Case: step 1, image 1 of 2 Nike+ Sportband Motherboard Replacement, External Case: step 1, image 2 of 2
    • To begin the disassembly of your NikePlus Sportband, first remove the device from the rubber wristband.

  2. Nike+ Sportband Motherboard Replacement: step 2, image 1 of 2 Nike+ Sportband Motherboard Replacement: step 2, image 2 of 2
    • Finish the disassembly of your NikePlus Sportband by utilizing the metal spudger tool on the short edge to pry the external body pieces apart.

  3. Nike+ Sportband Motherboard Replacement, Screen: step 3, image 1 of 2 Nike+ Sportband Motherboard Replacement, Screen: step 3, image 2 of 2
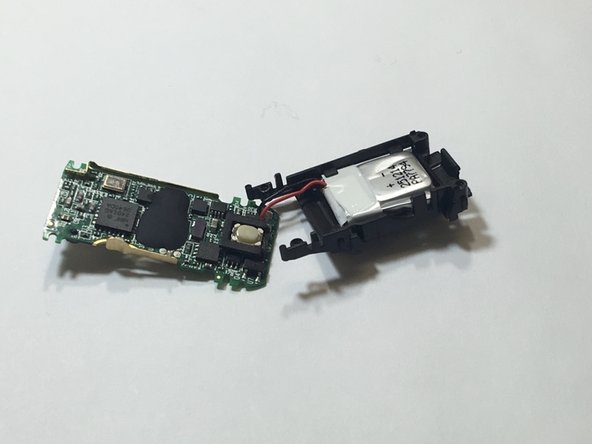
    • After the cover had been removed, use the metal spudger tool to remove the body of the device from the casing.

  4. Nike+ Sportband Motherboard Replacement: step 4, image 1 of 3 Nike+ Sportband Motherboard Replacement: step 4, image 2 of 3 Nike+ Sportband Motherboard Replacement: step 4, image 3 of 3
    • Use the metal tweezers to pry the screen casing from the body of the device.

    • The screen casing is fastened to the body of the device by four clips located in each corner of the casing.

  5. Nike+ Sportband Motherboard Replacement: step 5, image 1 of 2 Nike+ Sportband Motherboard Replacement: step 5, image 2 of 2
    • Flip the body of the device over so that the screen is now on the bottom.

    • The display ribbon cable is soldered to the motherboard. We were able to peel up the ribbon cable with a pair of tweezers.

    • Successfully resoldering this ribbon cable to the motherboard may prove difficult to the very small traces.

  6. Nike+ Sportband Motherboard Replacement: step 6, image 1 of 3 Nike+ Sportband Motherboard Replacement: step 6, image 2 of 3 Nike+ Sportband Motherboard Replacement: step 6, image 3 of 3
    • Flip the body of the device back over so that the screen is facing up.

    • Using the tweezers, gently lift the screen from body of the device.

  7. Nike+ Sportband Motherboard Replacement, Motherboard: step 7, image 1 of 1
    • Remove the four highlighted screws from the motherboard using the Philips screwdriver.

  8. Nike+ Sportband Motherboard Replacement: step 8, image 1 of 3 Nike+ Sportband Motherboard Replacement: step 8, image 2 of 3 Nike+ Sportband Motherboard Replacement: step 8, image 3 of 3
    • Use the metal tweezers to lift the motherboard out of the device.

Conclusion

To reassemble your device, follow these instructions in reverse order.

Alyssa Setnar

Member since: 02/15/16

331 Reputation

3 Guides authored

Team

IUPUI, Team 9-9, Wilson Spring 2016 Member of IUPUI, Team 9-9, Wilson Spring 2016

IUPUI-WILSON-S16S9G9

5 Members

4 Guides authored

0 Comments

Add Comment

View Statistics:

Past 24 Hours: 0

Past 7 Days: 0

Past 30 Days: 3

All Time: 242