Archived Guide
This guide is retained solely for historical purposes. Use the updated version of the guide to perform your repair.

Video Overview

This teardown is not a repair guide. To repair your Nexus 6P, use our service manual.

  1. Nexus 6P拆解, Nexus 6P拆解: step 1, image 1 of 2 Nexus 6P拆解, Nexus 6P拆解: step 1, image 2 of 2
    • 取出SIM卡卡托。

  2. Nexus 6P拆解: step 2, image 1 of 3 Nexus 6P拆解: step 2, image 2 of 3 Nexus 6P拆解: step 2, image 3 of 3
    • 加热后壳玻璃面板区域。

    • 使用hobby刀打开一个间隙,并切割在后玻璃面板下面的强烈的粘胶。

    • 后玻璃面板很容易破碎,下面的粘合剂很稳。 所以要小心撬这个部分。

    • 小心地取下玻璃面板。

  3. Nexus 6P拆解: step 3, image 1 of 3 Nexus 6P拆解: step 3, image 2 of 3 Nexus 6P拆解: step 3, image 3 of 3
    • 加热后壳塑料区域。

    • 使用hobby刀打开一个间隙,并插入小拨片来切割下面的粘合剂。

  4. Nexus 6P拆解: step 4, image 1 of 3 Nexus 6P拆解: step 4, image 2 of 3 Nexus 6P拆解: step 4, image 3 of 3
    • 拧下6个十字螺丝。

    • 插入小拨片和塑料开口工具,将前部组件与后盖分开。

    • 注意:这两个部分紧密配合,很难分开。 您也可以尝试使用重型吸盘来拆卸它们。

  5. Nexus 6P拆解: step 5, image 1 of 3 Nexus 6P拆解: step 5, image 2 of 3 Nexus 6P拆解: step 5, image 3 of 3
    • 拧下一个十字螺丝。

    • 卸下金属固定支架flex连接器。

    • 松开3个flex连接器并将其移除。

    • 这个flex用来连接主板和子板。

  6. Nexus 6P拆解: step 6, image 1 of 3 Nexus 6P拆解: step 6, image 2 of 3 Nexus 6P拆解: step 6, image 3 of 3
    • 松开电池连接器。

    • 电池是粘在一起的。

    • 使用塑料卡在下面切割强力胶,然后撬起并取出电池。

  7. Nexus 6P拆解: step 7, image 1 of 2 Nexus 6P拆解: step 7, image 2 of 2
    • 在这里,我们可以看到在3450毫安电池下面的标签。

  8. Nexus 6P拆解: step 8, image 1 of 3 Nexus 6P拆解: step 8, image 2 of 3 Nexus 6P拆解: step 8, image 3 of 3
    • 断开信号电缆连接器并拧下一个十字螺丝。

    • 卸下子板。

  9. Nexus 6P拆解: step 9, image 1 of 3 Nexus 6P拆解: step 9, image 2 of 3 Nexus 6P拆解: step 9, image 3 of 3
    • 在振动马达下面粘上粘合剂,然后去掉振动器。

  10. Nexus 6P拆解: step 10, image 1 of 3 Nexus 6P拆解: step 10, image 2 of 3 Nexus 6P拆解: step 10, image 3 of 3
    • 拧下一个十字螺丝,然后卸下扬声器。

  11. Nexus 6P拆解: step 11, image 1 of 2 Nexus 6P拆解: step 11, image 2 of 2
    • 拧下2个十字螺丝。

    • 拆下前置摄像头接触器和音频插孔接触器的金属托架,

  12. Nexus 6P拆解: step 12, image 1 of 3 Nexus 6P拆解: step 12, image 2 of 3 Nexus 6P拆解: step 12, image 3 of 3
    • 卸下前置摄像头。

  13. Nexus 6P拆解: step 13, image 1 of 2 Nexus 6P拆解: step 13, image 2 of 2
    • 卸下耳机插孔。

  14. Nexus 6P拆解: step 14, image 1 of 3 Nexus 6P拆解: step 14, image 2 of 3 Nexus 6P拆解: step 14, image 3 of 3
    • 拧下三个十字螺丝。

    • 拿走固定LCDflex连接器的金属支架。

    • 松开LCDflex连接器。

  15. Nexus 6P拆解: step 15, image 1 of 2 Nexus 6P拆解: step 15, image 2 of 2
    • 取下信号线。

  16. Nexus 6P拆解: step 16, image 1 of 2 Nexus 6P拆解: step 16, image 2 of 2
    • 撬起主板。

  17. Nexus 6P拆解: step 17, image 1 of 3 Nexus 6P拆解: step 17, image 2 of 3 Nexus 6P拆解: step 17, image 3 of 3
    • 取下指纹传感器。

  18. Nexus 6P拆解: step 18, image 1 of 3 Nexus 6P拆解: step 18, image 2 of 3 Nexus 6P拆解: step 18, image 3 of 3
    • 取下后置摄像头。

  19. Nexus 6P拆解: step 19, image 1 of 2 Nexus 6P拆解: step 19, image 2 of 2
    • 这个就是Nexus 6P的主板。

  20. Nexus 6P拆解: step 20, image 1 of 2 Nexus 6P拆解: step 20, image 2 of 2
    • 取下听筒。

  21. Nexus 6P拆解: step 21, image 1 of 3 Nexus 6P拆解: step 21, image 2 of 3 Nexus 6P拆解: step 21, image 3 of 3
    • 带有数字转换器的液晶显示屏下面的粘胶稍微有些强烈,所以使用热风枪将其软化几分钟。

    • 在吸盘,塑料开口工具和小拨片的帮助下,小心移除LCD屏幕组件。

  22. Nexus 6P拆解: step 22, image 1 of 1
    • 搞定!

Special thanks to these translators:

en zh

91%

笑得像个300斤的孩子 is helping us fix the world! Want to contribute?
Start translating ›

Witrigs

Member since: 11/24/15

69,454 Reputation

378 Guides authored

9 Comments

good jod !buddy

Kaye - Reply

Does the Nexus 6P have two antennas? I've noticed there's a two sim card slots?

sam34866 - Reply

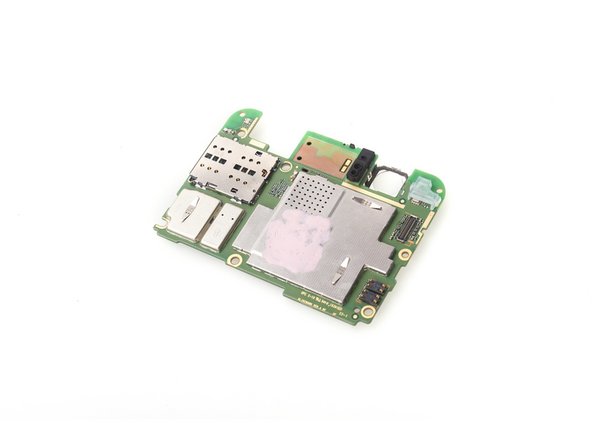
Its single sim slot sorry

Noorulla Shariff -

Ya its haveing to sim slot but there is only 1 antina

Noorulla Shariff - Reply

There is a thin lining of plastic around the screen. Does removing it deteriorate the structural integrity of the screen or is it simply cosmetic?

Sorry if this is the wrong place to ask.

Eric Jensen - Reply

Add Comment

View Statistics:

Past 24 Hours: 0

Past 7 Days: 1

Past 30 Days: 5

All Time: 19,513